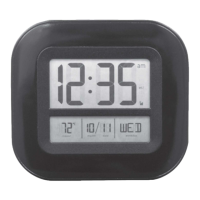
Basic Setup
After installing batteries, it is recommended that you set the clock and calendar
initially. After the atomic clock signal is acquired, which may take up to 24 hours,
the clock accuracy and daylight saving time changes will be automatically
maintained.
About the Atomic Clock
A clock is considered atomic if it has an accuracy of one second in a million
years. Consumer clocks are considered atomic if they attain this accuracy by
receiving a signal from an atomic clock. In North America, the National Institute
of Standards and Technologies operates an atomic clock in Colorado which
transmits the time codes via the radio station WWVB.The TIMEX®clock you have
purchased includes a built-in receiver which picks up the signal from the WWVB
station. For the best possible reception, place the main unit with the back side
facing Colorado. NOTE: Due to solar radiation in the atmosphere, the atomic
clock signal is weaker during the day. Most synchronization with the WWVB
atomic clock signal happens at night when there is less interference.
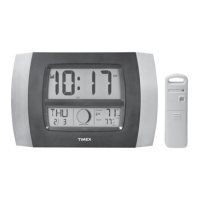
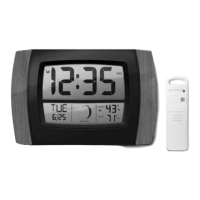
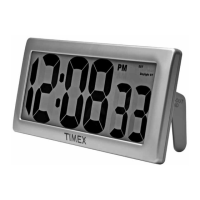
Initial Set Up
After power up, the display will show all segments for 3 seconds. The
display will read 12:00pm Jan 1, 2000 with room temperature and
flashing
T The time zone will default to PST [Pacific Standard Time!.
The Atomic Clock will start to search for the atomic signal.
If a valid signal is available, the Atomic clock will receive the local time in
3-5 minutes. The full strength signal bars will appear on the display.
If the signal is not available when setting up, you may enter the present
time and date by following the manual setup.
ManualSet Up
To set the time and day/date:
If the
Ticon is flashing, press the TIIIIbutton to stop the Atomic clock from
searching for a signal.
Press and hold the SET button for 3 seconds to begin manual set up mode.
1. Select 12 or 24 hour [standard or military]. Press SET to confirm
2. The
HOURwill flash.
Adjust the hour by pressing the+ or - button. Press SET to confirm
3. The
MINUTEwill flash.
Adjust the hour by pressing the+ or - button. Press SET to confirm
4. The
YEARwill flash [20001.
Adjust the year by pressing the+ or - button. Press SET to confirm
5. The
MONTHwill flash.
Adjust the month by pressing the+ or - button. Press SET to confirm
- 2 -
6. The DATEwill flash.
Adjust the date by pressing the+ or - button. Press SET to confirm
7. The
DSTwill flash.
Adjust the DST on or off by pressing the+ or - button.
Press SET to confirm
ButtonFunctions
1. SET
Hold SET button for 3 seconds to enter clock and calendar setting mode.
Set sequence: 12/24 > Hour> Minute >Year> Month > Date> DST
2. +/ ZONE
Press to select the current Time Zone:
PST= Pacific Time
MST= Mountain Time
CST= Central Time
EST= Eastern Time
During CLOCKsetting, press [+I button once for 1 step advance or hold for
fast scroll.
Hold +/ZONE button for 3 seconds to enter into Daylight Saving Time setup
mode
3.
T11ll!Atomic signal search)
Press to get a manual synchronization of atomic time signal.
4. (-) C/F
During CLOCKsettings, press 1-1button once for 1 step backward or
hold for fast scroll. In normal mode, press
1-1key to select °C and °F
Troubleshooting
Problem Possible Solution
Relocate the main unit. It is important that
the back side of the clock is facing the state
of Colorado for optimum reception. Make
Bad Atomic Clock
certain there are no large stone or metallic
Reception
surfaces disrupting the signal line-of-sight to
Colorado. Make sure the main unit is placed
T111I
at least 3 feet [0.91 ml from other electronic
no bars
appliances and devices that may interfere
with the wireless communication [such as
TV's, micro-waves, computers, etc]. Large
metallic surfaces will interfere with the
atomic clock signal.
Display Not
Make certain that the batteries are
installed correctly.
Working
The batteries may need replacing.
- 3 -
 Loading...