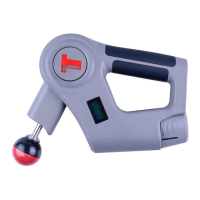
The TimTam PowerMassager™ PRO is a modern recovery device designed for deep tissue massage and muscle recovery. It utilizes an ultra-modern therapy device taking modern recovery to the next level of recovery performance. The PRO model offers 3 preset Deep Tissue levels and a total of 5 massage modes. It is outfitted with Antimicrobial Plastic Surfaces to offer non-cross contamination between users and features a 175-degree adjustable head for total self-body use. An LED Display provides battery level and temperature gauge feedback, and a built-in heat technology accessory increases recovery.
Function Description:
The PowerMassager™ PRO is designed to provide percussive massage therapy for muscle recovery. It helps to alleviate muscle soreness, improve circulation, and enhance overall recovery performance. The device is intended for self-use, with an articulating arm that allows users to reach various parts of their body.
Important Technical Specifications:
- Battery: Li-ion Battery 12V 2.0Ah (Rechargeable Lithium Ion battery 2000 mAh)
- Charger: AC Charger: 100-240V 50/60 Hz- .8A -15VDC-1A (AC wall charger 15 VDC- 1A)
- Deep Tissue Speeds: 3 preset speeds delivering up to 2800 strokes per minute (1000, 2000, 2800 SPM).
- Articulating Arm: 175-degree adjustable arm.
- Temperature Sensor: Built-in temperature sensor that allows you to obtain baseline personal data pre, during, and post-treatment. The thermometric sensor icon on the bottom handle part of the tip lights up on the LED screen. Press and hold the temperature button for 3 seconds and release; it will measure and report the temperature of the area massaged on the LED screen. Optimal skin temperature is above 90 degrees when the warmup function is used during therapy.
Usage Features:
- Activate Heat: To activate the heating function, attach the red colored tip and power the device on. Press and hold the "+" button for 2 seconds until the red ball icon appears on the LED screen. Within 2 minutes, it will heat up to 99°F.
- Activate Vibration: To initiate the vibration function, attach the large silver colored tip and power the device on. Press and hold the "+" icon for 2 seconds until the silver ball icon appears on the LED screen. It will instantly heat and show the tip vibrate.
- Massage Modes: For Warmup, Recovery, Neck or Lumbar modes, attach the desired tip and power on. Press "+" and cycle through the massage modes until you find the desired massage mode.
- Turn On: To power the device, insert the battery into it and press the "T" button once, which is located on the grip of the handle. The LED screen will illuminate, indicating it has powered on.
- Turn Off: To power down the device, press and hold the "T" button for 3 seconds, or simply remove the battery.
- Articulating Arm: The PowerMassager™ PRO shaft can be rotated up to 175 degrees of articulation, allowing you to target all areas of your body easily. By pushing the red logo portion of the dial directly above the shaft, you can then move the shaft into the desired position. Once you find the right massage point, release the button to lock the arm in place.
- Pressure: The device is designed for self-use, allowing users to quickly discover the appropriate pressure. It is advised not to apply excessive pressure. The device is designed to do the work without additional pressure from the user.
- Hand Placement: Designed with a one-touch trigger and a 175-degree articulating arm, the TimTam PowerMassager™ PRO is designed for 100% self-use. There are three ideal grip areas that, in conjunction with the articulating head, allow access to the body.
- Charging Instructions:
- Connect the prong adaptor to the charging port.
- Lay the prong adaptor on the snap-in points of the charger and twist to lock into place.
- Insert the battery onto the base while connecting the cable to the back of it.
- Plug into the proper rated outlet.
- Fully charge before first use. LED lights illuminate to show battery level and indicate active charging (Red on the left = Charging, Green on the right = Fully Charged).
- The unit may be recharged at any time and at any battery level. It is not recommended to fully deplete the battery level. Recharge the unit regularly to best prolong battery life. LED lights will remain illuminated when fully charged while the adaptor is plugged into the outlet.
Maintenance Features:
- Cleaning: Use a towel or soft cloth to wipe any moisture from the unit.
- Storage: Store in a cooler area. Keep the unit away from heat sources, liquids, and inexperienced individuals.
Warnings and Cautions:
- Consult a licensed health professional before use, especially if you have pre-existing conditions (headaches, joint issues, implanted devices, surgery, pregnancy, diabetes). Children should be supervised.
- Do not attempt to disassemble or assemble the device, as this can lead to electric shock, fire, exposure to battery chemicals, or render the product defective.
- Store in a cool, dry place. Avoid high temperatures or direct sunlight, which can render the product defective.
- Keep away from liquid to prevent damage.
- Allow a 20-minute cool-down phase after intense use before reusing.
- Do not leave the charger plugged in after the battery is fully charged to prevent damage to the battery or reduction of useful life.
- Unplug the charger from the outlet when not in use. Ensure the charger cable is visible to prevent damage or stress. Replace damaged chargers immediately.
- Charge indoors in a well-ventilated, dry location. Avoid charging outdoors or near wet surfaces, moisture, rain, snow, or heat, as this can damage the charger. Do not use the battery or charger in the presence of flammable locations.
- Do not slam the product on any surface to prevent damage.
- Excess weight on the unit may damage or break it during normal intended use.
- Keep fingers away from the metal shaft between the massage tip and the plastic body when the TimTam is powered on.