Do you have a question about the Titan TTB772STM and is the answer not in the manual?
General safety precautions for electric products to reduce risks of fire, shock, and injury.
Guidelines for safe usage including work area, storage, and avoiding overload.
Specific safety advice for the wallpaper stripper, like avoiding steam towards people.
Explanation of symbols and abbreviations found on the product's rating label.
Instructions for unpacking the product and checking delivery contents for damage.
Step-by-step instructions on how to securely connect the hose to the unit.
Procedures for safely disconnecting the hose after use or for cleaning.
Steps to safely connect the filled wallpaper stripper to the mains power.
Details the primary purpose and secondary cleaning tasks for the stripper.
Explains the safety valve that releases excess steam and pressure.
Describes the safety feature that automatically switches off the unit when overheated.
Basic operational guidelines for safe and effective use of the stripper.
Detailed process for using the steam stripper to remove wallpaper.
Key principles for maintaining the product's condition and ensuring longevity.
How to clean the product using a dry cloth and brush, avoiding harsh chemicals.
Procedures for checking and maintaining the product and its accessories for wear.
Method for removing calcium deposits using vinegar or citric acid to maintain performance.
Information regarding the replacement or repair of a damaged power cord.
Instructions for replacing the UK mains plug, including wiring details.
Guidance on when to seek professional repair for the product.
Proper procedures for storing the wallpaper stripper in a safe and suitable environment.
Advice on how to safely carry and transport the wallpaper stripper.
Solutions for when the product fails to power on, checking connections and defects.
Causes and solutions for the product not heating properly, e.g., voltage or cap issues.
Addressing issues leading to poor stripping performance like blocked plates or lime scale.
Troubleshooting abnormal steam release from the safety cap, checking for blockages.
Solutions for steam leaks from the hose or its connections, checking tightness.
This document is an instruction manual for the TITAN TTB772STM 2000W Wallpaper Stripper. It provides detailed information on the product's functions, technical specifications, operation, care, maintenance, troubleshooting, recycling, disposal, and guarantee.
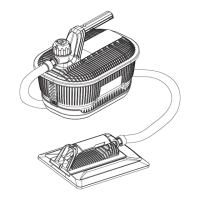
The TITAN TTB772STM is a 2000W wallpaper stripper primarily designed for removing wallpaper. It can also be used for certain cleaning tasks. The device operates by generating steam to loosen wallpaper from walls. It features a water tank, a hose, and a steam plate. A safety cap with a pressure release valve ensures safe operation by releasing excess steam and pressure when the internal pressure reaches its maximum level. The product is equipped with a thermal cut-out feature that automatically switches off the device if it overheats due to low or no water, resetting and switching on again after a cooling period.
Getting Started: The manual emphasizes reading all instructions thoroughly before use for safety. It covers unpacking, ensuring all parts are present and undamaged, and having necessary accessories and personal protective equipment.
Assembly: The product requires assembly before operation. This involves screwing one hose adaptor (5a) to the hose connector (4d) of the water tank (4) in a clockwise direction, ensuring it's properly secured. The steam plate (3) needs to be removed from the carry handle (2) by pressing the lock button (2a), then grasping the steam plate handle (3c) and sliding the steam plate (3) out of the track of the steam plate apron (3b). The other hose adaptor (5a) is then screwed to the hose connector (3a) of the steam plate (3) in a clockwise direction, ensuring a secure connection. Finally, the steam plate (3) is slid back into the track of the steam plate apron (3b), ensuring the hose (5) is not squeezed.
Filling with Water: Before each use, the water tank (4) must be filled with water. The product should be disconnected from the power supply and placed on a flat, stable, heat-resistant surface. The safety cap (1) is unscrewed in an anti-clockwise direction and removed. Water is poured into the tank until the level is between the MIN and MAX markings on the water level indicator (4c). Overfilling should be avoided, and the tank should never be connected to the power supply while empty. For refilling during use, the product must be disconnected from the power supply, and users should wait 15 minutes before adding water to avoid scalding. Hot water can be added to shorten preheat time, but boiling water should never be used.
Connection to Power Supply: After filling, ensure the water level is between MIN and MAX. The adaptor of the power cord (6) is plugged into the water tank socket (4b), and the plug of the power cord (6) is connected to a suitable mains socket. The unit automatically begins boiling when power is switched on. A residual current device (RCD) protected supply is recommended.
Stripping Operation: Before operation, users should check walls/ceilings for fragile materials and test the product on a small area. The product should be placed on a flat, stable, heat-resistant surface. While the product preheats, wallpaper can be scored with a suitable tool. Once water is boiling and steam escapes from the steam plate (3), hold the steam plate by its handle (3c) and apply it against the work area. After a few seconds, move the steam plate to the next area and use a scraper to remove the steamed wallpaper. If wallpaper is difficult to remove, leave the steam plate on the area for a few more seconds or spray scored wallpaper with water and let it soak for 10 minutes before applying steam. The product is not designed for continuous use; it should rest for 15 minutes after each hour of running. The maximum water volume allows for 80 minutes of use.
Safety Precautions: The manual highlights several safety warnings:
General Cleaning: The product should be cleaned with a dry cloth, using a brush for hard-to-reach areas. Chemical, alkaline, abrasive, or aggressive detergents/disinfectants should not be used as they can damage surfaces. Worn or damaged parts should be replaced or repaired by an authorized service centre.
Lime Scale Removal: Calcium deposits can form over time, depending on water hardness and usage frequency. A mixture of one part vinegar and two parts water should be used. Fill the water tank (4) with this mixture, connect to power, and let it heat for 15 minutes. Then, disconnect from power and leave the mixture in the tank for approximately 1 hour. Finally, empty the tank and rinse with clear water. After each use, rinsing the water tank with 1 litre of water is recommended to reduce lime scale formation.
Repair: The product does not contain user-repairable parts. Any repairs should be performed by an authorized service centre or a qualified specialist.
Storage: After use, disconnect the product from the power supply, clean it, and store it in a dark, dry, frost-free, well-ventilated place, out of reach of children. The ideal storage temperature is between 10 °C and 30 °C. Using the original packaging or a suitable cover is recommended to protect against dust. Remaining water should be drained from the water tank (4) at the end of each working session.
Transportation: Disconnect the product from the power supply. Always carry it by its carry handle (2) and steam plate handle (3c). Protect the product from heavy impact or strong vibrations during transport and secure it to prevent slipping or falling over.
UK Plug Replacement: If the fitted plug needs replacement, the wires in the mains lead are coloured blue (neutral) and brown (live). Blue should be connected to the terminal marked N or black, and brown to the terminal marked L or red. A 13 Amp BS 1363 or BS 1363/A plug with the correctly rated fuse should be used. Never connect live or neutral wires to the earth terminal. If a moulded plug is removed, it must be destroyed to prevent accidental engagement into a socket.