This document provides instructions for the TITAN TTB873SDR 900W Belt Sander.
Function Description:
The TITAN TTB873SDR 900W Belt Sander is designed for sanding various materials including wood, plastic, metal, fillers, and varnished surfaces. It is intended for dry operation only, without the use of water or other cooling liquids. This product is suitable for private domestic use and not for any commercial trade use.
Important Technical Specifications:
- Model Number: TTB873SDR
- Rated Voltage, Frequency: 220-240 V~, 50 Hz
- Rated Input Power: 900 W
- Rated No Load Speed: 200-380 min⁻¹
- Protection Class: II (double insulated)
- Weight: Approximately 3.6 kg
- Sanding Belt Dimensions: Approximately 533 x 76 mm
- Sound Pressure Level (LPA): 89.7 dB (A)
- Sound Power Level (LWA): 100.7 dB (A)
- Uncertainty (KPA, KWA): 3 dB (A)
- Hand Arm Vibration Values (ah,w): 2.482 m/s²
- Uncertainty (K): 1.5 m/s²
Usage Features:
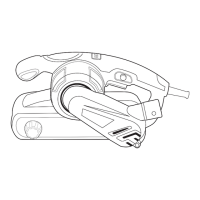
The belt sander features a front handle (1), speed dial (2), on/off switch (3), lock-on button (4), rear handle (5), dust extraction outlet (6), tracking adjustment knob (7), pre-assembled sanding belt (8), air vents (9), front roller (10), clamp lever (11), drive roller (12), power cord with plug (13), and a dust bag (14) with a connector (14a) and zipper (14b).
Sanding Belt Selection and Installation:
Sanding belts are available in different grain sizes (grit). For removal of paint and varnish or preparation of rough surfaces, coarse belts (<P100) are recommended. For finishing, cleaning plaster, and water stain from wood, fine belts (>P180) are suggested.
To attach a sanding belt:
- Pull the clamp lever (11) outward.
- Align the sanding belt (8) with the direction indicated on the product housing and slide it over the front roller (10) and drive roller (12).
- Press the clamp lever (11) back in to secure the belt.
To adjust belt tracking:
- Turn the tracking adjustment knob (7) clockwise to adjust the sanding belt (8) to the left (from the operator's perspective).
- Turn the tracking adjustment knob (7) anticlockwise to adjust the sanding belt (8) to the right (from the operator's perspective).
The product includes a dust bag (14) for dust collection. To attach the dust bag, align its connector (14a) with the dust extraction outlet (6) and push it all the way in. To remove, hold and pull the connector. The dust bag should be emptied when it is half full by opening the zipper (14b). An overfilled dust bag can reduce product performance. Alternatively, a dust extraction system or suitable vacuum cleaner can be connected to the dust extraction outlet (6) for a cleaner and safer work area.
Switching On/Off:
The sander can be operated in instant or continuous mode.
- Instant mode: Press the on/off switch (3) to turn on.
- Continuous mode: Press and hold the on/off switch (3), then press the lock-on button (4) to lock the switch in position. Release both buttons. To switch off, depress and release the on/off switch (3).
Speed Control:
The speed dial (2) allows adjustment of the maximum sanding speed. Turning the dial left decreases speed, while turning it right increases speed. A lower setting is suitable for coarse-grained sanding belts to remove paints and varnishes, while a higher setting is suitable for fine-grained sanding belts to achieve a fine finish.
General Operation:
- Ensure the workpiece is free of obstacles like nails or screws.
- Hold the product with one hand on the front handle (1) and the other on the rear handle (5).
- Switch the product on and wait for it to reach full speed before placing it on the workpiece.
- Move the product slowly over the surface, sanding with the grain in parallel overlapping strokes.
- For removing paint or smoothing very rough wood, sand across the grain at 45° in two directions, then finish parallel with the grain.
- Apply only enough pressure to keep the product flat on the workpiece; excessive pressure reduces performance and leads to uneven results.
- Keep the product moving at all times to avoid grooves.
- Lift the product from the workpiece before switching it off.
Maintenance Features:
- General Cleaning: Keep the product clean by removing debris after each use. Clean air vents (9) with a cloth and brush. Stubborn dust can be removed with high-pressure air (max. 3 bar). Do not use chemical, alkaline, abrasive, or aggressive detergents.
- Inspection: Inspect the product for worn and damaged parts before each use. Do not operate if damaged.
- Power Cord: If the power cord is damaged, it must be replaced by a specially prepared cord available through the service organization.
- UK Plug (for UK only): The wires in the mains lead are coloured blue (neutral), brown (live), and green/yellow (earth). The product is protection class II, meaning it is double insulated and does not require an earth connection. The blue wire connects to N, the brown wire to L. An approved 13 AMP BS 1363 or BS 1363/A plug and correctly rated 13A BS 1362 fuse should be used.
- Repair: This product does not contain consumer-repairable parts. Contact an authorised service centre for repairs.
- Storage: Store the product and accessories in a dark, dry, frost-free, well-ventilated place, inaccessible to children. Ideal storage temperature is between 10 °C and 30 °C. Use original packaging or a suitable cloth for dust protection.
- Transportation: Switch off and disconnect from power supply. Carry by the rear handle (5). Protect from heavy impact or strong vibrations and secure during transport.
Safety Warnings:
- Read all safety warnings, instructions, illustrations, and specifications.
- Keep the work area clean and well lit.
- Do not operate in explosive atmospheres.
- Keep children and bystanders away.
- Power tool plugs must match the outlet.
- Avoid body contact with earthed or grounded surfaces.
- Do not expose power tools to rain or wet conditions.
- Do not abuse the cord.
- Use an extension cord suitable for outdoor use when operating outdoors.
- Use an RCD-protected supply in damp locations.
- Stay alert and use common sense.
- Wear personal protective equipment, including eye protection, dust mask, non-skid safety shoes, hard hat, or hearing protection.
- Prevent unintentional starting.
- Remove adjusting keys or wrenches before turning on.
- Do not overreach.
- Dress properly; keep hair, clothing, and gloves away from moving parts.
- Use dust extraction and collection facilities properly.
- Do not become complacent with frequent tool use.
- Do not force the power tool.
- Do not use if the switch does not turn it on and off.
- Disconnect from power source before making adjustments, changing accessories, or storing.
- Store idle power tools out of reach of children.
- Maintain power tools and accessories.
- Keep cutting tools sharp and clean.
- Use the power tool, accessories, and tool bits according to instructions.
- Keep handles and grasping surfaces dry, clean, and free from oil and grease.
- Have power tools serviced by a qualified repair person using identical replacement parts.
- Hold the power tool by insulated gripping surfaces.
- Only use for dry sanding.
- Switch on before contact with workpiece, and off after removal.
- Never touch the sanding belt while it is running.
- Wear protective gloves.
- Ensure no persons are at risk from flying sparks.
- Do not use worn, torn, or severely clogged sanding belts.
- Avoid overheating the workpiece and sander. Empty the dust collector regularly.
- Clean air vents regularly.
- Harmful/toxic dusts can endanger health; wear appropriate dust masks and ensure ventilation.
- Children and pregnant women must not enter the work area.
- Do not eat, drink, or smoke in the work area.
- Seek professional advice if sanding lead-based paint.
- Wood dust, especially from MDF, can be hazardous; use a dust mask with replaceable filters.
- Ensure the trailing power cord remains clear of the tool.
- Vibration Warning: The declared vibration emission value has been measured according to EN 62841-1 and EN 62841-2-4. Actual use values may differ. Adopt correct working practices to reduce exposure. This tool may cause hand-arm vibration syndrome if not adequately managed.
- Noise Reduction: Limit operation time, use low-vibration and low-noise operating modes, and wear personal protective equipment.
- Emergency: Familiarise yourself with the manual. Switch off and disconnect from power supply if malfunctions occur.
- Residual Risks: Health defects from vibration emission, injuries from broken cutting attachments or hidden objects, and injury/damage from flying objects or poor accessories.
- Electromagnetic Field: This product produces an electromagnetic field that may interfere with medical implants. Consult a doctor and implant manufacturer before use.