EasyManua.ls Logo

TMG TMG-ALS61 - User Manual

TMG TMG-ALS61
28 pages
Print Icon
To Next Page IconTo Next Page
Loading...
6,000 lb PORTABLE SCISSOR CAR LIFT
MODEL: TMG-ALS61
WWW.TMGINDUSTRIAL.COM TOLL FREE:1-877-761-2819
Please read the product manual completely before assembly
Check against the parts list to make sure all parts are received
Wear proper safety goggles or other protective gears while in assembly
Missing parts or questions on assembly?
Please call: 1-877-761-2819 or email: cs@tmgindustrial.com
Do not return the product to dealer, they are not equipped to handle your requests
PRODUCT MANUAL
Question and Answer IconNeed help?

Do you have a question about the TMG TMG-ALS61 and is the answer not in the manual?

Summary

Manual Overview and Initial Information

Important Notices and Warnings

General instructions, owner responsibilities, and hazard level definitions.

Before Starting Installation

Key steps and considerations before beginning the lift installation process.

Installer and Operator Responsibilities

Safety Declarations

Installer/operator must read and understand all instructions and safety warnings.

Protective Equipment

Recommends specific personal protective equipment for installation and operation.

Safety Warning Introduction

General Safety Precautions

Lists 18 critical safety instructions for lift operation and maintenance.

Operational Safety Labels and Instructions

Lift Operation Warnings

Visual warnings and safety advice for operating the lift safely.

Locking and Lowering Procedures

Detailed steps for locking the lift and lowering a vehicle.

Maximum Lifting Capacity and Danger

Highlights maximum capacity and risks of overloading or misuse.

Installation Preparation

Tools Required

Lists the necessary tools for installation and assembly.

Site and Floor Requirements

Details site selection criteria and concrete floor specifications for safe installation.

Assembly Overview

Parts Identification

Identifies and lists all components included in the lift assembly.

Technical Specifications

Lift Dimensions and Performance

Provides key dimensions, lifting capacity, time, and power unit details.

Hydraulic System Setup

Power Unit Installation

Instructions for setting up and mounting the power unit.

Connecting Hydraulic Hoses

Guidance on connecting hydraulic hoses and fittings to the cylinders.

Lift Arm and Pad Installation

Lift Arm Assembly

Steps for correctly installing the adjustable lift arms.

Lift Pad Installation

Instructions for installing or changing lift pads and extensions.

Electrical Wiring

Power Unit Wiring Safety

Critical safety warnings and instructions for wiring the hydraulic power unit.

Initial Lift Operation and Checks

Lift Start-Up Procedure

Steps for starting the lift, checking fluid, and initial operation.

Safety Lock Verification

Instructions to visually confirm primary safety locks are engaged before work.

Post-Installation Procedures

Hydraulic System Bleeding

Steps for bleeding the hydraulic system after installation or fluid changes.

Installation Final Check-Off

A checklist of critical items to verify after installation.

Safe Lift Operation

General Operation Guidelines

Key safety rules and procedures for operating the lift.

Vehicle Lifting Procedures

Preparation and Safety Checks

Covers vehicle compatibility, preparation, lifting points, and general warnings.

Vehicle Loading and Positioning

Focuses on vehicle placement, center of gravity, and weight distribution for stable lifting.

Raising the Vehicle and Safety Locks

Details the process of raising the vehicle and verifying safety lock engagement.

Lowering and Maintenance

Vehicle Lowering Procedure

Step-by-step instructions for safely lowering the vehicle.

Routine Maintenance Instructions

Guidelines for daily, weekly, and monthly maintenance tasks.

Comprehensive Lift Operation

Operator Training Requirements

Outlines essential training topics for safe lift operation.

Lift Operation Safety Protocols

Detailed safety rules and best practices for operating the lift.

Critical Safety Directives

Operational Danger Avoidance

Emphasizes critical "Do Not" and "Always" safety directives during lift operation.

Troubleshooting: Lift Issues

Lift Will Not Raise

Lists potential causes and remedies for the lift failing to raise.

Troubleshooting: Motor and Lowering

Motor Will Not Run

Identifies causes and solutions for the motor not operating.

Lift Lowers Slowly

Addresses issues with the lift lowering slowly or not at all.

Troubleshooting: Load Capacity Issues

Lift Will Not Raise Loaded

Lists possible causes and remedies when the lift cannot raise a loaded vehicle.

Troubleshooting: Lift Stability Issues

Lift Will Not Stay Up

Explains potential causes and solutions for the lift not maintaining its position.

Parts Identification Diagram

Component Breakdown Illustration

Visual diagram showing numbered parts of the lift assembly.

Parts List and Quantities

Detailed Parts Inventory

Comprehensive list of all parts with their respective quantities.

Overview

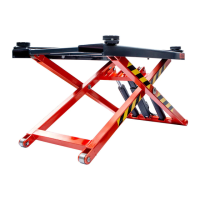
This document describes the TMG-ALS61 6,000 lb Portable Scissor Car Lift, a product designed for automotive lifting in indoor environments. The manual provides comprehensive instructions for installation, operation, and maintenance, emphasizing safety precautions throughout.

Function Description:

The TMG-ALS61 is a portable scissor car lift designed to raise vehicles for maintenance and repair. It utilizes a hydraulic system to lift vehicles, providing access to the undercarriage. The lift features adjustable arms and pads to accommodate various vehicle types and lifting points. Safety locks are integrated into the design to secure the vehicle in a raised position, preventing accidental lowering. The lift is operated via a power unit with push-button controls for raising and a lever for lowering. Its portable design, facilitated by a stand/tow handle and wheels, allows for flexibility in placement within a workshop.

Important Technical Specifications:

  • Lifting Capacity: 6,000 lbs (2721 Kgs)
  • Lifting Time: 45 seconds
  • Power Unit: 110VAC/60Hz, 1 Phase
  • Concrete Requirements: Minimum 3.5" thickness of 2,500 PSI concrete (for all models, 3,000 PSI concrete is required, adequately cured for at least 28 days).
  • Operating Temperature: 41°F - 104°F (5°C - 40°C)
  • Hydraulic Fluid: Dexron III ATF or 10W Non-foaming hydraulic fluid (6 quarts / 1.5 gallons)
  • Electrical Requirements: For 110-120 volt, single phase, use a 25 amp fuse with AWG 10 wire for 25 Amps (N.E.C. table 310-12). Wiring should be performed by a certified electrician.
  • Dimensions (Approximate):
    • Overall Length: 2058 mm
    • Overall Width: 1347 mm
    • Maximum Lifting Height: 1365 mm
    • Minimum Height: 155 mm
    • Platform Length: 1054 mm
    • Platform Width: 1307 mm

Usage Features:

  • Site Selection: Requires a solid, level concrete floor with no more than a 3-degree slope. Installation on asphalt, cracked/defective concrete, or elevated floors without architectural consultation is prohibited. Designed for indoor installation only.
  • Vehicle Positioning: Vehicles must be positioned with the center of gravity midway between adapters and/or centered on runways. The adjustable arms and pads should be placed under the vehicle's manufacturer-recommended lifting points. Height extenders or optional frame-cradle adapters may be used for proper contact.
  • Operation Sequence:
    1. Ensure the lift is fully lowered and the area is clear.
    2. Position the vehicle over the lift, ensuring at least 1 inch of clearance.
    3. Place adjustable arms and pads at the vehicle's lifting points.
    4. Raise the lift using the push-button until tires are off the ground and the vehicle is balanced.
    5. Raise the lift just past the desired height.
    6. Lower the lift onto the nearest safety lock position, ensuring the lock pin firmly rests against the lock block.
    7. To lower, ensure the area is clear, then raise the lift slightly to disengage the safety locks.
    8. Depress the lowering valve handle to smoothly lower the lift to the ground.
    9. Remove pads and drive the vehicle off the lift.
  • Safety Precautions:
    • Always read and understand the entire manual before installation and operation.
    • Only trained operators should use the lift.
    • Wear proper safety goggles and other protective gear during assembly and operation.
    • Keep hands and feet clear of moving parts and pinch points.
    • Ensure safety locks are engaged before working under a raised vehicle.
    • Do not overload the lift; adhere to the 6,000 lb capacity.
    • Avoid excessive rocking of the vehicle on the lift.
    • Never override self-closing lift controls.
    • Always use safety stands when removing or installing heavy components.
    • Disconnect power before performing electrical repairs.
    • The power unit contains high voltage and should not be exposed to flammable vapors or damp environments.

Maintenance Features:

  • Daily Inspections:
    • Visually inspect all moving parts for wear.
    • Check safety locks for proper operating condition.
    • Check pivot points and hinges for wear.
    • Inspect adapters for damage or wear.
    • Ensure all bolts are tight.
    • Keep lift components clean.
  • Weekly Maintenance:
    • Lubricate rollers with general-purpose oil or WD-40.
    • Lubricate arm hinge pins with grease.
    • Check bolts and pins for proper mounting.
  • Monthly Maintenance:
    • Lubricate locking latch shafts by pushing the latch handle several times to allow oil penetration.
  • Semi-Annual Maintenance:
    • Check the fluid level of the power unit reservoir and refill if necessary.
  • As-Needed Maintenance:
    • Bleed the hydraulic system after initial setup and if air is suspected in the oil.
    • Replace hydraulic oil with clean Dexron III ATF if contaminated.
    • Tighten all fasteners to recommended torques.
    • Check for hydraulic leaks and tighten/reseal fittings as needed.
    • Ensure all safety-related components are intact and functioning; do not use the lift if they are damaged or missing.
    • Replace all caution, warning, or safety-related decals if unreadable or missing.
    • Refer to the ANSI/ALI ALOIM booklet for periodic inspection checklist and maintenance log sheet.
  • Troubleshooting Guide: The manual includes sections for "Lift Will Not Raise," "Motor Will Not Run," "Lift Lowers Slowly or Not At All," and "Will Not Raise Loaded Lift," providing possible causes and remedies for common issues.

TMG TMG-ALS61 Specifications

General IconGeneral
BrandTMG
ModelTMG-ALS61
CategoryLifting Systems
LanguageEnglish

Related product manuals