Do you have a question about the Toguard CE52 and is the answer not in the manual?
Ensure camera placement does not obstruct driver's view or airbag deployment.
Insert and format the memory card before initial use.
Use high-speed Class 10 Micro SD cards (16GB/32GB recommended).
Battery saves video files upon external power loss.
Maintain lens cleanliness and avoid extreme temperatures/sunlight.
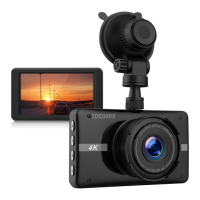
Identifies lens, speaker, Micro SD card slot, and mount socket.
Details the placement of UP, Menu, Down, OK, Mode, and Power buttons.
Explains UP, Down, OK for menu navigation and selection.
Details MODE for switching modes and OK/Down for recording control.
Covers MENU for settings access and Lock for file protection.
Describes POWER button for on/off and screen display.
Install on windshield using provided mount, adjust lens for optimal coverage.
Plug power adapter into car's cigarette lighter socket.
Route excess power cable along interior trim for a neat appearance.
Use the MODE button to cycle between Video, Photo, and Playback modes.
Camera automatically records when powered; indicators show status like recording progress.
Details icons for video status, resolution, audio, and memory card.
Switch to Photo Mode and press OK to take high-resolution photos.
Use MENU for mode-specific settings, MENU twice for System Settings.
Configure Exposure, Power-On Recording, Timestamp, and Plate Number Stamp.
Adjust video resolution (up to 4K) and quality settings.
Set loop recording duration (1/2/5 minutes) for continuous overwriting.
Adjust White Balance and Contrast for optimal video appearance.
Select desired photo resolution (12MP to 2MP) and quality level.
Adjust photo brightness and enable/disable photo timestamp.
Displays status for memory card, storage, date/time, and power.
Review recorded videos, view photos, and delete files.
Press MENU twice from Video or Photo mode to enter System Settings.
Includes Parking Monitor, G-Sensor, Recording Sound, Volume, Keytone.
Configure parking protection and shock detection sensitivity.
Control audio recording, speaker volume, and button operation prompts.
Choose the preferred language for the device interface.
Adjust light frequency and manage memory card (info, test, format).
Configure the delay time for camera power-off after losing external power.
Set the accurate system date and time for recordings.
Manage LCD timeout and restore device to factory default settings.
Details model, sensor, screen, lens, and resolution capabilities.
Covers video format, coding, photo resolution, loop recording, and storage limits.
Lists power supply, interface type, OS compatibility, and operating temperatures.
Addresses auto-stop recording due to memory, card, or file issues.
Resolves playback fluency and image interference problems.
Troubleshoots suction mount attachment and auto power-on.
Explains limited use of internal battery for saving files only.
Provides contact information for customer support inquiries.
| Display Size | 3 inch |
|---|---|
| Field of View | 170 degrees |
| G-Sensor | Yes |
| Night Vision | Yes |
| GPS | No |
| Parking Monitor | Yes |
| Loop Recording | Yes |
| Storage | Micro SD card, up to 128GB |
| Battery | Built-in rechargeable battery |