Do you have a question about the Toika LAILA and is the answer not in the manual?
Securing treadle holders to the back rail with step bolts, allowing for treadle height adjustment.
Fastening side parts and back legs to the loom structure using furniture and step bolts.
Attaching the lower front and back rails to the right side of the loom.
Securing the left loom side and attaching the lower front and back rails.
Fastening the upper front and back rails to both sides of the loom.
Placing wooden dowels and attaching the breast beam and back beam.
Assembling the beater on the floor and fastening it to the loom.
Placing treadles and treadle spacers onto the treadle rod.
Inserting rods and components for lams and jacks into their respective positions.
Periodically tightening all bolts to ensure loom stability during use.
Instructions on how to fold the loom for storage or transport.
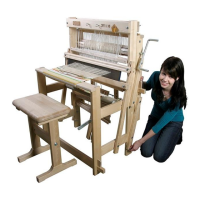
The Laila Loom is a versatile weaving device designed for a wide range of fabrics, excluding rugs. It is equipped with either 4 shafts and 4 treadles or 8 shafts and 8 treadles, allowing for the creation of diverse textiles. This loom is particularly well-suited for weavers who have limited space, as it features a foldable design that can be compacted even with the warp in place. This space-saving capability makes it convenient for storage or transport.
The Laila Loom is designed to be accessible for both children and adults, offering a weaving experience that mimics the feel of a larger countermarch loom. This ensures a consistent and enjoyable weaving process regardless of the user's age or experience level. For optimal comfort and ergonomics, a specially proportioned Laila bench is available separately, complementing the loom's design. The purchase of the loom includes essential accessories such as a cork board, a scissor holder, and a comprehensive manual to guide users through its operation and maintenance.
The loom is composed of several key components, each serving a specific function in the weaving process. The main structural elements include the Left side (1) and Right side (2), which form the primary frame. The Lower front rail (3) and Lower back rail (4) provide stability at the base, while the Breast beam (5) and Back beam (6) are crucial for managing the warp. The Upper front rail (7) and Upper back rail (8) complete the upper frame, supporting various mechanisms.
The Warp beam (9) is where the warp threads are wound, and it is controlled by the Crank (10). The woven fabric is collected on the Cloth beam (11), which has a Cloth beam release (12) mechanism. For preparing the warp, the loom includes 2 warp & 2 cloth sticks (13) and 2 lease sticks (14). The shedding mechanism involves Jacks (15), 2 rods for jacks (16), and 2 long locking rods (17). Shaft bars (18) support the heddles, while Upper lams (19) and Lower lams (20) are connected to the treadles. 2 rods for lams (21) facilitate their movement, and a Box for side lams (22) houses these components.
The Treadles (23) are operated by foot to create the shed, connected via a Treadle rod (24) and held in place by Treadle holders (25). The Beater mechanism consists of the Beater top (26), Beater race (27), and 2 beater legs (28). Structural integrity is maintained by the Lower joint part (29) and Upper joint part (30), along with the Right back leg (31) and Left back leg (32).
The assembly process begins by fastening the treadle holders (25) onto the back rail (4) using two step bolts (B) 6x75 mm. The treadle rod (24) is then inserted, head first without a hole, and secured with a cotter pin. The treadle holders offer multiple holes for height adjustment, with the second hole from the top being the most commonly used position.
Next, the joint parts (30) and (29) are attached to the loom sides. Eight furniture bolts (F) 6x40 mm (sleeve nut + threaded rod + sleeve nut) and two step bolts (B) are used for this. Specifically, part (30) is fastened with one furniture bolt, and part (29) with one furniture bolt and one step bolt (B) to the right side of the loom (2). The back leg (31) is then attached to parts (29) and (30) with one furniture bolt each. The same procedure is followed for the left side of the loom (1), ensuring that the right back leg is bolted to the right side and the left back leg to the left side. It is important to hammer the sleeve nuts into the wood for a secure fit.
The lower front rail (3) and lower back rail (4) are then fastened to the right side of the loom (2) using two furniture bolts (D) 6x60 mm (sleeve nut + threaded rod + barrel nut). The barrel nut should be hammered into place and its position set with a screwdriver. The warp beam (9) is then placed into the right back leg, and the crank (10) is turned into position. Before setting the cloth beam (11) in place on the right side of the loom, the lever of the cloth beam release (12) is positioned on the axle of the cloth beam. The cloth beam is secured by engaging the hook with the cogwheel.
The left side (1) is carefully positioned, and the front rail (3) and back rail (4) are fastened to it using furniture bolts (D) 6x60 mm (sleeve nut + threaded rod + barrel nut). Again, the barrel nut is hammered into place and adjusted with a screwdriver. The upper rails (7) and (8) are then fastened to both the left side (1) and the right side (2) of the loom. The wooden dowels (K) are typically pre-installed. Two long furniture bolts (H) 6x120 mm (sleeve nut + threaded rod + sleeve nut) are used for this, fastening both the front and back parts to the side simultaneously.
The wooden dowels (J) are inserted into the holes of the front legs, and the breast beam (5) is put into place. The same process is repeated for the back legs and the back beam (6). The beater is then assembled on the floor: the beater top (26) is fastened to the beater legs (28) with two step bolts (C), and the beater race (27) is attached to the beater legs (28) with furniture bolts (H) 6x60 mm (sleeve nut + threaded rod + sleeve nut). Once assembled, the beater is placed into the loom and fastened with two beater rods (E) 6x45 mm (refer to 16.). The height and distance of the beater can be adjusted, with the middle holes often being the preferred setting.
To complete the treadle assembly, the cotter pin is removed from the treadle rod (24), and the treadles (23) and treadle spacers (I) are put into place. The rod is then secured with the cotter pin.
For the lams, the rods (21) are inserted into their holes in the box for the side lams (22), with the head without holes going in first. The upper lams (19) are placed on the upper rod, and the lower lams (20) on the lower rod. The rods are then locked with cotter pins.
Finally, the rods for the jacks (16) are placed into the outer holes of the upper back rail (8), again with the head without holes first. The jacks (15) are then positioned (the rod goes into the middle hole), and the rods are locked with cotter pins. The locking rods (17) are fitted into the holes in the upper front rails (7).
Once assembled, the Laila Loom is ready for weaving. An important maintenance step is to periodically tighten all bolts, as they may loosen during weaving. This ensures the loom remains stable and functional.
One of the key usage features of the Laila Loom is its ability to fold even with the warp in place. This makes it highly convenient for storage in small spaces or for transport. To fold the loom, first loosen the furniture bolts on the lower and upper joint parts (29 & 30). Next, remove the step bolts located in the front of the lower joint parts (29). The loom can then be folded by lifting the warp beam (9). After folding, the step bolts are reinserted into their new places in the loom sides and secured with wing nuts. This mechanism allows weavers to easily store their loom without having to remove the warp, making it ready for use whenever inspiration strikes. The ability to tighten or loosen the warp as needed further enhances its convenience for storage and transport.
| Width | 150 cm |
|---|---|
| Material | Birch plywood |
| Heddles | 4 |
| Treadles | 10 |
| Weight | 65 kg |