7
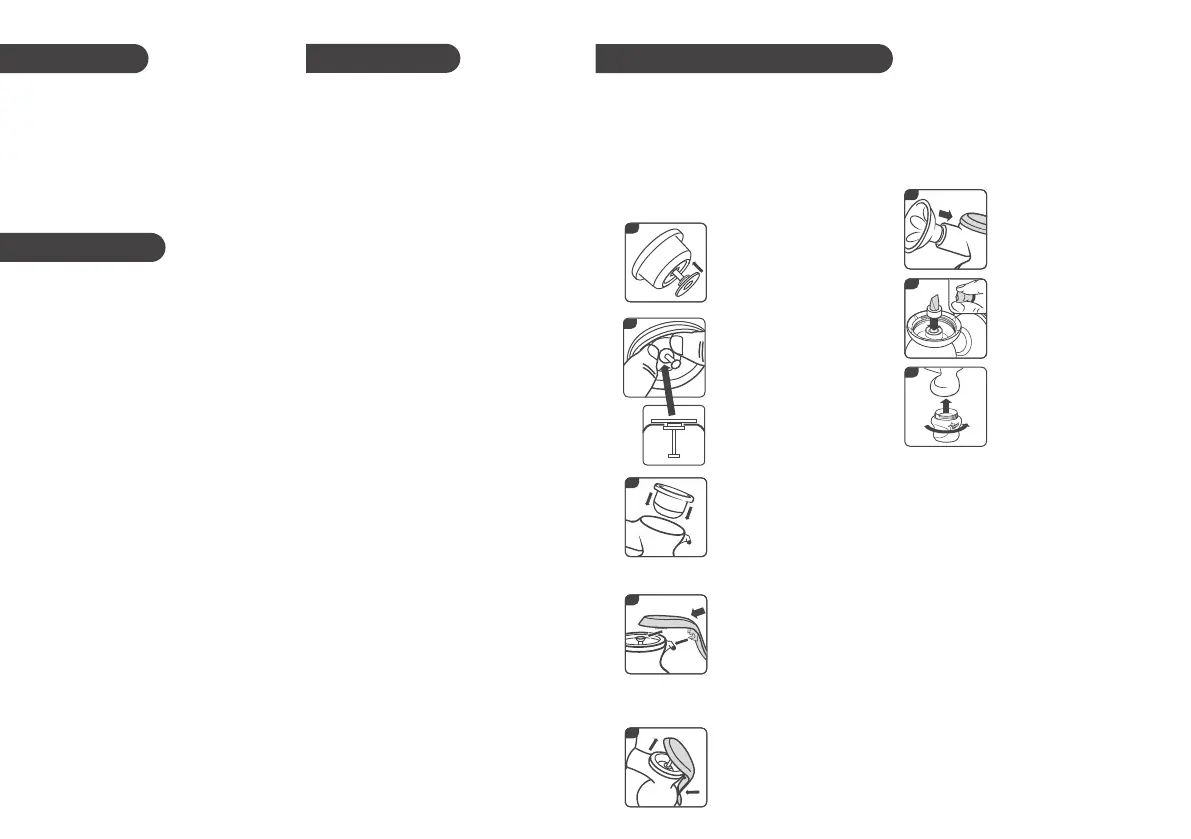
7. Push the horn onto
the body until it’s fully
engaged and secure.
Turn your pump upside
down.
8. Insert the duck-bill valve.
Gently squeeze the sides
of the valve to make sure
it opens.
9. Screw in a Tommee
Tippee® Closer to
Nature® or Advanced
Anti-Colic bottle. This
breast pump is designed
to fit all Tommee Tippee
Closer to Nature and
Advanced Anti-Colic
bottles and Express &
Go / Pump & Go milk
pouches with adaptor
rings (excludes Tommee
Tippee Closer to Nature
Glass bottles).
10. Place the assembled
pump on a flat surface.
Remember
DO wash your hands with soap and
water and dry thoroughly before
handling your breast pump.
DO thoroughly clean and sterilise
all the parts of your breast pump
following the instructions below.
DO this before you use it for the first
time and after every use.
How to clean
1. Unscrew the bottle from the pump
body.
2. Pull the horn away from the pump body
and remove the duck-billed valve.
3. Disconnect the handle from the
body by pulling away from the body
horizontally.
4. Lift out the diaphragm from the body.
5. Pull out the connector rod from
the diaphragm.
6. Wash all parts in clean soapy water.
Don’t use water that you’ve used for
cleaning other products.
7. Rinse thoroughly with clean water.
8. You can also wash the pump
components in the top rack of a
dishwasher. Place the peach duck-bill
valve in the cutlery rack or dishwasher
pod to help keep it safe.
9. Sterilise all parts of the pump using
either cold water sterilisation,
microwave sterilisation, boiling water,
or electric steam sterilisation.
10. For best results use Tommee Tippee®
electric or microwave sterilisers.
3 4
2
4
5
6
3
8
Putting your pump together
Each time you use your breast pump,
check all parts of the pump for any
damage.
Wash your hands with soap and
water and dry thoroughly before
handling your breast pump.
1.
Make sure that all parts of the pump
have been washed and sterilised.
2. Push the connector rod
through the bottom of
the diaphragm.
3. With two hands gently
squeeze the bottom of
the diaphragm over the
ring in the base of the
connector rod. The rod
should be securely held
by the diaphragm.
4. Place the diaphragm
in the top of the pump
body and push the
diaphragm edge down
around the whole
circumference of the
pump body to make
a good seal.
5. Pick up the pump body
and, from the side, slide
the handle onto the body,
so that the clips on the
top slide onto the top of
the connecting rod, and
the two clips at the side
snap onto the back of the
pump body.
6. The handle should now
freely move up and down
and you should see the
diaphragm lift up when
you press the handle
down.
9
• Keep all components not in use
out of the reach of children.
• Do not clean with solvents or
harsh chemicals.
• Do not place fingers between the
handle and the pump body or
bottle when pumping as you may
trap them.
• User maintenance, other than
cleaning and sterilising is not
required.
• Do not leave the unit in direct
sunlight.
• Do not allow product to come
into contact with oil-based foods
(e.g. oil/tomato-based sauces) as
staining will occur.
• This product is a personal care
product and therefore cannot
be returned once opened unless
faulty.
WARNINGS
 Loading...