This document is an operation manual for an Airless Spray Gun, model TSASG, distributed by The ToolShed. It provides comprehensive information on the device's specifications, identification, safety guidelines, assembly, operation, maintenance, and troubleshooting.
Function Description:
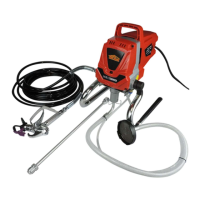
The Airless Spray Gun is designed for applying paint and other materials by atomizing them without the use of compressed air. Instead, it uses a high-pressure pump to force the fluid through a small tip, creating a fine spray. This method allows for faster application and a smoother finish compared to traditional painting methods. The device is suitable for both new and experienced users, with detailed instructions provided for safe and effective operation.
Important Technical Specifications:
- Power: 230V / 1100W
- Flow Rate: Up to 1.5 Liters Per Minute (LPM)
- Hose Length: 10 meters
- Pressure: 3000 psi
- Weight: 5.9 kg (spray unit)
- Nozzles: Includes 215, 415, and 515 nozzles.
- Nozzle 215: Spray Fan Width 100mm at 300mm distance.
- Nozzle 415: Spray Fan Width 200mm at 300mm distance.
- Nozzle 515: Spray Fan Width 250mm at 300mm distance.
Usage Features:
The manual details various components and their functions:
- ON/OFF Switch: Controls power to the sprayer.
- Suction Tube: Draws fluid into the pump.
- Fluid Section: Contains a piston that creates suction.
- Spray Gun: Controls fluid delivery.
- Spray Hose: Connects the gun to the pump.
- Return Tube: Returns fluid to the original container when the PRIME/SPRAY knob is in PRIME position.
- PRIME/SPRAY Knob: Directs fluid to the spray hose (SPRAY) or return tube (PRIME).
- Pressure Control Dial: Regulates pump force.
- Oiler: Provides lubrication to the fluid section.
- Pusher Stem: Keeps the inlet valve open and prevents sticking.
Assembly:
Assembly requires two adjustable wrenches and a 3/16" allen wrench. Key steps include:
- Threading the high-pressure hose to the spray hose port and the spray gun.
- Attaching the suction tube to the inlet valve and the return tube to its fitting.
- Ensuring the seal is present inside the suction tube and threading the inlet filter.
Note: The spray tip should not be attached until after purging and priming.
Locking the Spray Gun:
The trigger lock should always be engaged when attaching the spray tip or when the gun is not in use. The gun is locked when the trigger lock is at a 90° angle to the trigger.
Pressure Relief Procedure:
This critical safety procedure must be followed before shutting off the unit for any purpose. Steps include:
- Locking the spray gun and turning the ON/OFF switch to OFF.
- Turning the PRIME/SPRAY knob to PRIME.
- Unlocking and triggering the spray gun into a material bucket, then re-locking it.
Purging and Priming:
New units contain test fluid to prevent corrosion, which must be purged.
- Place the suction tube in spraying material and the return tube in a waste container.
- Set pressure to maximum and the PRIME/SPRAY knob to PRIME.
- Turn the sprayer ON to draw material until test fluid is removed.
- Switch OFF, then place the return tube back into the material container.
Purging and Priming the Spray Hose:
- Unlock the gun, set PRIME/SPRAY knob to PRIME (spray tip NOT attached).
- Aim the gun at a waste container and pull the trigger.
- Switch pump ON, turn PRIME/SPRAY knob to SPRAY, and hold the trigger until material flows freely.
- Release trigger, turn PRIME/SPRAY knob to PRIME, switch pump OFF, and trigger gun to relieve pressure.
- Lock the gun, ensure saddle and black seal are in place, and thread the spray tip guard assembly onto the gun.
Operation:
- Switch pump ON, turn PRIME/SPRAY knob to SPRAY, and set pressure to maximum.
- Once the motor shuts off, unlock the gun and spray a test area.
- Adjust the pressure control dial for the desired spray pattern.
Tips for Spraying:
- Keep the gun at a right angle to the surface, moving the entire arm.
- Pull the trigger after starting the stroke and release before ending it.
- Overlap strokes by about 30% for even coating.
Unclogging Spray Tip:
- DO NOT use fingers, needles, or sharp instruments to clean the tip.
- If the pattern distorts or stops: release trigger, lock gun, rotate tip 180° (CLEAN position), set PRIME/SPRAY to SPRAY, unlock and squeeze trigger to blow out obstruction, then re-lock gun and reverse tip (SPRAY position).
Maintenance Features:
Cleaning:
- Use water for latex materials, mineral spirits for oil-based materials.
- Dispose of cleaning solution properly.
- Thorough cleaning and lubrication are essential for proper operation and storage.
Notes for Mineral Spirits:
- Flush spray gun at least one hose length away from the pump.
- Ensure the area is free from vapors.
Spray Gun Filter:
Clean the filter every time the sprayer is used, or more often with thicker materials.
- Perform the PRESSURE RELIEF PROCEDURE.
- Unscrew the fitting from the bottom of the gun, unclip the trigger guard, and unscrew the filter housing.
- Remove and clean the filter with appropriate solution.
- Inspect for holes and replace if necessary.
- Reassemble, ensuring the tapered end of the filter is loaded correctly.
Inlet Filter:
Clean the inlet filter at the bottom of the suction tube every time spray containers are changed.
- Unscrew and remove the filter from the suction tube.
- Clean with appropriate solution and thread back into place.
Cleaning for Latex Materials (with garden hose):
- Lock gun, remove spray tip, place suction and return tubes into a waste container.
- Rinse tubes and inlet filter with a garden hose.
- Remove inlet filter, connect pump cleaning adapter to garden hose and suction tube.
- Unclip return tube into waste container, set PRIME/SPRAY to PRIME.
- Turn water supply and pump ON to flush return tube.
- Aim gun into original material container, hold trigger, turn PRIME/SPRAY to SPRAY to purge material back.
- When cleaning solution appears, aim gun into waste container until fluid is clear.
- Turn PRIME/SPRAY to PRIME and trigger gun to relieve pressure.
Cleaning for Oil-Based Materials:
- Lock gun, remove spray tip, submerge suction set in cleaning solution.
- Aim gun into original material container, hold trigger.
- Turn pump ON, PRIME/SPRAY to SPRAY to purge material back.
- When cleaning solution appears, aim gun into waste container until fluid is clear.
- Turn PRIME/SPRAY to PRIME and trigger gun to relieve pressure.
Note: Ground gun with a metal container if flushing with flammable solvent.
Cleaning the Suction Set:
- Lock gun, turn pump OFF.
- Remove and clean suction hose and return tube, including inlet nut threads and inlet filter.
- Re-thread suction tube, replace return tube and clip.
- Submerge suction set in NEW cleaning solution.
- Turn PRIME/SPRAY to PRIME, pump ON, trigger gun into waste container, then let pump circulate for 2-3 minutes. Turn pump OFF.
Note: If oil-based materials were used, flush with water before storage.
Cleaning Spray Gun Components:
- Ensure pump is OFF, PRIME/SPRAY knob is to PRIME, and sprayer is unplugged.
- Remove spray gun from paint hose.
- Remove filter from spray gun.
- Remove spray tip from guard assembly, clean with a soft-bristled brush and appropriate solution. Remove and clean washer and saddle seat.
- Install gun filter, reassemble spray gun, install spray tip, saddle seat, washer, and guard assembly.
- Thread spray gun back onto paint hose.
Cleaning the Inlet Valve:
Required for priming problems.
- Remove suction set.
- Unscrew inlet valve assembly, inspect and clean paint residue.
- Lubricate O-ring, replace inlet valve assembly, torque 23-27lbs.
- Replace suction set.
Short-Term Storage (up to 16 hours - latex materials only):
- Lock spray gun.
- Turn PRIME/SPRAY to PRIME, pump OFF, unplug.
- Pour ½ cup of water over paint to prevent drying. Wrap gun in damp cloth and plastic bag.
- Seal bag, store in a safe place out of the sun.
Long-Term Storage:
Follow after all clean-up steps.
- Fill a cup with approximately 60ml of separating oil, submerge inlet valve.
- Place a rag over spray hose port, turn switch ON. When oil is sucked from cup, turn pump OFF.
- Wipe entire unit, hose, and gun with a damp cloth. Replace high-pressure hose to paint hose port.
Troubleshooting:
The manual includes a detailed troubleshooting table covering common issues like the sprayer not starting, not drawing paint, pressure drops, and leaks, along with their causes and solutions.
Parts List:
An exploded diagram and a list of 18 parts are provided for the spray gun, including the spray tip, guard assembly, diffuser, valve spring unit, trigger guard, trigger assembly, trigger screws, gun housing, hex nut, retainer block, sliding pin, filter, washer, handle, spring, sealing ring, and fitting.