RIGHT HAND MITERING
FIGURE
30
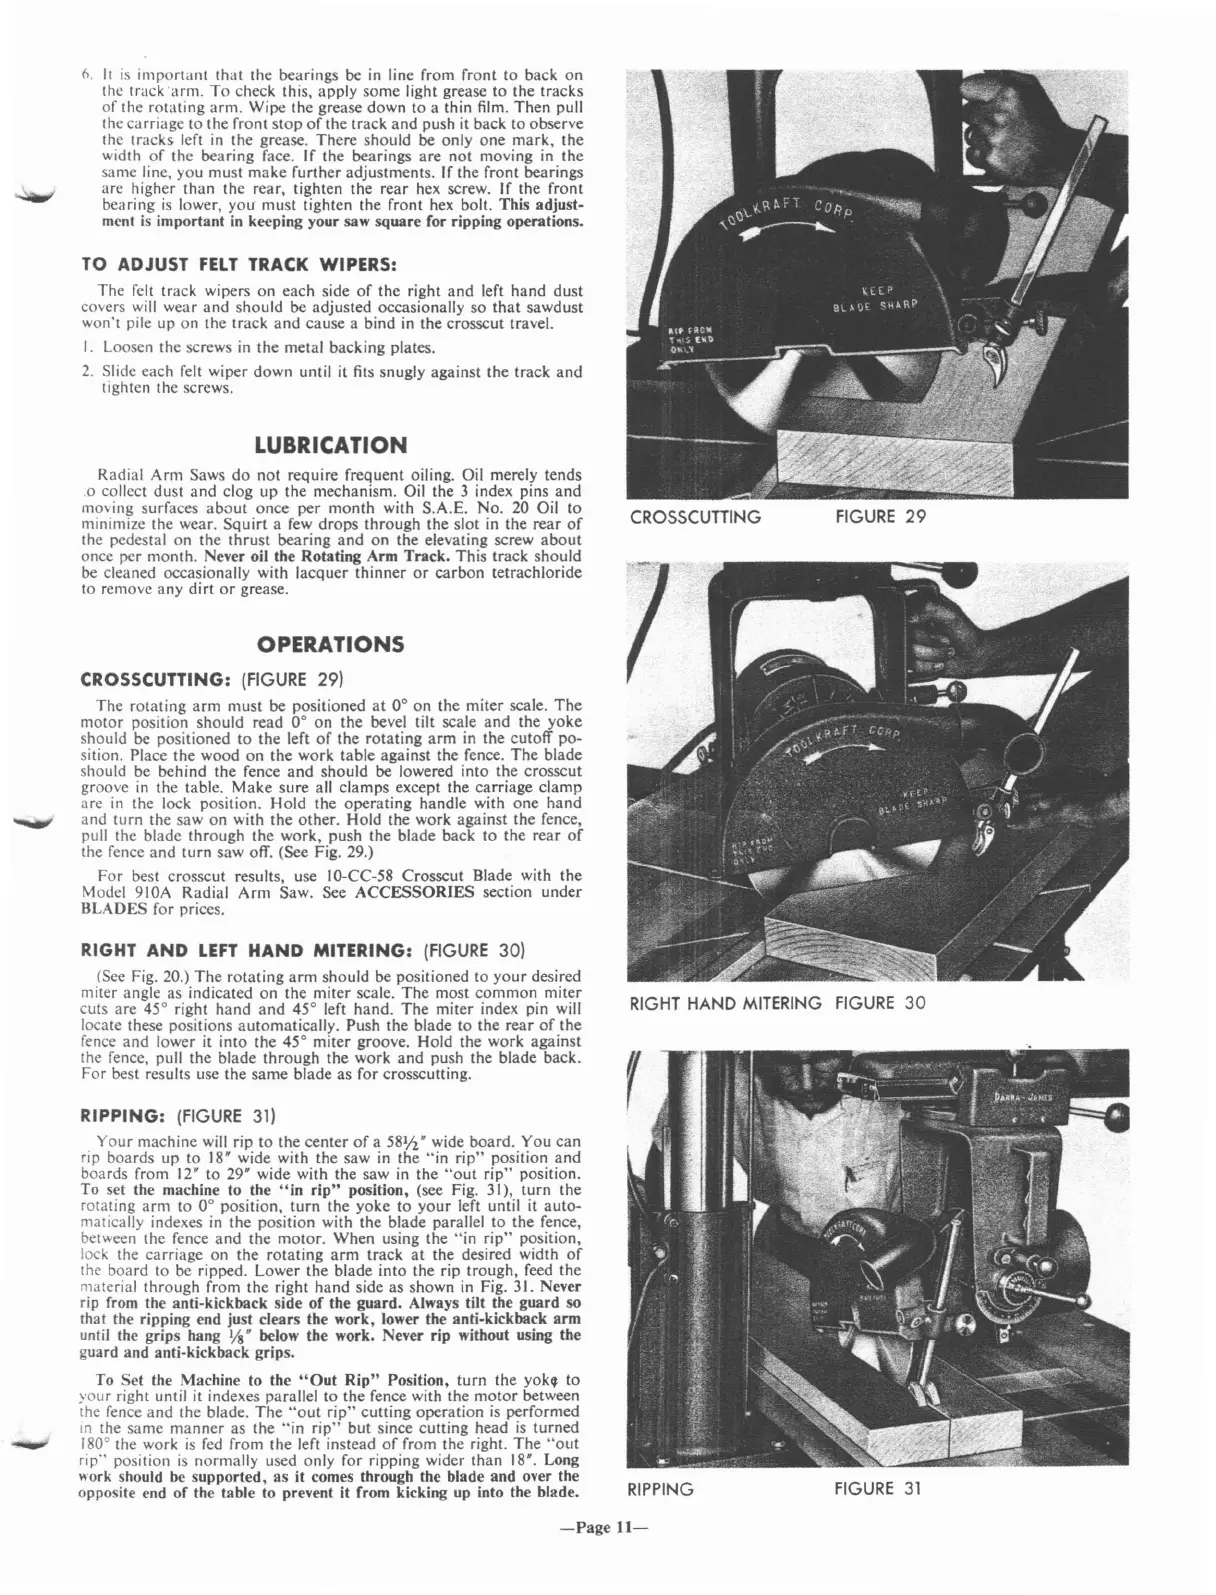
FIGURE
29
FIGURE
31
CROSSCUTIING
RIPPING
7
0.
It
is
important that the bearings be
in
line from front to back on
the track ·arm.
To
check this, apply some light grease to the tracks
of
the rotating arm. Wipe the grease down to a thin film. Then pull
the carriage to the front stop
of
the track and push it back to observe
the tracks left
in
the grease. There should be only one mark, the
width
of
the bearing face. If the bearings are
not
moving in the
same line, you must make further adjustments. If the front bearings
are higher than the rear, tighten the rear hex screw. If the front
bearing
is
lower, you' must tighten the front hex bolt. This adjust-
ment
is
important
in
keeping your saw
SQuare
for ripping operations.
The
felt
track wipers on each side
of
the right
and
left hand dust
covers
will
wear and should be adjusted occasionally so
that
sawdust
won't pile up on the track
and
cause a bind
in
the crosscut travel.
I.
Loosen the screws
in
the metal backing plates.
2.
Slide each felt wiper down until it fits snugly against the track
and
tighten the screws.
TO
ADJUST
FELT
TRACK
WIPERS:
OPERATIONS
CROSSCUTTING:
(FIGURE
29)
The rotating
arm
must be positioned
at
0° on the miter scale.
The
motor position should read 0° on the bevel tilt scale and the yoke
should be positioned to the left
of
the rotating arm
in
the cutoff po-
sition. Place the wood on the work table against the fence.
The
blade
should be behind the fence and should be lowered into the crosscut
groove
in
the table. Make sure all clamps except the carriage clamp
are
in
the lock position. Hold the operating handle with one hand
and turn the saw on with the other. Hold the work against the fence,
pull the blade through the work, push the blade back to the rear
of
the fence and turn saw off. (See Fig. 29.)
For
best crosscut results, use IO-CC-58 Crosscut Blade with the
Model 910A Radial
Arm
Saw. See
ACCESSORIES
section under
BLADES for prices.
RIGHT
AND
LEFT
HAND
MITERING:
(FIGURE
30)
(See Fig. 20.)
The
rotating
arm
should be positioned to
your
desired
miter angle as indicated on the miter scale.
The
most common miter
cuts are 45° right hand
and
45° left hand.
The
miter index pin will
locate these positions automatically. Push the blade to the rear
of
the
fence and lower it into the 45° miter groove. Hold the work against
the fence, pull the blade through the work and push the blade back.
For best results use the same blade as for crosscutting.
Radial Arm Saws
do
not
require frequent oiling. Oil merely tends
.0
collect dust and clog up the mechanism. Oil the 3 index pins
and
moving surfaces
about
once per month with S.A.E. No. 20 Oil to
minimize the wear. Squirt a
few
drops through the slot
in
the rear
of
the pedestal on the thrust bearing
and
on the elevating screw
about
once per month. Never oil the Rotating Arm Track. This track should
be cleaned occasionally with lacquer thinner
or
carbon
tetrachloride
to remove any dirt
or
grease.
LUBRICATION
RIPPING:
(FIGURE
31)
Your machine
will
rip to the center
of
a 58
1
11."
wide board. You can
rip boards up to
18"
wide with the saw in the
"in
rip"
position
and
boards from
12"
to 29" wide with the saw
in
the
"out
rip"
position.
To set the machine to the
"in
rip"
position, (see Fig. 31), turn the
rotating arm to 0° position, turn the yoke to
your
left until it auto-
matically indexes
in
the position with the blade parallel to the fence,
between the fence and the motor. When using the
"in
rip"
position,
lock the carriage on the rotating
arm
track
at
the desired width
of
the board to be ripped. Lower the blade into the rip trough, feed the
material through from the right hand side as shown
in
Fig. 31. Never
rip from the anti-kickback side
of
the guard. Always tilt the guard so
that the ripping end just clears the work, lower the anti-kickback arm
until the grips hang
Ys"
below the work. Never rip without using the
guard and anti-kickback grips.
To Set the Machine to the
"Out
Rip"
Position, turn the yoklt to
your right until
it
indexes parallel to the fence with the motor between
the fence and the blade.
The
"out
rip"
cutting operation
is
performed
In
the same
manner
as the
"in
rip"
but since cutting head
is
turned
180°
the work
is
fed
from the left instead
of
from the right.
The
"out
rip"
position
is
normally used only for ripping wider than
18",
Long
work should
be
supported, as it comes through the blade and over the
opposite end
of
the table to prevent it from kicking up into the blade.
-Page
11-
 Loading...