ADJUSTMENT KNOB
The Adjustment knob (Fig. 2-B) serves two purposes:
1. To clamp the le in position for side edge ling. Turning the knob will clamp or
release the le.
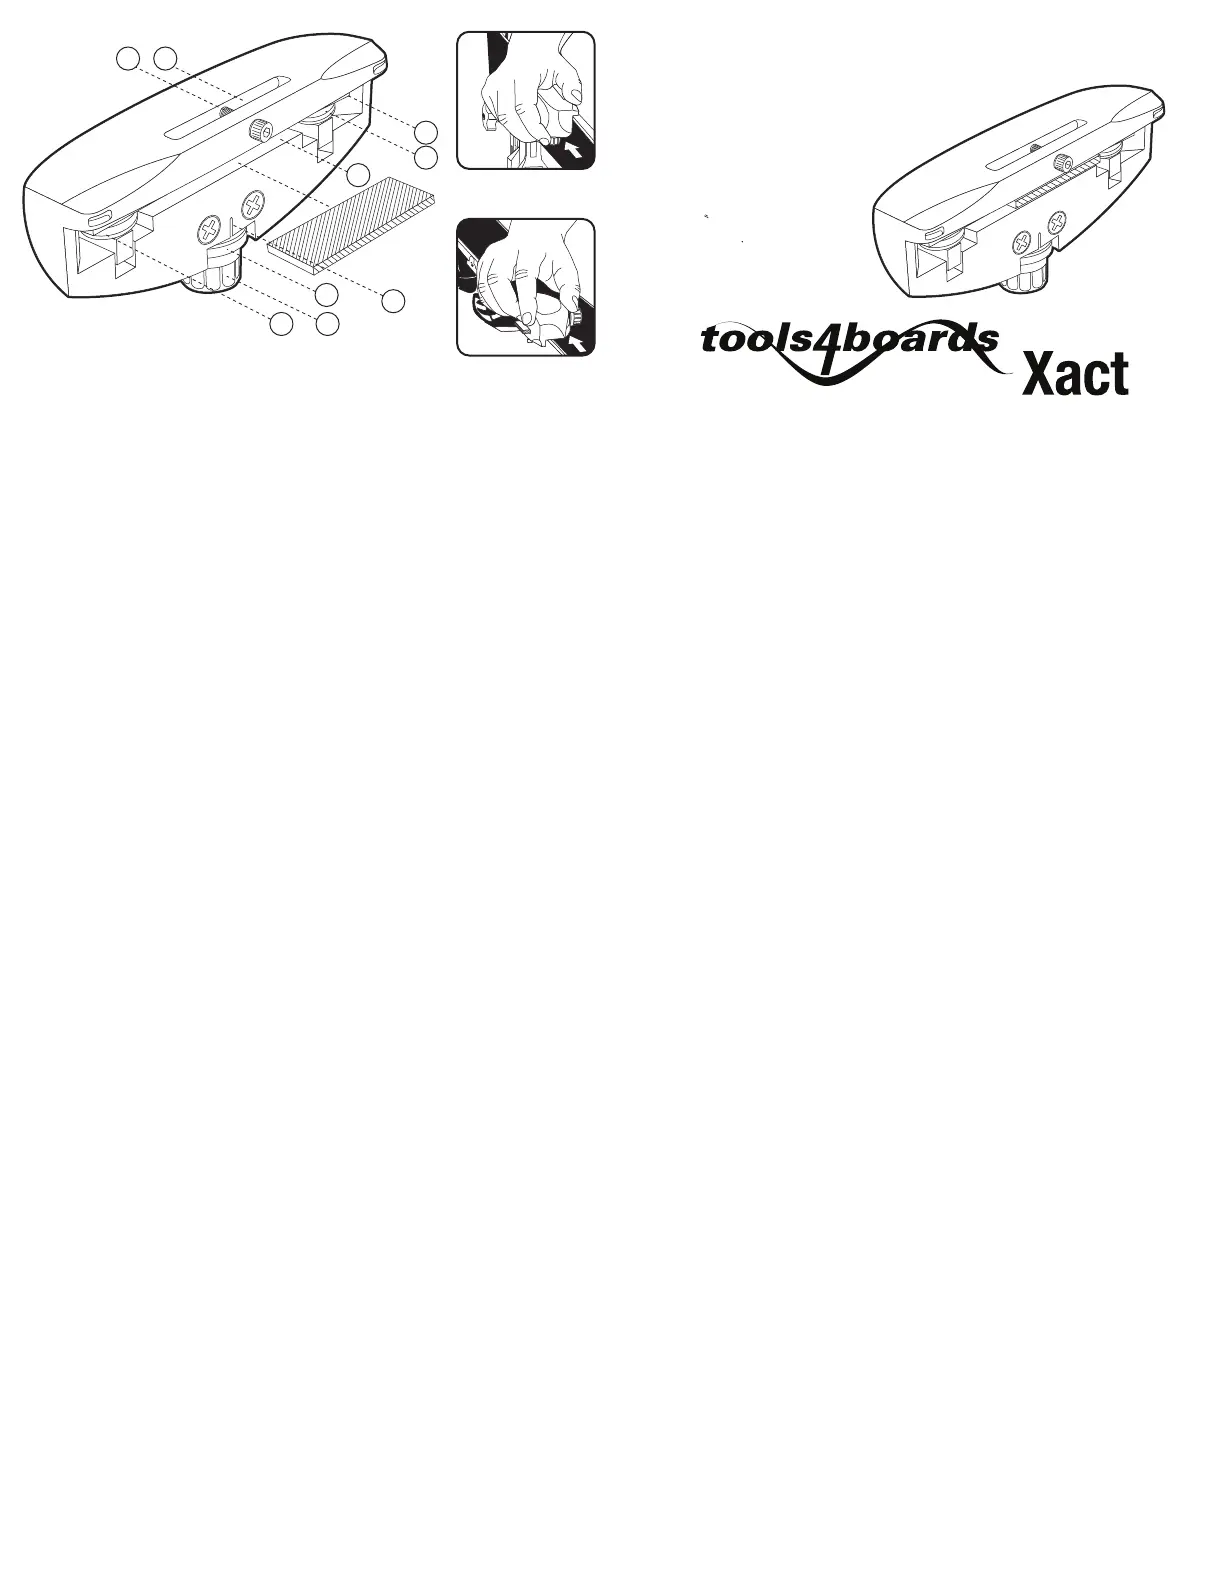
2. To adjust the bevel angle. Pull the knob out, then turn it to align the desired degree
angle number marked on the knob with the groove on the tool body (Fig. 2-C).
The XACT provides bevel angles between 0-6 degrees. Plus, it is possible to make even
smaller adjustments between the marked increments by turning the knob a little more
or less between the degree numbers.
BASE EDGE (Fig. 4)
Generally a base edge bevel of 1 degree is used on skis. Often snowboards use much
more base edge bevel. Follow the ski or board manufacturer’s recommendations.
1. Unclamp the le from the side edge slot (Fig. 2-H) by turning the adjustment knob
counter clock-wise until the clamp plate (Fig. 2-E) is completely retracted. Next pull the
adjustment knob out and align the desired angle with the reference groove on the tool
body (Fig. 2-C).
NOTE: When the adjustment knob is aligned with the reference groove at 2 the base
bevel angle is 0 degrees, when the adjustment knob is aligned at 3 the base bevel angle
is .5 degrees, when the adjustment knob is aligned at 4 the base bevel angle is 1 degree,
when the adjustment knob is aligned at 5 the base bevel angle is 1.5 degrees and when
the adjustment knob is aligned at 6 the base bevel angle is 2 degrees.
2. Remove the le from the side edge slot and place it in the base edge slot (Fig. 2-G).
Make sure the le teeth face the direction the tool will be pulled along the edge. Position
the le through the base edge slot until it contacts the clamp plate, then tighten the set-
screw (Fig. 2-F).
3. The ski or board should be held in the horizontal position in the vise. Place the XACT
on the base surface, and pull the tool along the edge towards you. The XACT will
sharpen and bevel the edge simultaneously. Repeatedly pull the XACT along the
edge until the desired sharpness and bevel angle is achieved.
Normally the base edge bevel only needs to be established initially when the ski or board
is new. After the base edge bevel is set, the bevel and rock damage removal can be
maintained with the use of a stone. If, after some time, the base edge bevel and
sharpness needs to be re-established, the base should be stone ground or belt sanded
by a reputable tuning shop to bring base and edge back to at, or 0 degrees. Then follow
the directions for base edge bevel once again.
SIDE EDGE (Fig. 3)
Generally side edge bevels of 1, 2 or 3 degrees are used. Follow the manufacturer’s
recommendations.
To sharpen and bevel the side edge, position the le in the XACT as shown in Fig. 1.
Make sure the le teeth are facing the direction the tool will be pulled along the edge.
Turn the adjustment knob clockwise until the le is secured in place. Next, pull the
adjustment knob out and align the desired bevel angle with the number on the
reference groove on the tool body (Fig. 2-C). When the adjustment knob is aligned at
1 the side bevel angle is 1 degree, when the adjustment knob is aligned at 2 the side
edge bevel angle is 2 degrees and so on.
The ski or board should be held in the vertical position in the vise. Place the XACT on
the side edge surface and use pulling strokes along the edge towards you. Keep the
ceramic rollers (Fig. 2-A and D) in contact with the base. Continue with pulling strokes
until the entire length of the edge reaches the desired sharpness and bevel.
SIDEWALL REMOVAL (Fig. 3)
After ling the side edge several times it may be necessary to shave down, or reduce the
sidewall oset to expose more steel edge for ling.
NOTE: Although the normal le supplied with the XACT is adequate for sidewall
trimming, for faster results the Tools4Boards Short Panzar File is recommended.
Pull the adjustment knob out and align the 6 degree number with the reference groove
on the tool body. 6 degrees is the highest angle and allows the le to trim only the
sidewall. Follow the procedure outlined for side edge sharpening. After trimming the
sidewall, reset the XACT to the desired bevel angle for the side edge surface, and
proceed with side edge sharpening.
Continued on back.
SAVE THESE INSTRUCTIONS
CONSERVEZ CES INSTRUCTIONS
BEWAHREN SIE DIESE ANLEITUNGEN AUF
FIG. 1
For Skis and Snowboards
• Precise
• Innovative
• Technical
• Simple
Pour skis et planches à neige
• Précis
• Innovateur
• Technique
• Simple
Für Ski & Snowboard
Präzise
Innovativ
Fachmännisch
Leicht handhabbar
FIG. 2
H
B
D
E
F G
D
A
FIG. 3
FIG. 4
SAFETY
• Use vises designed for skis and snowboards.
• Use pulling strokes. Pull the XACT toward you.
• Use light pressure. Let the file do the work.
• Pay attention. Sharpened edges can be harmful.
Skis and Snowboards perform at their best when the edges and base are maintained
on a regular basis. Tuned skis & boards are much more fun and responsive!
The XACT comes with a high quality le blade. It will also accept other types of
les, diamond stones, ceramic stones, or abrasive stones. These, and replacement
les, are available at tools4boards.com
The edges on new skis and boards are easily sharpened by beginning with the
XACT. However, if the edges are damaged from hitting rocks, the damaged area
should rst be removed with a diamond stone or abrasive stone. Rock damaged
spots are “tempered” and a normal le will skid over the area. Simply hand-hold
the stone and briskly rub back and forth over both edge surfaces to
remove the hardened steel. Then proceed with the XACT to establish bevel
angles and sharpening.
Conseils de sécurité
• Utilisez des étaux destinés pour les skis ou les planches à neige
• Travaillez par petits mouvements. Tirez le XACT vers vous
• N’exercez qu’une légère pression. Laissez la lime faire le travail.
• Soyez attentif. Les carres bien aiguisées peuvent Ítre dangereuses.
Les skis et planches à neiges performent à leur maximum quand ils sont entretenus
de façon régulière. Les skis et planches sont toujours beaucoup plus agréables et
réagissent beaucoup mieux quand ils sont bien préparés !
Le XACT vous est offert avec une lime de haute qualité. Il acceptera tous les types
de lime, pierres au diamant, à la céramique ou abrasives. Celles-ci, en plus des limes
de remplacement, sont disponibles chez votre détaillant tools4boards.com
Les carres de nouveaux skis ou de nouvelles planches à neige peuvent facilement
être aiguisées en débutant avec le XACT. Toutefois, si les carres sont
endommagées par des roches, la partie à réparer devra premièrement être travaillée
à l’aide d’une pierre au diamant ou une pierre abrasive. Les endroits endommagés
par les roches sont très durs et une lime standard ne ferait que glisser. Tenez la pierre
dans la main et avec un mouvement de va-et-vient, frotter vivement les deux
surfaces de la carre pour éliminer le métal durci. Procéder ensuite à l’utilisation du
XACT pour ré-établir les angles de biseautage et l’aiguisage.
SICHERHEITSANWEISUNGEN
• Verwenden Sie professionelle Einspanner für Ski und Snowboard.
• Arbeiten Sie schubweise. Den XACT zu sich ziehen.
• Mit leichtem Druck arbeiten. Lassen Sie die Feile arbeiten.
• Achtung: Geschärfte Kanten bergen Verletzungsgefahr.
Ski und Snowboards funktionieren am besten mit regelmässig gewarteten Kanten.
Getunte Ski & Boards „reagieren“ viel schneller und machen mehr Spass.
Der XACT beinhaltet eine qualitative hochwertige Feile. Es können auch andere
Feilen, Diamantsteine, Keramiksteine oder Schleifsteine eingespannt werden. All
diese Tuning-Werkzeuge führt Tools4Boards in seinem Sortiment.
Die Kanten neuer Ski und Boards können mit dem XACT ganz einfach geschärft
werden. Sind die Kanten jedoch von Fahrten über Steine zerkratzt, sollten die
Schläge in der Kante zuerst mit groben Diamant- oder Schleifsteinen bearbeitet
werden. Gewöhnliche Feilen gleiten an diesen Verhärtungen in der Kante ab.
Diamant oder Schleifstein über die Schläge in der Kante hin- und herreiben, um die
Verhärtungen zu entfernen. Dann mit XACT den gewünschten Winkel abhängen
und die Kante schärfen.
C
 Loading...