This document provides a comprehensive guide for the TOOL SHOP® Jigsaw, model 241-9834, covering its functional description, important technical specifications, usage features, and maintenance instructions.
Functional Description:
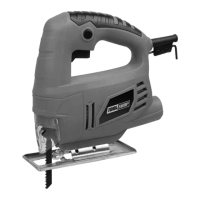
The TOOL SHOP® Jigsaw is designed for cutting various materials. Its core components include a blade clamp (A) for securing the saw blade, a protective cover (B) for safety, an On/Off trigger (C) for operation, a lock-on button (D) for continuous use, and a hex key (E) conveniently stored in the housing for adjustments. The jigsaw is equipped with a reciprocating action mechanism that moves the blade up and down to perform cuts. The baseplate can be adjusted to achieve different cutting angles, enhancing its versatility for various tasks.
Important Technical Specifications:
- Voltage: 120V AC, 60Hz
- Current Rating: 3.0 Amp
- No Load Speed: 3,000 /min
- Maximum Depth of Cut:
- Wood: 2-3/16”
- Steel: 1/4"
- Included Accessories:
- 1 wood cutting blade
- 1 hex key (stored in the housing below the cord sheath)
- Blade Compatibility: Designed to accept standard "T" and "U" shank jigsaw blades.
Usage Features:
Safety Precautions (General):
- Always wear eye protection (full-face mask or goggles) when operating the tool, especially when producing metal filings, dust, or wood chips. A clean dust mask is recommended for tasks involving fine or coarse dust.
- Secure your workpiece with clamps or a vise to free both hands for tool operation.
- Maintain proper footing and balance; avoid overreaching or reaching across running machines.
- Keep tools sharp, clean, and well-maintained. Follow lubrication and accessory change instructions. Ensure handles are dry, clean, and free from oil and grease.
- Prevent unintentional starting by ensuring the switch is in the OFF position before plugging in.
- Always remove adjusting keys or wrenches before turning on the tool to prevent them from flying off and causing injury.
- Do not use the tool if the switch cannot turn it on or off; have it repaired.
- Disconnect the plug from the power source before making any adjustments or changing attachments/accessories to prevent accidental starts.
- Stay alert, pay attention to your work, and avoid operating the tool when tired.
- Before use, check for damaged parts (alignment, binding, breakage, mounts, loose screws) and have them properly repaired or replaced by an authorized service center. Do not use the tool if the switch is faulty.
- When servicing, use only identical replacement parts.
- All service and repairs should be performed by qualified repair technicians at an authorized repair center to prevent serious shock or injury.
Safety Precautions (Jigsaw Specific):
- Guard Against Electric Shock: When cutting in areas where "live" electrical wires may be present, hold the tool only by the plastic handle. Do not touch any metal parts of the tool. Contact with a live wire can electrify the saw's exposed metal, shocking the operator.
- Starting the Saw: Do not start the saw with the blade in contact with any surface. The reciprocating action can cause violent bouncing and injury.
- Stopping the Saw: Allow the saw to come to a complete stop before setting it down. Contact with the blade tip while still reciprocating can cause violent jerking.
Installing a Saw Blade:
- Unplug the saw before starting.
- Loosen the two hex screws on the saw blade clamp.
- Insert the saw blade into the clamp, pushing it in as deeply as possible.
- Ensure the blade is firmly seated in the guide roller slot.
- Tighten the hex screws to secure the blade.
- Before plugging in, pull sharply on the blade to confirm it is firmly held in the clamp. Failure to do so can result in injury.
Adjusting the Angle of Cut:
- Loosen the two hex screws located under the baseplate.
- Slide the baseplate back approximately 5/16" (8mm).
- Rotate the baseplate to the desired angle, using the marked angles on the baseplate as a guide.
- Ensure the blade support roller, which is clamped by the same two screws, is seated with its slot against the back of the blade.
- Tighten the two screws.
Returning to a Vertical Position:
- Loosen the screws under the baseplate.
- Rotate the baseplate until the '0' line is clear of the housing.
- Slide the baseplate forward to lock it in the vertical position.
- Ensure the blade support roller is seated with its slot against the back of the blade.
- Tighten the two screws.
Running the Jigsaw:
- Plug in the tool.
- Hold the saw firmly, ensuring the saw blade's travel is unobstructed.
- Depress the trigger switch to turn on the tool.
- Engage the lock-on button and release the trigger switch for continuous operation.
- To stop the tool, depress the trigger fully and then release it.
Warning Signs During Operation:
Turn off and unplug the saw immediately if:
- Moving parts get stuck.
- Speed drops abnormally low.
- The motor housing becomes hot.
- Sparks or odors emit from the casing.
General Cutting:
- Hold the saw firmly in front and away from you.
- Ensure the blade is clear of any surface and the power cord is out of the blade path.
- Secure the material to be cut firmly (clamp small pieces to a workbench).
- Clearly mark the cutting line.
- Depress the trigger switch and allow the blade to cut the material. Do not force the tool; apply only enough pressure to keep the saw moving forward.
- Use a sharp blade specifically designed for the metal being cut.
- Apply a cutting fluid to the metal surface to prevent heat buildup.
Extension Cord Usage:
- Always use a three-wire extension cord with a three-prong grounding plug and a three-pole receptacle that accepts the tool's plug.
- Ensure the extension cord is in good condition and free from damage.
- Use only outdoor-rated extension cords marked "W-A" or "W".
- Refer to the provided table for recommended minimum wire gauge based on amperage and cord length to prevent power loss and overheating:
| Amps from Tool Nameplate |
25' length |
50' length |
75' length |
100' length |
150' length |
200' length |
| 0-5 amps |
18 ga. |
16 ga. |
16 ga. |
14 ga. |
12 ga. |
12 ga. |
| 5.1-8 amps |
18 ga. |
16 ga. |
14 ga. |
12 ga. |
10 ga. |
Do Not Use |
| 8.1-10 amps |
18 ga. |
14 ga. |
12 ga. |
10 ga. |
Do Not Use |
Do Not Use |
| 10.1-12 amps |
16 ga. |
12 ga. |
10 ga. |
10 ga. |
Do Not Use |
Do Not Use |
| 12.1-20 amps |
10 ga. |
10 ga. |
10 ga. |
Do Not Use |
Do Not Use |
Do Not Use |
Maintenance Features:
- Cleaning: Keep the tool housing clean, free of oil, and grease. Use mild soap and a damp (not wet) cloth. Avoid solvents like brake fluid, gasoline, or petroleum-based products, as they can harm plastic parts and compromise the double insulating system.
- Screws: Regularly inspect and tighten mounting screws. Loose screws can lead to serious injury.
- Motor Winding: Ensure the motor winding does not get damaged or wet with oil or water.
- Vents: Keep vents clear of dust and debris. Use compressed air to clear them, which helps prevent electrical shorts and ensures proper cooling.
- Overloading: Avoid overloading the saw. Do not force the tool. If it becomes hot and loses efficiency, run it free of load for one or two minutes to allow it to cool to normal temperature.
- Cord Inspection: Regularly inspect the cord and have it replaced by an authorized repair facility if damaged.
- Lubrication: Lubrication is done at the factory. Under normal use, further lubrication is not necessary, except for the blade guide roller, which can benefit from a drop of oil periodically.
- Repairs: Any repairs, modifications, or maintenance involving opening or disassembling the saw should be performed by an authorized repair center. All damage to the tool should be corrected by an authorized repair center.
The TOOL SHOP® brand power tool carries a 1-Year Limited Warranty from the original purchaser. This warranty covers defects in material or workmanship for one (1) year from the date of purchase, provided the original sales receipt is presented to a MENARDS® retail store. TOOL SHOP® agrees to repair or replace the tool free of charge within the stated warranty period. The warranty does not cover damage resulting from abuse or misuse, or expendable parts (blades, belts, lights, bulbs, batteries). It also excludes commercial/rental purposes and does not cover losses, injuries, or property/costs. This warranty grants specific legal rights, which may vary by state. Seller is not liable for incidental, special, or consequential damages. The seller's sole remedy is repair or replacement, or a refund of the purchase price. For insurance purposes, seller is not allowed to demonstrate any power tools. For questions or technical assistance, contact customer service at 1-866-915-8626 (M-F 9am – 5pm EST). SAVE YOUR RECEIPTS. THIS WARRANTY IS VOID WITHOUT THEM.