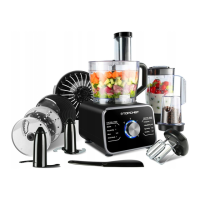
The TopChef Multifunctional Food Processor, model HGM408, is a versatile kitchen appliance designed to facilitate healthy and delicious meal preparation for busy families and professionals. This device is BPA-free, ensuring food safety.
Function Description:
The HGM408 is a multi-functional food processor capable of various tasks including chopping, kneading, slicing, shredding, whisking, citrus pressing, blending, and grinding. It comes with a range of accessories to support these functions. The main body houses the motor unit and control knob, while different attachments are used for specific tasks.
Important Technical Specifications:
- Model: HGM408
- Voltage: 220-240V~
- Frequency: 50/60Hz
- Power: 820-1100W
- Safety Features: The device incorporates a dual safety system, ensuring it operates only when all parts are correctly installed. A safety switch prevents operation if the bowl or blender jar is not properly locked into place (indicated by a "click" sound and a specific angle of the handle relative to the main body, typically around 55 degrees).
- Maximum Processing Quantities:
- Chopping/Kneading: Food/flour should not exceed 500g.
- Whisking: Eggs should not be less than 2.
- Blender Jar: Do not put food above 80°C.
- Grinder: Food materials suitable for dry grinding include soybeans, chili peppers, rice, etc. Some food materials like ice, turmeric, and maka cannot be processed.
Usage Features:
General Operation:
- Always ensure the main body is placed on a flat, stable desktop to prevent shaking during operation.
- Components that come into contact with food must be thoroughly washed before first use.
- The device will only function when all parts are correctly installed and locked.
- The power cord should be inserted, and the switch turned to the desired setting (1, 2, or 3 depending on the function) to start operation.
- Working times vary by function but are generally short (e.g., less than 30 seconds for chopping, kneading, slicing, shredding, whisking, and grinding; less than 1 minute for citrus pressing and blending).
- Allow hot ingredients to cool down (max. temperature 80°C/175°F) before processing.
Specific Function Usage:
-
Chopping Meat:
- Place the bowl on the main body, ensuring the handle and safety switch are at approximately 55 degrees.
- Hold the bowl handle and turn it clockwise until a "click" is heard, indicating it's locked.
- Put the drive shaft into the bowl.
- Put the chopping blade on the drive shaft.
- Put meat into the bowl (max 500g).
- Cover the bowl with the bowl lid and rotate clockwise until a "click" is heard.
- Insert the power cord, turn the switch to 1 or 2, and start. Working time should be less than 30 seconds.
- Caution: Do not process hard food materials (coffee beans, ice cubes). Ingredient should not exceed max calibration line. Turn off power if ingredient sticks to blade.
-
Kneading Dough:
- Place the bowl on the main body, ensuring the handle and safety switch are at approximately 55 degrees.
- Hold the bowl handle and turn it clockwise until a "click" is heard.
- Put the drive shaft into the bowl.
- Put the dough hook on the drive shaft.
- Put flour into the bowl (max 500g).
- Cover the bowl with the bowl lid and rotate clockwise until a "click" is heard.
- Insert the power cord, turn the switch to 1 or 2, and start. Working time should be less than 3 minutes. Pour water slowly through the chute on the bowl lid when the product starts working, do not pour too fast.
- Caution: Ensure dough hook is placed first. Do not process hard food materials. Ingredient should not exceed max calibration line. Turn off power if ingredient sticks to dough hook. Adjust water proportion to flour.
-
Slicing & Shredding:
- Place the bowl on the main body, ensuring the handle and safety switch are at approximately 55 degrees.
- Hold the bowl handle and turn it clockwise until a "click" is heard.
- Put the drive shaft into the bowl.
- Place the adjustable slicing disc on the drive shaft (three types of discs available).
- Cover the bowl with the bowl lid and rotate clockwise until a "click" is heard.
- Insert the power cord, turn the switch to 1 or 2, and start. Working time should be less than 30 seconds.
- Put food slowly through the chute on the bowl lid. Gently use the double pusher to push ingredients through the chute.
- Caution: Ensure food size can fit the chute. Do not push hard with the double pusher. Do not use hands or other objects in the chute. Ingredient should not exceed max calibration line. Turn off power if food sticks to disc.
-
Whisk:
- Place the bowl on the main body, ensuring the handle and safety switch are at approximately 55 degrees.
- Hold the bowl handle and turn it clockwise until a "click" is heard.
- Put the drive shaft into the bowl.
- Whisk the egg into the bowl (min 2 eggs).
- Put the whisk body on the drive shaft.
- Cover the bowl with the bowl lid and rotate clockwise until a "click" is heard.
- Insert the power cord, turn the switch to 1 or 2, and start. Working time should be less than 30 seconds.
- Caution: Ensure the inside of the bowl is dry and free of water/oil when processing egg white. Do not use whisk body to knead dough. Ingredient should not exceed max calibration line. Clean whisk stick after each use.
-
Citrus Press:
- Place the bowl on the main body, ensuring the handle and safety switch are at approximately 55 degrees.
- Hold the bowl handle and turn it clockwise until a "click" is heard.
- Put the drive shaft into the bowl.
- Put the citrus juicer filter on the drive shaft and rotate clockwise until a "click" is heard.
- Put the citrus juicer on the citrus juicer filter.
- Insert the power cord, turn the switch to 1, and start. Working time should be less than 1 minute.
- Cut one orange in half. Hold the orange peel and push it to the citrus juicer when the product is working.
- Caution: Choose low speed. Do not use hand directly to press citrus juicer. Citrus juicer filter must be completely stuck in the bowl, and citrus juicer should be put in place before power is turned on.
-
Blender:
- Check if the sealing ring is installed in the blender jar base. Rotate the blender jar base clockwise into the blender jar. Tighten to prevent leakage.
- Pour food materials and some water into the blender jar.
- Put the blender jar lid on the blender jar. Rotate the blender jar lid clockwise into the blender jar.
- Place the measuring cup in the blender jar lid.
- Place the blender jar on the main body, ensuring the handle and safety switch are at approximately 55 degrees. Rotate the blender jar clockwise into the main body until a "click" is heard.
- Insert the power cord, turn the switch to 1, and start. Working time should be less than 1 minute.
- Caution: Do not put food above 80°C. Ingredient should not exceed max calibration line. Solid food is better cut into small pieces. Do not put your finger in the blender jar. Forbidden to start operation without covering the blender jar lid. If desired effect is not achieved within 1 minute, turn off and wait 2 minutes before re-processing.
-
Grinder:
- Put ingredients in a dry grinder. (Food materials suitable for dry grinding include soybeans, chili peppers, rice, etc. Some food materials like ice, turmeric, and maka cannot be processed.)
- Check if the sealing ring is installed in the grinder base. Rotate the grinder base clockwise into the grinder. Tighten to prevent leakage.
- Place the grinder on the main body, ensuring it's on a flat desktop and not shaking. Rotate the grinder clockwise into the main body until a "click" is heard.
- Insert the power cord, turn the switch to 3, and start. Working time should be less than 30 seconds.
- Caution: Forbidden to install grinder base without grinder on main body. Ingredient should not exceed max calibration line. Do not unscrew grinder when working. You can put the grinder lid on the grinder to store processed food. If desired effect is not achieved within 30 seconds, turn off and wait 1 minute before re-processing.
Maintenance Features:
- Cleaning: Thoroughly clean all parts that come into contact with food before first use and after each use.
- Storage: Store the appliance and its accessories in a safe place.
- Troubleshooting: If the appliance does not work, check if all parts are correctly installed and locked. If the mains cord is damaged, it must be replaced by the supplier or a service center.
- Safety: Never immerse the motor unit in water or any other liquid. Never rinse it under the tap. Always unplug the appliance before reaching into the blender jar with fingers or an object. Wait until moving parts stop running before removing the lid of the bowl or jar. Never use any accessories or parts from other manufacturers or that the supplier does not specifically recommend.