Height alert warning of rotating laser
A blink signifies that the height alert function of rotating laser is
operating.
(This function is not usable to the rotating laser which does not
have the height alert and the function to output alarm signal.)
Rotating laser battery warning display
A blink shows that the rotating laser power is low.
(This function is not usable to the rotating laser which does not
have the function to output alarm signal.)
Goes out:
Battery is sufficient. (When Mode 1 is selected, the lamp will
light up.)
Blinks slowly:
The power is low, but sensor is still usable.
Blinks quickly:
Dead battery. Replace the dry battery with new one or recharge
the battery (BT-83Q Optional accessories).
Mode1
Mode2
Mode3
Mode4
Precision mode
Auto-cut off function(Effective only when using the internal battery)
Laser beam positions and display patterns
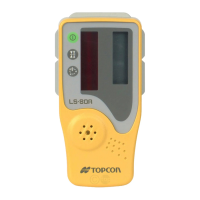
LS-B200 Battery remaining display
Battery remaining display LED
Power-save function(Effective only when using the internal battery)
This instrument will enter the power-save mode when no switches are
operated or no laser beam is received for about five minutes. During
the power-save mode, two LEDs (one yellow and one red) will blink.
(When the laser beam is received again, the power-save mode will be
automatically turned off. Or when the power switch is pressed again,
the power-save mode will be also turned off.)
To disable the power-save function, press the power switch for at least
five seconds to turn the power on. When the function is disabled, the
LED shown in the figure will blink twice.
Rotating laser battery remaining warning LED
Blinks
Blinks
It is possible to change the detective precision of the instru-
ment. Please select Mode 1 to 4 according to the objective
of the operation.
(”Laser beam positions and display patterns”)
Pressing the detective precision (Mode) switch will change
the mode and the corresponding LED lamp will light up.
(During battery remaining display shown below, the lamp
will blink.)
Battery remaining for the LS-B200 will be displayed at 3 levels.
Detective precision (Mode) switch
This instrument will automatically power off when no switches are
operated or no laser beam is received for about 60 minutes after
entering the power-save mode. (To use the instrument again, press
the power switch once again.)
To disable the auto-cut off function, press the power switch for at least
five seconds to turn the power on. When the function is disabled, the
LED shown in the figure will blink twice.
Blinks
CHANGING THE ON-GRADE POSITION FUNCTION
The ON-GRADE position can be changed to the position where laser beam is detected.
Using this function when installing the LS-B200 on the pole of the machine allows easy
setting of the height at which the ON-GRADE will be displayed on the LS-B200. The
range in which the ON-GRADE position can be changed is ±50mm (total of 100mm)
from the center of the detective range.
In order to set the ON-GRADE position at high precision, set it while the laser beam is
stable. When setting the ON-GRADE position while the laser beam is unstable (when
using at a long-distance - more than 150m - or when atmospheric condition is unstable
due to air shimmering or other conditions), the sensor will automatically detect it and the
LED indicating the failure will be displayed while changing the ON-GRADE position.
Setting the ON-GRADE position change
The LED display while changing the ON-GRADE position
Canceling the ON-GRADE position change
 Loading...