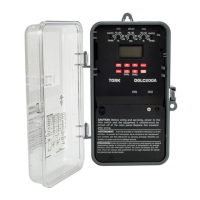
TORK MODEL DGLC
DIGITAL LIGHTING CONTROLLER
Installation & Operation
READ INSTRUCTIONS CAREFULLY BEFORE SETTING UNIT
PHOTOCELL MODEL EPC1 IS SUPPLIED WITH
THE DIGITAL TIME SWITCH
FEATURES
Single channel controller - 2 circuit
Circuit #1: Photocell ON/Time OFF/Time
ON/Photocell OFF, Selectable days
Circuit #2: Photocell ON/Photocell OFF, Everyday
7 day scheduling
Special day scheduling
32 set points
Battery back-up - uses standard 9 volt non-
rechargeable (not supplied). Lithium averages
275 hours of power outage; Alkaline averages
100 hours
Manual override to the next scheduled event
Automatic daylight saving - user selectable
Automatic leap year compensation
AM/PM or 24 Hour format - user selectable
INSTALLATION
UNIT IS TO BE INSTALLED BY A LICENSED ELECTRICIAN
1. Remove the photocell (EPC1) from the time
switch enclosure (lift insulating board at bottom).
2. To remove unit from enclosure: Push tab on
right to swing unit to the left and remove.
3. Mount the enclosure at eye level using screws
or other suitable fastening device. Bring supply
and load wires in through the bottom or side
knockouts. DO NOT USE TOP KNOCKOUTS.
Clock input wires to controller must be from a
dedicated source i.e. no other loads connect-
ed to the same circuit.
4. Install standard 9 volt lithium or alkaline battery
(not supplied) by gently squeezing the right
side of the battery cover on the front of unit
and pull to open. Pull out the battery connector
and connect the battery. Reinstall battery
cover. Lithium should be replaced every 3-5
years; alkaline every year.
NOTE:
Unit can also be programmed using bat-
tery power only.
5. Reinstall unit by reversing step # 1 above and
connect wires to unit as per suggested wiring
diagrams. See illustration on enclosure label.
6. The photocell can be mounted directly through
a standard 1/2” knockout. Connection to junc-
tion box must be watertight through a tapped
opening and the use of a nut and neoprene
washer to be provided by the installer. In addi-
tion, use suitable tape or sealant on nipple
threads. Mounting is recommended in the
upright position with cell facing North for
optimum efficiency.
Protect the window side of the photocell from
any direct artificial light that may be on after
dark, from windows, signs, and the artificial
light being controlled.
Locate the photocell in as open a spot as pos-
sible. Particularly keep it out of corners and
overhanging eaves.
Do not wire the photocell while AC current
is applied to the unit.
Do not apply any voltage from external
source to photocell input terminals.
PHOTOCELL INPUT
Connect Photocell (EPC1) to input terminals
labeled (1 & 2 ).
One photocell controls both circuits.
POTENTIOMETER:
Adjust potentiometer labeled (MIN MAX) for
desired light level actuation. If adjusted to the
extreme left (MIN position), the ON relay will close
2