Do you have a question about the tormek SE-77 and is the answer not in the manual?
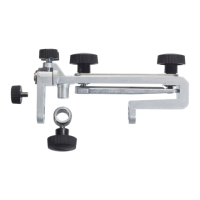
Details the jig's upper base, lower clamp, locking knobs, and safety stops.
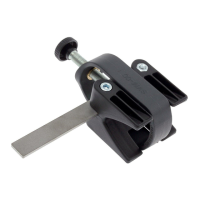
Instructions for mounting tools on both SE-77 and SE-76 jigs.
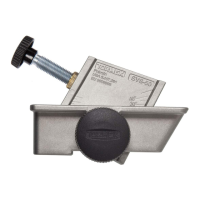
Details positioning inner (A) and outer (B) stops for secure tool holding.
Methods for replicating existing or setting new edge angles using markers or AngleMaster.
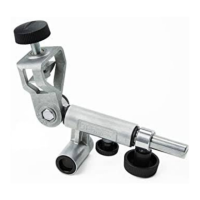
Using adjustment screws for precise angle corrections when a 90° angle is not achieved.
Recommended edge angles for different tools and wood types (20°, 25°, 30°).
The Square Edge Jig SE-77, an evolution of the SE-76, is a precision sharpening accessory designed for plane irons and wood chisels, ensuring a consistent and accurate edge angle. Its primary function is to hold tools securely and guide them across a grinding wheel, facilitating precise sharpening and honing.
One of the key usage features of the SE-77 is its adjustable side, which allows for fine-tuning and accommodates various tool widths and shapes. The jig is designed to line up chisels to their upper flat side, simplifying the mounting process and ensuring the tool is correctly positioned without twisting. This eliminates the need for manual alignment often required with conventional jigs. The lower clamp incorporates a central ridge, enabling firm mounting of shorter tools with tapered shanks, such as Japanese chisels. The upper base is engineered to distribute clamping pressure evenly to the ends of the tool, ensuring a secure hold without excessive tightening of the knobs.
For safety during operation, the jig includes two stops that prevent the tool from slipping off the grinding wheel. An inner stop (1) can be adjusted according to the tool's width, while an outer stop (2) is fixed on the end of the Universal Support. These stops are particularly useful when sharpening plane irons, which may extend partially beyond the wheel's width. When sharpening blades wider than 60 mm (2 3/8"), the inner stop (A) should be removed.
Setting the edge angle is a crucial aspect of sharpening, and the SE-77 offers two methods. Users can replicate an existing angle using the Marker Method, which involves coloring the bevel with a marker and adjusting the Micro Adjust on the Universal Support until the grinding wheel touches the entire bevel. Alternatively, a new angle can be set using the Tormek AngleMaster WM-200, where the AngleMaster is set to the wheel's diameter, and the Universal Support's height is adjusted with the Micro Adjust. It's important to ensure the entire base of the jig rests on the tool, with the corner (a) on the wheel, for accurate angle setting.
The sharpening process involves moving the tool continuously across the grinding wheel, utilizing its full width. It's recommended not to move the tool more than approximately 2 mm (5/64") outside the wheel. Applying pressure with fingers close to the edge provides better control. Higher grinding pressure leads to faster steel removal, while lightening the pressure towards the end of sharpening results in a finer surface. The goal is to sharpen until a burr develops on the entire bevel, which can be felt with a finger. The user controls the pressure and grinding time, checking the shape frequently and grinding more where needed.
For tools with parallel sides, they should rest on the shoulder of the jig. When mounting tools without parallel sides, the tool should protrude approximately 50–75 mm (2–3") and be locked by tightening the movable knob about 5 mm from the tool. For the SE-76, the clamp is opened to the tool's thickness and approximately parallel to the base, with the tool protruding 50–75 mm (2–3"), and locked by tightening only the knob nearest to the tool.
The SE-77 also features adjustment screws (5) for fine-tuning, particularly useful for achieving a precise 90° angle or a slightly convex shape. These screws allow for a movable side, enabling fine adjustments. When the lines on the jig meet, it indicates a neutral position. To increase sharpening pressure on one side, one knob is loosened while the other is tightened, typically by about 1/4 turn.
Maintenance features primarily revolve around preparing the grinding machine and tools. Before grinding, it's essential to check that the stone is true by letting the Universal Support touch it. If necessary, the stone should be trued with the Truing Tool TT-50 to ensure its surface is flat and parallel to the Universal Support.
Flattening and honing the back of tools is a critical maintenance step for achieving a sharp and durable edge. Both converging surfaces must be smooth. New tools often have visible grooves from manufacturing, which should be removed, and the surface honed and polished. This process typically needs to be done only once when the tool is first used. The tool should be carefully positioned against the wheel, ensuring the edge does not touch before the heel. The back is flattened by holding it flat to the grinding wheel and moving it slightly, preventing the tip from cutting into the wheel and rounding off. The side of the tool should rest on the Universal Support, placed close to the wheel. It's usually sufficient to smooth the tool 25-30 mm (1–1 1/4") from the edge. After grinding, the surface is honed and polished freehand on the leather honing wheel, holding the tool tangent to the wheel.
Japanese chisels, with their unique tapered shanks and non-parallel sides, require a slightly different approach. The jig's clamp is designed to accommodate tapered shanks. When sharpening Japanese chisels, caution is advised due to the limited amount of available steel. The back of these chisels often has a hollow, which moves closer to the edge with each sharpening. If the hollow reaches the edge, the back might need to be flattened on the side of the grinding wheel. A pencil line drawn on the stone using the Universal Support as a guide helps align the tool correctly.
Achieving a perfectly straight edge, especially for wide tools like plane irons, requires attention to pressure and sharpening time. Pressing equally on both sides and moving the tool evenly across the stone can result in a concave edge because the middle part is exposed to longer sharpening time. To compensate, more time should be spent sharpening the sides.
Many plane irons benefit from a slight convex shape or camber, which varies depending on the plane type and desired shaving thickness (e.g., 0.8 mm (1/32") for a jack plane to 0.05 mm (0.002") for a smooth plane). Camber is achieved by pressing harder on the sides. A longer protrusion of the blade in the jig can facilitate this, as most plane irons are somewhat flexible. For thick, stiff tools, more time spent sharpening the sides creates the camber. The SE-77's adjustment screws can be used for tools requiring greater convexity. Loosening both adjustment knobs (A and B) equally allows the side to have a pendulum motion, increasing convexity.
For a finer surface, the Tormek Original Grindstone can be graded with the fine side of the Tormek Stone Grader SP-650. Pressing the Stone Grader firmly onto the grindstone for about 45 seconds refines its surface to act like a 1000-grit stone. The same setting is then used for fine sharpening for 30-40 seconds, without pressing too hard.
Honing on the leather honing wheel involves turning the machine around so the honing wheel rotates away from the user. The Universal Support is moved to the honing wheel side and mounted horizontally. The honing angle is set to match the grinding angle, using either the Bevel Marker Method or the AngleMaster WM-200 (remembering to change the AngleMaster's diameter to Ø 220 mm). The jig provides full control over the honing angle on the T-8 model. The back of the tool is honed without the jig. Safety stops are not used during honing, as they are designed for the grinding wheel. It's important to ensure a part of the blade always remains in contact with the wheel to prevent sliding the jig too far sideways.
The manual also addresses the concept of a secondary bevel. While some recommend it for quicker honing, the Tormek method of grinding and honing the entire bevel is efficient enough that a secondary bevel is generally unnecessary. With a single bevel, the desired angle can be precisely set and maintained.
Edge angles for plane irons, wood chisels, and spoke shave blades are typically 25°. For delicate work in soft wood, the angle can be decreased to 20°. For hard wood or when using a mallet, the angle should be increased to 30°.
| Model | SE-77 |
|---|---|
| Category | Power Tool |
| Material | Steel |
| Maximum tool width | 77 mm |
| Suitable for | Sharpening chisels and plane irons |
| Compatibility | Tormek sharpening systems |
| Type | Sharpening Jig |
| Product Type | Sharpening Jig |