EasyManua.ls Logo

Torque Fitness Fold Away Strength Trainer F3 User Manual

Default Icon
44 pages
To Next Page IconTo Next Page
Page #1 background imageLoading...
Page #1 background image
Part #: 5134001-CVersion: F3-01-001
Assembly and Maintenance Guide
Fold Away Strength Trainer
TM
Question and Answer IconNeed help?

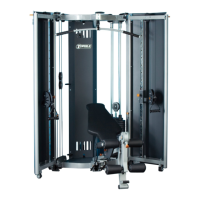
Do you have a question about the Torque Fitness Fold Away Strength Trainer F3 and is the answer not in the manual?

Torque Fitness Fold Away Strength Trainer F3 Specifications

General IconGeneral
BrandTorque Fitness
ModelFold Away Strength Trainer F3
CategoryFitness Equipment
LanguageEnglish

Summary

Safety Instructions

For Using the Equipment

Crucial safety guidelines for operating the fitness equipment, emphasizing user responsibility and physician consultation.

For Assembling the Equipment

Essential safety advice for the assembly process, recommending professional help and adherence to steps.

Obtaining Service

General Notes

Unpacking and Preparation

Includes unpacking, organizing parts, required tools, and optional equipment for assembly.

Assembly Guidance

Key tips for a successful assembly, including tightening connections, aligning parts, and using the scale.

Parts List

Step 1: Cable Tensioner Reactivation and Base Assembly

Step 2: Top Boom Assembly

Step 3: Adjustment Arm Support and Frame Tightening

Step 4: Right Door Assembly

Step 5: Left Door Assembly

Step 6: Door Lock Angle Adjustment

Step 7: Weight Stack Assembly

Step 8: Guide Rod Support and Weight Stack Labels

Step 9: Center Upright to Top Boom Assembly

Step 10: Pivot Shaft and Adjustment Arm Assembly

Step 11: Seat Support Assembly

Step 12: Adjustment Arm and Front Wheel Adjustment

Step 13: LC/LE Pivot Assembly

Step 14: Seat Pad and Roller Pad Assembly

Step 15: Back Pad Assembly

Step 16: Head Plate Pulley and Weight Stem Assembly

Step 17: Mid Pulley Cable Preparation

Step 18: Mid Pulley Cable Routing (Left Side)

Step 19: Mid Pulley Cable Routing (Right Side) and Reassembly

Step 20: Upper Pulley Cable Routing (Left Side)

Step 21: Upper Pulley Cable Routing (Right Side) and Reassembly

Step 22: Link Cable Routing and Attachment

Step 23: LC/LE Cable Routing

Step 24: LC/LE Cable Routing Through Base

Step 25: LC/LE Cable Routing to Seat

Step 26: Cable Tension Adjustment

Step 27: Badge Plate Installation

Step 28: Door Shroud and Placard Installation

Step 29: Accessories Attachment and Use

Maintenance

Component Care

Procedures for maintaining guide rods, nuts, bolts, cables, and spring pins for optimal performance.

Frame and Upholstery Care

Cleaning and conditioning the frame and upholstery for preservation and appearance.

Assembly Checklist

Post Assembly Adjustments and Checks

Verifying connections, cable tension, smooth adjustments, door operation, and latch engagement.

Limited Warranty Offer and Limitation of Liability

Warranty Registration

Related product manuals