EasyManua.ls Logo

Torque Fitness F5 User Manual

Torque Fitness F5
50 pages
To Next Page IconTo Next Page
Page #1 background imageLoading...
Page #1 background image
Part #: 5099201-CVersion: F5-01-001
Assembly and Maintenance Guide
Fold Away Strength Trainer
TM
Question and Answer IconNeed help?

Do you have a question about the Torque Fitness F5 and is the answer not in the manual?

Torque Fitness F5 Specifications

General IconGeneral
TypeFunctional Trainer
Weight StacksDual
Dimensions62" x 53" x 83"
Frame MaterialSteel
FinishPowder-coated

Summary

Safety and Service Information

Important Safety Instructions

Essential safety precautions for using and assembling the equipment.

Assembly Step 1: Frame Base Assembly

Attach Right and Left Sides to Base

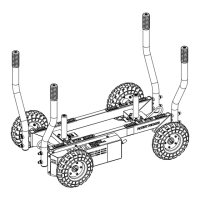
Instructions for attaching the right and left sides to the base structure.

Assembly Step 6: Door Leveling and Locking

Adjust Doors for Leveling and Smooth Pivoting

Adjusting doors for proper leveling, rotation, and locking mechanism engagement.

Assembly Step 11: Weight Stack Components

Install Weight Stack, Plates, and Head Plate

Installing guide rods, bumpers, weight plates, head plate, and shaft collars.

Assembly Step 12: Guide Rod Support

Attach Guide Rod Support and Weight Stack Labels

Assembling the guide rod support and applying weight stack labels.

Assembly Step 13: Bench Swivel Attachment

Secure Bench Swivel to Base

Securely attaching the bench swivel to the base of the machine.

Assembly Step 19: Leg Curl/Extension Pivot

Assemble Leg Curl/Extension Pivot

Assembling the leg curl/extension pivot onto the bench frame.

Assembly Step 23: Gas Shocks and Bench Storage

Install Gas Shocks and Position Bench for Storage

Installing gas shocks and positioning the bench for storage.

Assembly Step 25: Upper Cable and Pulleys

Route Upper Cable and Assemble Pulleys

Assembling pulleys and routing the upper cable through the machine.

Assembly Step 26: Upper Cable Routing and Reassembly

Continue Upper Cable Routing and Reassemble Coupler

Continuing upper cable routing and reassembling the cable coupler.

Assembly Step 27: Lower Cable (Right Side)

Route Lower Cable and Install Right Pulleys

Routing the lower cable and attaching pulleys on the right side of the machine.

Assembly Step 29: Lower Cable (Left Side)

Route Lower Cable and Install Left Pulleys

Routing the lower cable and attaching pulleys on the left side of the machine.

Assembly Step 30: Lat Cable Routing

Route Lat Cable and Attach to Top Boom

Routing the lat cable through pulleys and attaching it to the top boom.

Assembly Step 32: Leg Curl Cable Routing

Assembly Step 34: Leg Curl Cable to Bench

Adjustments and Maintenance

Step 35: Cable Tension Adjustment

Procedures for adjusting cable tension at various points for optimal performance.

Post-Assembly Checks

Related product manuals