Unpack the box and check the components
Quick Tour BDX3500KU/BDX5500KUQUICK START
The online User’s Guide contains important safety precautions not
included in this document. Please review the safety precautions
in this document and the online User’s Guide prior to using this
product. Complete instructions are located on Toshiba’s web site
at support.toshiba.com.
When the player is connected and powered on for the fi rst time, please follow the on-
screen setup instructions as directed.
Get detailed product information:
A comprehensive User’s Guide for your model is available
at
support.toshiba.com
as well
as up-to-date product information.
1. Remove the components and
the Symbio
TM
Streaming Media and Universal Disc Player
from the box. Save the packing materials in case you need them later.
2. Remove the documentation for important information.
Your Product comes with:
•
Remote control and two AAA batteries
•
Quick Start (this document)
•
•
Desktop stand & two screws (For BDX5500KU only)
•
AC adapter
Notice
CAUTION
• Subject to Change. Product specifi cations, confi gurations, prices,
system/component/options availability are all subject to change
without notice.
Playing a disc
NOTE
Please wait for a moment for the disc to load.
NOTE The images in this document are sample illustrations and are subject to change
without notice.
1 4
52
3
1
4
52
1 52
6
6
3
4
3
1
4
5
2
3
Place the disc on the disc tray with its label side facing up.
2
Playback starts automatically.
To pause playback, press
.
.To return to the normal playback, press
To stop playback, press
.
4
Press the button to close the disc tray.
3
Initial Setup
After all connections are complete, connect to the AC adapter.
Install the batteries (two AAA batteries) matching the polarity indicated inside battery
compartment of the remote control.
Turn on your TV. Press the button on the TV’s remote control that accesses the TV
HDMI
TM
input channel (for details, refer to the TV’s User’s Guide). Once the TV is
connected by a HDMI
TM
cable, please allow a few moments for the opening screen
to display.
Press the button on the remote control to turn on the unit.
1
2
4
3
Press the
button on the remote control to open the disc tray.
1
Your player has an integrated Wi-Fi
®
device and antenna. No physical connection to the wireless router is necessary.
1 Confi gure your player to access the wireless access point or router.
2 The network confi guration and connection method may vary depending on the equipment in use and the network environment. For the best wireless performance, it is
recommended
to use an IEEE 802.11n Wi-Fi CERTIFIED
TM
network access point or wireless router.
Connecting to a wireless network
Connecting your Symbio
TM
Streaming Media and Universal Disc Player
Connecting to a digital AV receiver/amplifi erConnect the HDMI
TM
cable
NOTE
Do not tilt the connector when inserting it into the HDMI
TM
jack, and make sure the
shapes of the jack and the connector correspond.
NOTE To enjoy viewing 3D content, an HDMI
TM
connection with a High Speed HDMI
TM
cable is required. (HDMI
TM
cable sold separately).
Digital audio coaxial cable
(not supplied)
AV receiver/amplifi er
HDMI
TM
cable
(not supplied)
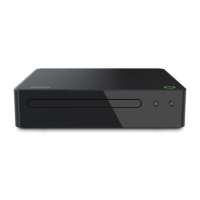
Front panel
Back panel
Disc tray
IR Sensor
T
urns the power on (indicator glows green) or restores
the unit to the standby mode (indicator is off).
Playback/pause (touch button for BDX5500KU)
Opens or closes the disc tray (touch button for BDX5500KU)
NOTE
For BDX5500KU, the sensor fi eld is within the rectangular area and the
indicators are located in the
fi eld.
These indicators will go off briefl y after power on. To turn on the indicators again, simply touch the sensor field
and the indicators will light up.
1 4
5
2 3
1
DC IN 12V jack
Connects to AC adapter output.
2
USB jack
Connects a USB flash drive for external storage for BD-Live
TM
content,
or for media playback.
3
LAN jack
Connects to home network for Internet and network access.
4
HDMI OUT jack
Outputs video/audio signals to a connected TV, monitor or AV receiver/
amplifier. Connects to a TV, monitor or AV receiver/amplifier equipped
with HDMI
TM
input.
5
COAXIAL DIGITAL jack
Outputs digital audio signals when connecting the coaxial digital cable.
All other cables and 3D glasses are sold separately. If any items
are missing or damaged, notify your dealer immediately.
BDX5500KUBDX3500KU
BDX3500KU
BDX5500KU
(to DC IN 12V jack)
Key Features
This player is a Wi-Fi CERTIFIED Miracast
TM
Wi-Fi Alliance
®
device; connection and/or compatibility issues with other Wi-Fi CERTIFIED Miracast
TM
devices are possible.
Issues include, but not limited to:
• non-transfer of certain kind of data through the mirroring function of this player.
• connection errors due to functions of sending device.
• video and/or picture contents displayed on sending device may not be displayed as is through the player.
Models
Key features
BDX3500KU
BDX5500KU
Blu-ray
TM
, BD-Live , Blu-ray 3D
TM
TM
, Wi-F
i
®
, Wi-Fi Direct
TM
, Miracast
TM
, USB Video, ePortal, Internet , MediaShare, UDE
TM
4K Upscaling, Technicolor 4K Certified, and key media apps.
Blu-ray
TM
, BD-Live
TM
, Wi-Fi
®
, Wi-Fi Direct
TM
, Miracast
TM
, USB Video, ePortal, Internet, MediaShare, and key media apps.
Please Do The Following Before Returning
This Product To The Store.
If you are experiencing a technical problem or have questions regarding operation, authorized service centers,
warranty or parts, please contact our Customer Support Center at:
(888) 592-0944 (From inside the United States)
(949) 583-3305 (From outside the United States)
Many questions regarding parts, service, and warranties can be answered by visiting the Customer Support Section
of our website:
support.toshiba.com
THANK YOU
,
Sensor field area
CAUTION
AC adapter operates on AC 100-120V. Using an adapter other than the
one supplied with the unit may damage the unit.
Assembling the Desktop stand for BDX5500KU (Optional)
1
32
Gently tighten the screws with the screwdriver (not supplied). In order to use
the cover of the Desktop stand slot for the future, please attach it to the
bottom of the Desktop stand. Refer to the following figure for details.
Insert the two screws that are included with the player
through the holes of the Desktop stand. Align the screw
holes on the player with the screws.
The Desktop stand comes with the Symbio
TM
Streaming Media and Universal Disc Player
; you may assemble the Desktop stand before all connections.
Use a screwdriver (not supplied)
to unscrew the screws on the
rear panel.
Standard Limited Warranty
NOTE The images in this document are sample illustrations and are subject to change without notice.
sensor