This document is the Owner's Manual for TOSHIBA Air Conditioners (Split Type) with wireless remote controller kits. It covers the RBC-AX32U(W)-E and RBC-AX32U(WS)-E models, which use the WH-L11SE wireless remote controller and SX-W1NE or SX-W2NE signal receiving units, respectively.
Function Description
The TOSHIBA wireless remote controller allows users to operate their split-type air conditioner units with ease. It provides control over various operational modes, temperature settings, fan speeds, and timer functions, enhancing comfort and energy efficiency.
Key Functions:
- Start/Stop Operation: The main START/STOP button initiates or terminates air conditioner operation. A receiving beep confirms the command. If no beep is heard, the button should be pressed twice.
- Mode Selection: The MODE button cycles through different operation modes: Auto changeover, Cool, Dry, Heat, and Fan only. Each selection is confirmed by a receiving beep.
- Temperature Adjustment: The Temperature buttons (▲/▼) allow users to increase or decrease the desired room temperature within a range of 17 °C to 30 °C. In Fan only mode, temperature display is not indicated.
- Fan Speed Control: The FAN button cycles through five fan speed settings: LOW, LOW+, MED, MED+, and HIGH. In AUTO mode, the fan speed adjusts automatically based on room temperature. For Dry operation, the fan speed is fixed to AUTO and cannot be changed manually.
- Auto Louver (SWING): The SWING button activates the automatic louver swing, moving the horizontal louver up and down to distribute air evenly. Pressing it again stops the swing at the desired position.
- Set Louver (FIX): The FIX button allows for manual adjustment of the airflow direction. It cannot be operated by holding down the button; instead, it requires intermittent presses.
- Timer Operations:
- ON Timer: Sets a specific time for the air conditioner to start operation.
- OFF Timer: Sets a specific time for the air conditioner to stop operation.
- Combined Timer (OFF -> ON): Allows setting both an OFF timer (to stop the unit) and an ON timer (to start it again), useful for overnight or daily routines.
- Every Day Combined Timer: Activates both ON and OFF timers simultaneously on a daily basis.
- High Power Operation (Hi-POWER): This mode quickly cools or warms the room by automatically controlling room temperature, airflow, and operation mode. It is activated by the Hi-POWER button and indicated by the "Hi POWER" mark on the remote controller. It cannot be used in DRY or FAN ONLY modes, or when the ON TIMER is reserved.
- Quiet Operation (QUIET): This mode provides a quieter operating status by automatically setting the fan speed to the lowest setting. It is activated by the QUIET button and indicated by the "Q" mark. It cannot be activated in DRY operation.
- Preset Operation: The PRESET button allows users to memorize a preferred operation mode (excluding airflow direction) and recall it later. Holding the button for 3 seconds saves the setting, indicated by the "P" mark. Subsequent presses activate the memorized mode.
- Comfort Sleep Operation (COMFORT SLEEP): This is an OFF timer operation that automatically adjusts room temperature and fan speed for comfortable sleep. Users can select durations of 1, 3, 5, or 9 hours. This mode is not available in DRY or FAN ONLY operation.
- Clock Adjustment: The remote controller includes a clock that needs to be set. The CLOCK button (accessed with a pencil tip) allows setting the current time using the TIMER ▲/▼ buttons, followed by the SET button to confirm.
- Wireless Remote Controller A-B Selection: This feature allows two wireless remote controllers to operate their respective air conditioners independently when units are closely installed. The default setting is "A". To set a controller to "B", start the air conditioner, point the controller at the indoor unit, push and hold the CHK button until "00" is displayed, then push the MODE button while still holding CHK. "B" will be displayed, "00" will disappear, and the air conditioner will turn OFF, memorizing the "B" setting.
Usage Features
Remote Controller Handling:
- Signal Transmission: The remote controller transmits signals to the indoor unit via an infrared signal emitter. A transmission mark ( ) indicates when signals are being sent.
- Signal Reception: The signal receiving unit, attached to the indoor unit, receives commands. A "Pi" sound confirms successful signal reception. The standard reception distance is approximately 8 meters vertically, but this can vary with battery capacity and other factors.
- Placement: The remote controller should be placed where its signals can reach the indoor unit without obstruction. Avoid direct sunlight, heat sources, or areas near fluorescent lamps with rapid start or inverter systems, as these can interfere with signal reception.
- Physical Care: Do not drop, apply strong shock, or spill liquids on the remote controller to prevent damage.
Operation Modes Specifics:
- Automatic Operation (Auto Changeover): In "A" mode, the air conditioner automatically selects the operating mode (Cool, Heat, Dry, Fan only) based on room temperature. The OPERATION lamp (green) on the signal receiving unit lights up, and operation starts after approximately 3 minutes. This mode is not available for all SMMS series units or Cooling-only models, which may result in blinking lamps and alarm sounds.
- Louver Direction: The louver automatically closes when the air conditioner is not operating. During heating preparation, the louver directs airflow upward and then begins swinging. The louver angle does not change immediately after pressing FIX; allow some time for adjustment. For heating, direct the louver downward to ensure hot air reaches the floor. For cooling/dry modes, direct it upward to prevent condensation and dripping.
Signal Receiving Unit:
- The signal receiving unit has a temporary operation button, a signal receiving part, and display lamps.
- Display Lamps:
- Green lamp (on): Unit is operating.
- Green lamp (blinking): Timer is reserved.
- Orange lamp (on): Indicates heating operation, temperature controller activation, or defrost operation.
- Orange lamp (flashing): Indicates a trouble or error.
- Temporary Operation: In cases where the remote controller is lost, damaged, or its batteries are depleted, the air conditioner can be operated using the temporary operation button on the signal receiving unit. Pressing it starts operation in the last selected mode. Pressing it again stops the unit. To change the mode, turn the power off and on, then press the temporary operation button again.
Maintenance Features
Battery Management:
- Battery Replacement: The remote controller uses two R03 (AAA) batteries. Replace them when the indoor unit does not beep upon command or when the air conditioner fails to respond to the remote controller.
- Battery Life: Under normal use, batteries last approximately one year.
- Storage: If the remote controller will not be used for more than one month, remove the batteries to prevent leakage and potential malfunctions.
Troubleshooting (Before Asking for Repair):
The manual provides a detailed troubleshooting guide for common issues:
- Operation does not start:
- Check if the power switch is ON.
- Ensure the air conditioner is not in ON timer operation (cancel if it is).
- Replace remote controller batteries.
- Verify that the LEDs on the signal receiving unit are in a normal state and the operation mode is correct.
- Display lamp disagreement: If the display lamp shows "Disagreement of (cool) and (heat)" or "A (Automatic operation)", change the operation mode.
- Limited functions: If dual swing, cycle swing, individual louver position, or power-saving cannot be set, it indicates that the remote controller type does not support these functions.
- LEDs flashing on signal receiving unit: Different flashing patterns indicate specific errors:
- Communication error between signal receiving unit and indoor unit, or address setup error (if wired remote controller is used).
- Communication error between indoor unit and outdoor unit.
- Activation of the protective device in the indoor unit.
- Activation of the protective device in the outdoor unit.
- Temperature sensor error.
- Compressor protection.
- Air conditioner performing a test run.
General Advice:
- If any problems persist after checking the troubleshooting guide, stop operation, turn off the power, and contact the dealer. Provide the air conditioner model name, wireless remote controller kit model name, wireless remote controller model name, signal receiving unit model name, and details of the error (including LED flashing state).
- Do not attempt to repair the unit yourself, as it can be dangerous and may cause further damage.
- Ensure that installation and reinstallation are performed by qualified professionals to avoid electric shock, fire, or other troubles.
- The contents of this Owner's Manual should be clearly explained and handed over by the constructor or dealer to the user.

 Need help?
 General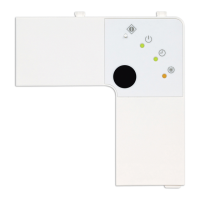

 To Next Page