- 2 -
AV1
(
TV
)
OUT
RF IN
(
FROM ANT
)
RF OUT
(
TO TV
)
AV 2
(
SET TOP BOX
)
I/O
DIGITAL AUDIO OUTPUT
BITSTREAM / PCM
OPTICAL
AC IN
COAXIAL
RL
VIDEO
S-VIDEO
RL
VIDEO
S-VIDEO
INPUT1
OUTPUT
1
3
4
2
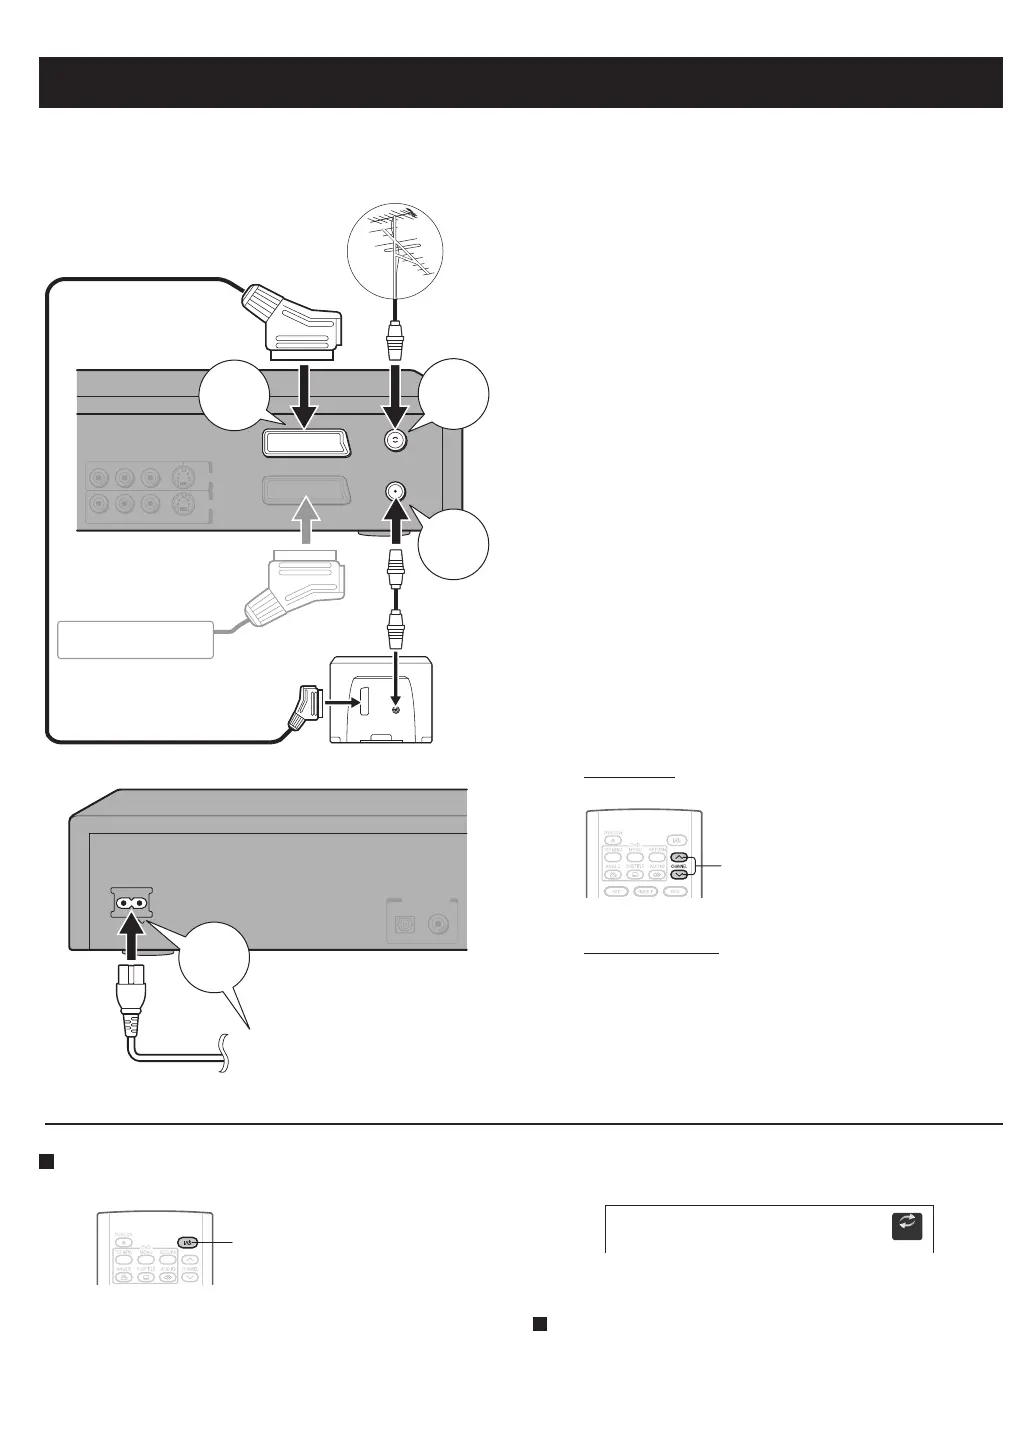
Make a connection first. - Plug & Auto Set Up function
If you make a simple connection and plug in, your recorder will automatically store TV stations in memory and
set its clock (Plug & Auto Set Up function), to be ready for recording and viewing of TV programmes. Follow the
procedure below.
1
Disconnect the aerial cable from your
TV, and connect it to the RF IN (FROM
ANT.) terminal on the recorder.
2
Using the RF coaxial cable (supplied),
connect the RF OUT (TO TV) terminal to
the TV.
3
Connect the AV1 (TV) socket to a TV
equipped with SCART input using the
SCART cable (supplied).
4
Connect the power cord of the recorder
to a wall outlet.
TV stations (in the range of UHF E21-E69) will be
stored in memory. The process will finish after a few
minutes. (The display on the recorder shows “Auto”
while the Plug & Auto Set Up function is running.)
Then the date and time are set automatically from
broadcast signal.
5
Check the following.
TV stations
Press CHANNEL.
To add or change TV stations, go to the next page.
Recorder’s clock
If it is not correct, go to the next page.
If these are OK, your recorder is ready!
Open guide to page 4 to for Recording
Instructions.
TV
To aerial input
To SCART input
If you use a satellite receiver,
connect it to AV2 (SET TOP
BOX) I/O socket.
To wall outlet
VHF/UHF aerial
Turning the power on
Press ON/STANDBY.
When the power is turned on, the ON/STANDBY indicator
changes from red (standby mode) to green (operation).
After a few seconds, a start-up screen appears.
Satellite receiver
The following icon appears at the top right corner of the
screen.
When this icon disappears, the recorder is ready to operate.
Turning the power off
Press ON/STANDBY.
ON/STANDBY
 Loading...