Do you have a question about the Toshiba SR-V10 and is the answer not in the manual?
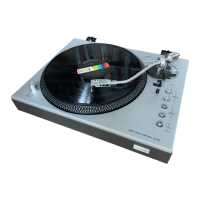
The Toshiba SR-V10 is a stereo turntable designed for automatic and manual playback of records, featuring an electronically controlled system with a unique open/close loading mechanism and synchronized recording capabilities. This turntable offers a comprehensive set of functions for both casual listening and more advanced audio setups.
The SR-V10 operates as a fully automatic turntable, meaning it can handle most playback operations with minimal user intervention. When the POWER button is pressed, the unit powers on, and the POWER indicator illuminates. The turntable features an open/close loading mechanism, which is activated by pressing the OPEN/CLOSE button. This mechanism brings the turntable unit forward, and the front cover automatically opens and closes in sync with its movement, ensuring smooth and protected operation. Users should avoid manually forcing the front cover or turntable unit.
Once the turntable unit is in the opened state, the stylus cover should be gently removed. Records are placed on the platter sheet, and the appropriate record size and speed are selected using the SIZE and SPEED buttons. For automatic playback in the opened state, the START/STOP button is pressed. If playing in the closed state, the START/STOP button is pressed after activating the OPEN/CLOSE button and inserting the turntable unit. Upon activation, the platter begins to turn, and the tonearm automatically moves to the start position for the first track, initiating playback (automatic lead-in operation). After the record finishes playing, the tonearm automatically returns to the arm rest, and the platter stops turning (automatic return operation). If the START/STOP button is pressed during playback, the record will be interrupted, the tonearm will return to the arm rest, and the platter will stop (automatic stop operation).
Manual operation is also supported, allowing users more control over tonearm positioning. After powering on and preparing the turntable as for automatic play, the tonearm can be moved left or right by pressing the FORWARD or REVERSE buttons, respectively, to position it over the desired track. Once positioned, pressing the CUEING button will automatically lower the tonearm onto the record surface, beginning playback. Similar to automatic operation, the tonearm will return to the arm rest, and the platter will stop after the record has finished.
A key feature of the SR-V10 is its one-touch operation and synchronized recording function, particularly when used with the Toshiba SK-V10 stereo cassette receiver system. When a record is set and the START/STOP button on the SR-V10 is pressed, the receiver unit (SA-V10) automatically switches to PHONO mode, enabling immediate playback. If the cassette deck unit (PC-V10) is in synchronized recording mode, pressing the START/STOP button on the SR-V10 will not only start record playback but also automatically initiate recording on the PC-V10. If the tonearm is lifted from the record surface using the CUEING, FORWARD, or REVERSE buttons, the PC-V10 will enter a pause state. Resuming playback by pressing the CUEING button will also restart recording on the PC-V10. If playback is halted by pressing the START/STOP button, the PC-V10 will enter a pause state.
The SR-V10 emphasizes user convenience with its fully automatic and one-touch functions. The open/close loading mechanism simplifies record handling, protecting both the record and the turntable components. The ability to switch between automatic and manual modes provides flexibility for different listening preferences.
However, certain precautions are necessary for optimal use. Automatic playback of 25cm records is not possible; for these, the SPEED button should be adjusted, the SIZE button set to "30", and manual operation performed. Users should avoid touching the rotating platter or the tonearm during operation to prevent malfunctions or damage. If the OPEN/CLOSE button is pressed while a record is playing in the opened state, the tonearm will rise to protect the stylus tip, and playback will temporarily cease. After the turntable unit moves, the tonearm will lower, and playback will resume from approximately the same position. If the same action is performed in the closed state, the turntable unit will come forward with the tonearm risen. For subsequent plays, the tonearm should be lowered by pressing the CUEING button.
If the FORWARD or REVERSE buttons are pressed during automatic lead-in or return, the tonearm will continue its current operation. If pressed during playback, the tonearm will rise automatically from the record surface. Turning the POWER button off and on again in the opened state will cause the tonearm to return to the arm rest, and the turntable unit will move inwards to the closed state.
In manual operation, if the FORWARD button is continuously pressed until the tonearm reaches the inner circumference, it will stop in the risen state. Pressing the CUEING button thereafter will cause the tonearm to return to the arm rest. If the FORWARD button is pressed when the tonearm is on the arm rest, the tonearm will rise, and the platter will turn; this condition should be released by pressing the CUEING button.
For temporarily stopping playback, the CUEING button can be pressed to lift the tonearm from the record surface. Playback can be resumed by pressing the CUEING button again, which will lower the tonearm onto the record surface at approximately the same position. If the tonearm remains in the risen state for three minutes or more, it will automatically return to the arm rest, and the platter will stop. It is important not to turn off the POWER button with the tonearm risen via the CUEING button.
The SR-V10 is designed with ease of assembly and maintenance in mind. For initial setup, the turntable components are packaged separately to prevent damage during transportation. Users are instructed to unpack and assemble the turntable according to a specific procedure, ensuring the platter, belt, and platter sheet are correctly installed. Four red screws and spacers, used for protection during transportation, must be removed from the bottom of the main turntable unit before operation.
The drive-belt installation involves pulling the belt through a hole in the platter surface and fitting it over the pulley, ensuring it is not twisted. The platter should then be rotated slowly clockwise a few times by hand to ensure proper seating.
For installation, the turntable should be placed on a firm, level surface, away from external vibrations, direct sunlight, heaters, dust, and high humidity. While the unit can be mounted with other system components, care must be taken to avoid gravitational imbalance, especially with heavy items (over 15 kg), as this could impair the loading mechanism's functioning.
Disassembly instructions are provided for top cover removal, mechanism and PC board removal, and PC board check, facilitating servicing and repairs. These steps involve removing specific screws to access internal components. For example, removing two screws from the sides and four from the back plate allows the top cover to be detached. Further screws on the bottom plate enable removal of the mechanism and PC board.
Adjustments such as stylus height, tracking, turntable rotation, auto-in position, and auto-return position can be performed. Stylus height adjustment involves removing the turntable, top cover, and arm cover, then positioning the arm and adjusting screws to achieve the correct height. Tracking adjustment similarly requires accessing the arm and adjusting a cam. Turntable rotation speed (33 rpm and 45 rpm) can be adjusted using a test record to ensure accurate output frequency. Auto-in and auto-return position adjustments involve removing the top cover and adjusting a cam to ensure the stylus falls within the specified range for different record sizes. These adjustments are crucial for maintaining optimal playback performance.
| Motor | DC servo motor |
|---|---|
| Overhang | 15mm |
| Type | Belt-drive |
| Speeds | 33 and 45rpm |
| Platter | Aluminum die-cast |
| Cartridge | Moving magnet type |
| Output | 2.5 mV |
| Frequency Response | 20Hz to 20kHz |