EasyManua.ls Logo

Toto CONCEALED TANK - User Manual

Toto CONCEALED TANK
8 pages
Print Icon
To Next Page IconTo Next Page
Loading...
563303 13-1.0
ৡ⿄
NO.
⫼䗨᭄䞣
㝼㚔㶎󰶈㒘 ᴎᶊ೎ᅮ⫼
೎ᅮᥦ∵ᔃㅵ⫼
఼֓ᥦ∵ㅵ䘧
఼֓կ∈ㅵ䘧
೎ᅮ఼֓⫼
ֱᡸ䭓㶎ᴚ⫼
೎ᅮ఼֓⫼
ⷠ๭ᯊЎކࠋⳈㅵᥦ∈Ⳉㅵ乘⬭ぎ䯈⫼
䖯∈䯔ᓔ݇
⫼Ѣ఼֓ⱘ䖲᥹ঞϢ๭䴶䎱⾏ⱘ㸹ٓ
ㅵ།
ᥦ∵Ⳉㅵ
ކࠋᔃㅵ
ᥦ∵Ⳉㅵӊ
ކࠋⳈㅵӊ
䭓㶎ᴚ
䗣ᯢᴚ༫
೎ᅮ఼֓䳊ӊ㒘
ฉ༈
㾦䯔
14
1
1
2
2
2
1
1
1
1
1
1
1
2
3
4
5
6
7.1
7.2
8.1
8.2
8.3
9
10
Expansion bolt components
Clamp
Drainage pipe
Flush pipe
Drainage straight pipe components
Flush straight pipe components
Long bolt
Transparent long bolt shield
Long bolt components
Plug
To fix frame
To fix drainage pipe
To drain
To supply water to flush
To connect the bended pipes to toilet bowl
To fix toilet bowl
To shield long bolt
To fix toilet bowl
To reserve space for straight pipes when laying bricks
NAME
QTY
FUNCTION
On-off For Filling Water
Angle valve
THE INSTALLING INSTRUCTION FOR CONCEALED TANK
䞡㽕ᦤ⼎˖
ᅝ㺙ࠡ䇋Ҩ㒚䯙䇏䇈ᯢкˈᴀ݀ৌϡᡓᢙ಴ᅝ㺙Ҏ᳾ᣝ䇈
ᯢк㽕∖ᮑᎹ᠔䗴៤ⱘᤳ༅ѻકЁࣙ৿⍺⒥ࠖˈᅝ㺙偀Ṋ
ᯊ䗝⫼
೼ᬃᶊᅝ㺙ࠡˈᑨܜ⹂䅸ᅝ㺙ԡ㕂ˈᑊḍ᥂ᅸݙ㺙ׂⱘᘏԧ
ㄪߦ⹂ᅮ㺙ׂᅠ៤ৢⱘഄാ䴶))/೼ᅝ㺙๭Ϟߦߎ))/㒓ˈ
ᑊྟ㒜ҹℸ԰Ў催ᑺⱘ෎ޚ㒓
⊼˖䇋೼䌈⫋ⷪࠡᅝ㺙ᴀѻક˗
᠔᳝ⱘሎᇌԡЎ↿㉇
FFL ᅠ៤䴶ഄാ


೒⼎䳊ӊ㢹Ϣᅲ⠽ϡヺˈ䇋Ϣᅲ⠽Ўޚ
Note:
1.Please install the frame before paving the tiles. The dimensional unit
is millimeter.
2.Please subject to the object as right if it is not in conformity with the
components in picture.
))/ FFL of finish face, all dimension is millimeter


Important remind:
Please read through this Instructions carefully prior to installation,
and our company shall not be responsible for any loss caused by
not installating accrding with this Instructions. There are lubricants
in production for toilet bowl installation.
Please confirm the FFL according to the overall indoor fitment
method. Line out the FFL on the wall and always regard FFL as
datum line of 0 height.
䜡ӊϔ㾜㸼
Accessories List:



1.
2.
3.
೼ᅝ㺙ᬃᶊࠡˈ䇋⹂䅸᠔ᅝ㺙๭ຕᰃᡓ䞡๭ˈ๭ຕ
ᑺ೼80mmҹϞˈϨᔧ300kgfҹϞⱘ࡯ᮑࡴѢᅠᎹৢⱘ
偀Ṋࠡッᯊˈ๭ຕᑨ㛑ᡓফ䖭㙵ᢝ࡯DŽ
Please confirm the wall is the main wall ,the thickness exceed
80mm and it can bear more than 300kgf strength when the
strength act on the front of toilet bowl.

8
9

7

8.2
8.3
300kgf
FFL
0
ᅝ㺙๭
main wall
䰆ℶ㺙ׂᯊᴖ⠽䖯ܹ∈ㆅ
ⷠ๭ᯊЎᣝ䪂䴶ᵓ乘⬭ぎ䯈⫼
ֱᡸⲪ
ֱᡸḚ
Protection frame
For space reservation of push button plate when building the wall
To prevent sundries falling into the tank when fitment
Protection cover
Straight flush pipe of some products are
offered with two kinds of seal gaskets A.B
which can be selected according to toilet
bowl type during installation.
೼ᶤѯൟোѻકކࠋⳈㅵᆚᇕ༫ᦤկϸ
⾡㾘ḐA.Bˈᅝ㺙ᯊḍ᥂఼֓ൟো䗝䜡DŽ
B
A
7.2
7.1
8.1
5
4
Question and Answer IconNeed help?

Do you have a question about the Toto CONCEALED TANK and is the answer not in the manual?

Overview

This document provides a comprehensive guide for the installation and maintenance of a concealed toilet tank system. It includes detailed instructions, technical specifications, and illustrations to ensure proper setup and long-term functionality.

Function Description

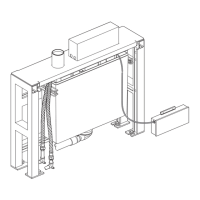
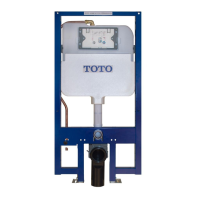
The device is a concealed toilet tank system designed to be integrated into a wall, offering a sleek and space-saving solution for modern bathrooms. Its primary function is to store and deliver water for flushing a toilet bowl. The system includes components for water inlet, drainage, and structural support, ensuring a robust and reliable operation.

Important Technical Specifications

Dimensions and Supply Pipe-laying:

  • Top Inlet:
    • Water inlet pipe diameter: G1/2"
    • Overall height from FFL (Finished Floor Level) to top of tank: 1165 mm
    • Distance from FFL to center of water inlet: 1000 mm
    • Adjustable height range for toilet bowl connection: 0-200 mm from FFL
    • Width of the tank: 500 mm
    • Depth of the tank: 180-230 mm (adjustable)
  • Back Inlet:
    • Water inlet pipe diameter: G1/2"
    • Overall height from FFL to top of tank: 1170 mm
    • Distance from FFL to center of water inlet: 1048.5 mm
    • Adjustable height range for toilet bowl connection: 0-200 mm from FFL
    • Width of the tank: 360 mm
    • Depth of the tank: 180-230 mm (adjustable)

Drainage Pipe Installation:

  • Maximum length of drainage pipe "W" can be cut according to actual need.
  • Recommended positions for drainage pipe clamp:
    • Position 1: W=275 mm
    • Position 2: W=295 mm

Drill on the Main Wall and Floor:

  • Drill diameter for wall mounting: Ø10X50 mm
  • Drill diameter for floor mounting: Ø10X50 mm
  • Recommended height for "a" (drainage pipe position) can be adjusted according to the real location of the drainage pipe.

Expansion Bolts:

  • Drill hole: Ø10X50 mm
  • Insert expansion bolt.
  • Tighten nut to strain bolt.
  • Unscrew nut.
  • Hold screw and washer for later use.

Thickness of Fixed Wall:

  • Measured from the front of the frame to the finished tile surface: 20-60 mm.

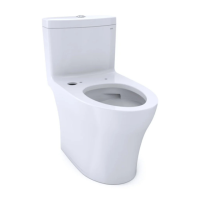
Toilet Bowl Installation:
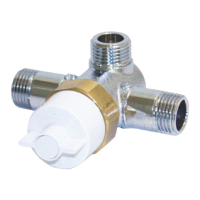
  • Flush Pipe Seal Gasket:
    • Seal Gasket A: For standard flush pipes.
    • Seal Gasket B: For specific flush pipes, requiring installation into the bowl first, then inserting the flush pipe.
  • Drainage Pipe Connection:
    • L1 is the distance of two marks on the Flush Straight Pipe.
    • L2 is that of two marks on the Drainage Straight Pipe.
    • Adjusting length for bolt is d+25 mm.

Tank Fittings:

  • The tank fittings have been installed before leaving the factory. The above sketches are only for reference.

Usage Features

Concealed Design: The primary feature is its ability to be hidden within the wall, providing a clean and minimalist aesthetic in the bathroom. Adjustable Height: The system allows for adjustment of the toilet bowl height relative to the finished floor level (FFL), accommodating different user preferences and accessibility requirements. Flexible Installation: The design supports both top and back water inlet configurations, offering versatility to suit various plumbing layouts. Robust Support: The frame is designed to provide strong support for the toilet bowl, ensuring stability and safety. It is recommended to use expansion bolts for secure wall and floor mounting. Easy Maintenance Access: While concealed, the system is designed with access points for maintenance and repairs of internal components, such as the flush valve and inlet valve.

Maintenance Features

Pre-installation Testing:

  • Before sealing the concealed tank, it is crucial to perform a water leak test for at least 12 hours to ensure all connections are watertight. This prevents costly repairs after the wall is finished.

Component Replacement:

  • The manual provides diagrams for various components, including the flush pipe seal gaskets (A and B), which can be replaced as needed.
  • The tank fittings, including the inlet valve and flush valve, are designed for serviceability. The diagrams illustrate how these components are assembled, facilitating replacement if necessary.

Adjustments:

  • Drainage Pipe: The drainage pipe length ("W") can be cut to fit the specific installation requirements.
  • Support Bracket: The support bracket can be adjusted horizontally and vertically to ensure the toilet bowl is level and securely mounted.
  • Angle Valve: The angle valve for water supply can be installed and connected to the flexible hose leading to the inlet valve.
  • Flush Pipe: The flush pipe can be adjusted in length by cutting its ends to ensure a proper fit with the toilet bowl.

Cleaning:

  • Regular cleaning of the visible toilet bowl and surrounding areas is recommended. For internal components, periodic inspection during maintenance checks can help identify any buildup or wear.

Important Reminders:

  • Always follow the instructions carefully to prevent damage or improper installation.
  • Ensure all connections are tight and leak-free.
  • For fixing the long screw, there are two groups of screw holes on the bracket, choose the right position according to the size of the toilet bowl.
  • If necessary, adjust the clamp and drainage pipe location according to the toilet bowl. Keep the clamp tightened to professionals.
  • When connecting the drainage pipe, apply silicone oil and smear it on connecting edges of straight pipe and bends to ensure a smooth and sealed connection.
  • All data contained is based upon the latest product information available at the time of publication. The manufacturer reserves the right to make changes to product characteristics, packaging, and availability at any time without further notice.

Toto CONCEALED TANK Specifications

General IconGeneral
BrandToto
ModelCONCEALED TANK
CategoryPlumbing Product
LanguageEnglish

Related product manuals