TUNING SUSPENSION
If you tune the suspension, make sure that you adjust it softly enough. Since
the bicycle is still affected by pedaling, the suspension at the bicycle is always
adjusted relatively hard. Those influences are not existing for the singletrailer,
and accordingly the suspension can be adjusted more softly (your child will
thank you for that!). If you test the suspension, remember to produce light
pressure from above with both hands on the singletrailer, which corresponds
to the weight of your child (comparable, if you would press with 150-200kg on
your bicycle). With this pressure the suspension should work already really
soft. Loaded with your child alone the suspension should use about 30-35% of
travel.
WARNING: [singletrailer] Do not press on the suspension, if the stand
is downward folded, otherwise it will be loaded with force, it is not de-
signed for and warranty will be lost.
In the air chamber a different air pressure must be adjusted depending upon
the child’s weight. This can be only 1.8bar for infants, and go up until 5.5bar.
The damping (red adjusting screw) should always be adjusted as weakly as
possible, so that the shock releases quickly but without striking through when
releasing. If you adjust the suspension travel (road or off-road position) note
that shock air pressure and damping also possibly must be adapted.
Please also read the separate manual for the shock.
Approximate values for the air pressure in the shock (off-
road position singletrailer & streamliner):
load air pressure
bis 10kg......... 1.8–2.5 bar
10 - 15kg........ 2.5–3.2 bar
15 - 20kg....... 3.2–4.0 bar
20 - 25kg....... 4.0–5.0 bar
25 - 30 kg....... 5.0–5.5 bar [streamliner only]
30 - 35 kg....... 5.5–6.0 bar [streamliner only]
The indicated pressures are approximate values and can vary depending upon
use.
[singletrailer] The road position requires slightly lower air pressure.
MAINTENANCE [singletrailer & streamliner]
Examine the wearing parts in regular intervals and/or let your dealer accom-
plish maintenance work if necessary. Regular maintenance rates can difficulty
be indicated, as the wear strongly depends upon frequency of use and terrain.
Parts, which should be examined before each trip for wear and function:
•
tread
•
air pressure of the wheel (min 2bar)
•
spoke tension and rotation of the wheel
•
function of the shock
•
correct & secure fit of the wheel;
•
[streamliner] gear shift and breaks as well as function of the shock
•
[singletrailer] make sure the play of the axle and the wheel is adjusted
correctly with the screw nut on the axle.
WARNING: It is important that the wheel engages completely and you
cannot pull it out! You recognize this by the fact that the pin
completely disappears in the axle center!
!
!
8
The streamliner+ is NOT shipped completely. The following assemby steps need
to be carried out before first use:
1. Connecting the front end to the rear end
2. Cutting the steerer (optional)
3. Attaching the handlebar
4. Attaching the adjusting the front brake
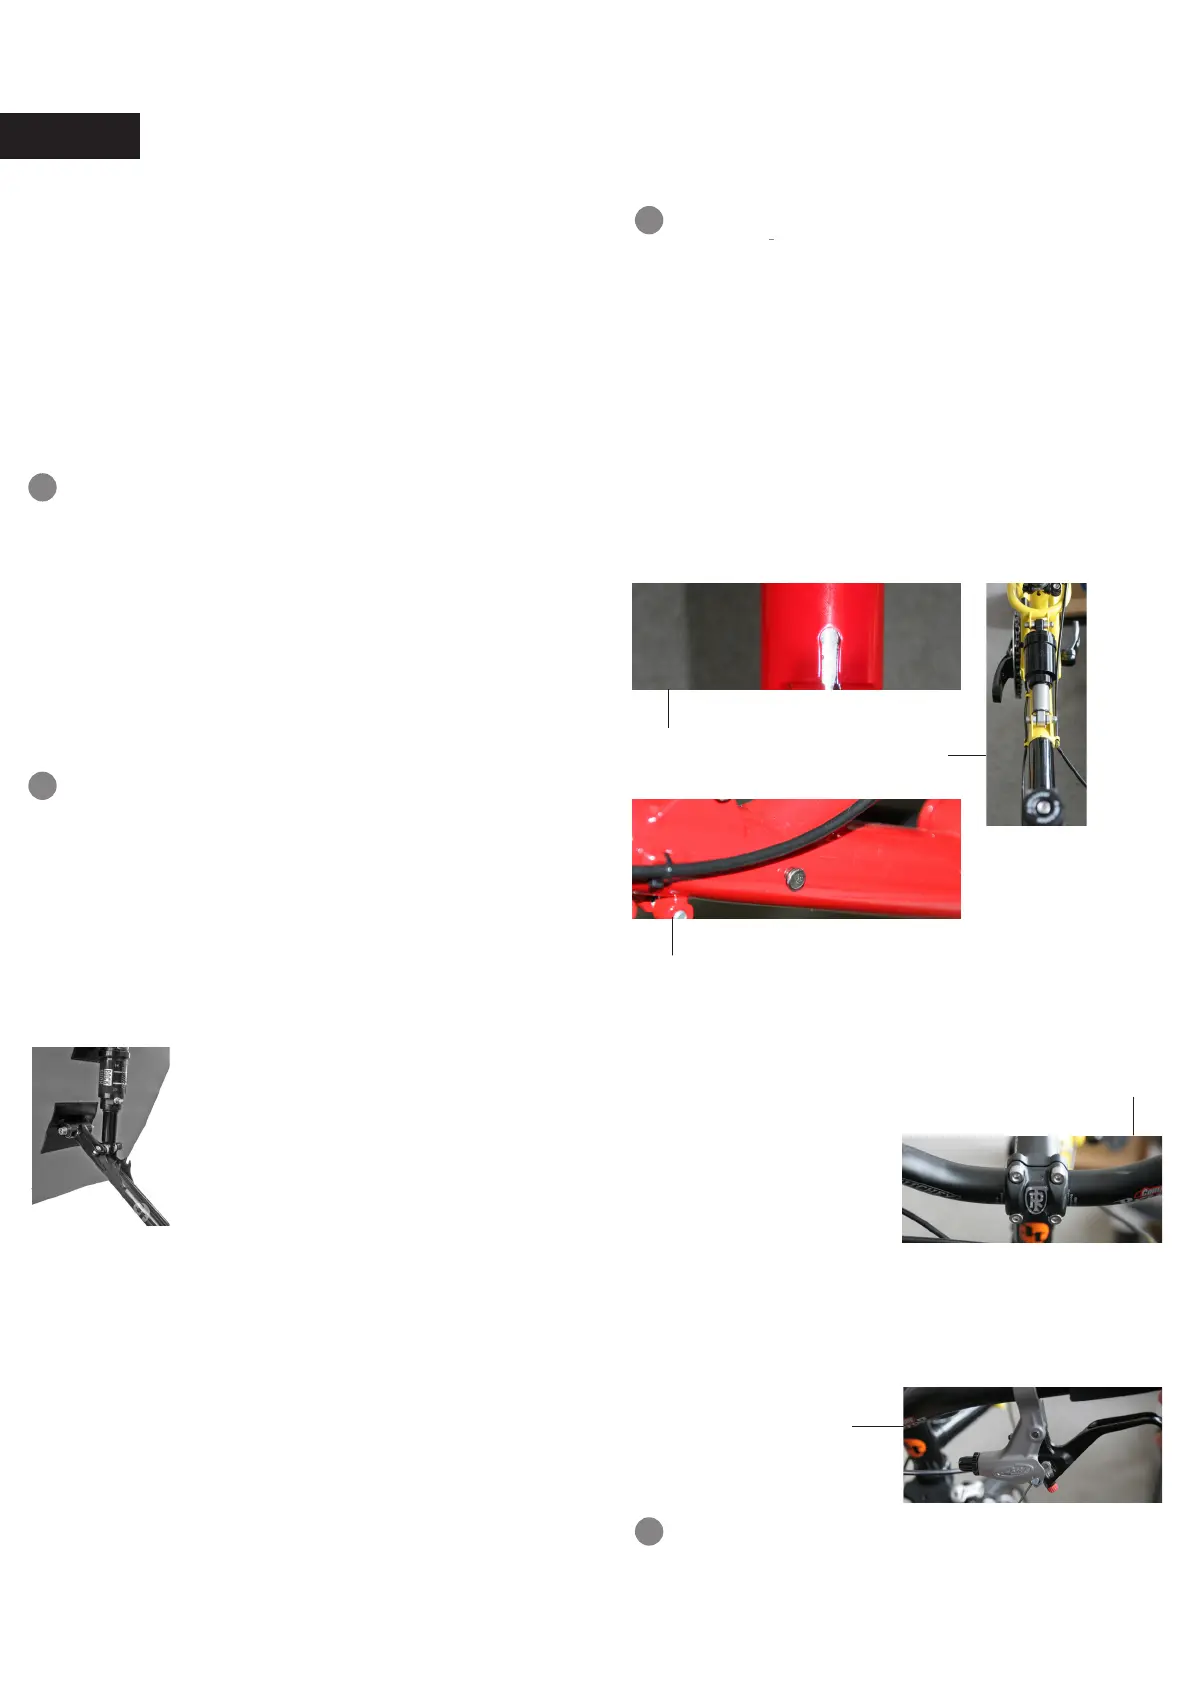
Ref 1. Connecting the front end to the rear end
•
Slide the front end into the down tube of the main frame. Make sure it
completely overlaps (see picture 1) and the safety pin is inserted (see pic 1a)
into front AND rear frame.
•
Bring the front and rear end in-line and make sure they are not twisted
against each other (see picture 2).
•
After the alignment tighten the bolts with a torque of 9Nm!
Ref 2. Cutting the steerer
•
Cut the steerer to the desired length. Please keep in mind, that you might
want to reposition the stem in the future - so don‘t cut too short!
•
Install the star nut.
•
Adjust the headset.
Ref 3. Attaching the handlebar
Ref 4. Attaching the adjusting the front brake
•
Attach the brake lever on the side where it is missing (after removing grip
and shifter)
•
Install the brake cable and adjust the brake pads. You might want to switch
the cable so that right lever is rear and the left front (picture 4).
•
Reinstall the grips.
•
Install the shift- und brake cables in the braze-ons on the frame
!
WARNING The streamliner+ should only be assembled by a professional
bike mechanic. Check the bolts between front & rear end before every
ride.
pic 2
pic 1
ASSEMBLY INSTRUCTION FOR THE STREAMLINER+
!
WARNING It is important that you practice with your child the brake
behaviour, bevor you ride the first time. Please take extra care if you
switched the brake levers!
pic 4
•
Remove the handlebar from the
streamliner and attach it to the
streamliner+ (see picture 3).
pic 3
ENGLISH
Bild 1a
 Loading...