Do you have a question about the Tractus3D LARGE VOLUME Series and is the answer not in the manual?
Manual includes warnings and safety notices to help perform tasks or avoid problems and potential damage or injuries.
Covers electromagnetic compatibility (EMC) and electrical safety, including FCC rules and earthing requirements for safe operation.
Addresses compliance with Machine Directive 2006/42/EU and safety of moving parts, advising unplugging before maintenance.
Warns about burn risks from hot print head (up to 300°C) and bed (over 100°C), recommending cooling before maintenance.
Discusses material compatibility, recommends Tractus3D materials, and warns about VOCs from third-party materials causing health issues.
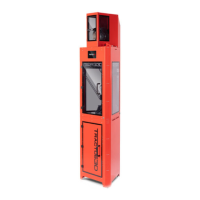
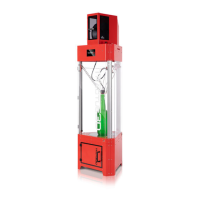
Lists and briefly describes the essential components of the Tractus3D printer, such as the print head, build plate, and touchscreen.
Details technical specifications for the T3500 model, including machine properties like printing technology, build dimensions, and speed.
Details machine properties for the T3500 model, including printing technology, build dimensions, speed, and resolution.
Provides physical dimensions, weight, shipping details, and build plate and print head specifications for the T3500 printer.
Details T3500 ambient conditions, supported materials, and software specifications.
Details machine properties for the T3000 model, including printing technology, build dimensions, speed, and resolution.
Provides physical dimensions, weight, shipping details, and build plate and print head specifications for the T3000 printer.
Details T3000 ambient conditions, supported materials, and software specifications.
Explains how to configure network settings, recommending static IP addresses or DHCP reservations for printer connectivity.
Detailed steps to set a static IP address for the printer using the web interface and system editor.
Instructions to revert to DHCP mode by changing the IP address back to 0.0.0.0.
Guides users through updating the printer's firmware via the web interface, covering the process and necessary steps.
Provides instructions for calibrating the print bed, including heating the bed and attaching the probe unit.
Detailed steps on how to attach the probe unit to the printhead, ensuring it is secured correctly.
Instructions for connecting the probe cable and initiating the Auto Delta Calibration for print bed levelling.
Detailed steps for installing the Simplify3D software on your computer, including language selection and accepting the license agreement.
Instructions on how to import the provided .FFF profile into Simplify3D for pre-configured printer settings.
Guide to creating a new process profile in Simplify3D by selecting the imported settings and naming the profile.
Instructions on how to import STL or OBJ files into Simplify3D for printing, located in the Models section.
Instructions on importing firmware configuration files into Simplify3D for optimal printer performance.
Explains how to use the web interface to control the 3D printer remotely, including machine control and temperature monitoring.
Details web interface controls for manual printhead movement (Home, X, Y, Z) and Auto Delta Calibration.
Information on using pre-defined shortcuts or creating custom macros (sequences of G-code commands) for frequent operations.
Explains how to use the extruder control panel for manual filament extrusion (Retract and Extrude) at specific temperatures.
Describes controls for managing print jobs: Pause, Cancel, Resume, Print Another, and Baby Stepping for first layer adjustment.
Allows overriding print file settings for Tool Fan, Fan 0, and Speed Factor via the web interface.
Enables control of the printer's extrusion multiplier directly from the web interface.
Instructions on how to start a print by selecting a G-Code file from the G-Code Files list on the web interface.
Details additional file management options like Simulate File, Download, Rename, and Delete from the web interface.
Discusses open material support, preferred Tractus3D filaments, and known experimental materials, advising caution and support desk consultation.
Provides recommended print settings (bed/nozzle temperature, speed, cooling) for supported materials like PLA, PETG, ABS, and Facilan C8.
Recommended print settings for PRO1 filament, including bed temperature, nozzle temperature, and print speed.
Offers advice for printing experimental materials, including nozzle changes, temperature adjustments, and starting slow.
Step-by-step instructions for loading filament into the 3D printer, including placement on the spool and feeding through the tubes.
Details on inserting filament into the extruder tube, squeezing the extruder, and initiating loading via LCD or web interface.
Instructions on heating the nozzle to the required temperature (e.g., 180 degrees Celsius) via the LCD screen or web interface.
Guide to manually extruding filament using the 'Extrude' button on the LCD or web interface, with recommended feed rates.
Procedure for unloading filament, involving heating the nozzle and using the 'Unload Filament' command or manual retraction.
Instructions on how to remove filament that has formed a blob in the extruder or Bowden tube, by removing the tube from the fitting.
Steps for cutting off a filament blob using a cutter and re-inserting the tube into the feeder after removal.
Guide to preparing the print bed by cleaning it with a spatula, warm water, and optionally Isopropanol, then applying adhesion products.
Instructions on safely removing a finished print from the build plate after it has cooled down, using a spatula.
Guidance on post-processing steps to remove support structures or brims from printed objects using tools like pliers or tweezers.
Provides a recommended maintenance schedule based on usage hours, detailing tasks for 'Every print again', 'Every month', 'Every 3 months', and 'Every 12 months'.
Step-by-step guide for changing the print head on the LARGE VOLUME series printer, including filament unloading and tube removal.
Procedures for cutting stuck filament and disconnecting the main cable from the print head during replacement.
Procedure for disconnecting the arms from the print head by unscrewing screws and removing the print head assembly.
Guide for installing a new print head, securing the main cable, re-inserting the Bowden tube, and restarting the printer.
Instructions for changing the glass bed plate, including removal, installation, and the necessity of recalibrating the machine afterwards.
Explains how to calibrate dimensional accuracy using a G-Code file and how material contraction affects accuracy.
Details on measuring printed objects and calculating scaling factors using the M579 command for improved dimensional accuracy.
Instructions on modifying the M579 line in the config.g file via the web interface to apply calculated scale factors.
Provides guidelines for properly storing filament to preserve its quality, recommending cool, dry conditions and resealable packaging.
Advice on keeping the 3D printer clean for best results, including cleaning the bed plate and the polycarbonate casing.
Instructions on checking the arms for friction caused by PTFE layer wear and lubricating them if necessary.
Procedure for cleaning the print head and nozzle, including heating, wiping with a heat-resistant cloth, and checking for obstructions.
Steps for cleaning the Bowden tubes to ensure smooth filament movement, involving removal, cleaning, and re-insertion.
Instructions on cleaning the Bowden tube by pushing a piece of sponge or tissue through it to remove particles.
Guide to cleaning the slide wheels and poles to prevent dust accumulation that can affect print results.
Procedure for checking and adjusting the concentric nut on the slide wheels to eliminate play and ensure smooth movement.
Instructions on checking belt tension and wear, ensuring equal tension across all three belts for accurate print head movement.
Guidance on verifying the print head fan operation after heating, checking for airflow obstructions or potential fan replacement.
Steps for cleaning or replacing the feeder/extruder motor, including unloading filament, powering off, and removing the unit.
Instructions on cleaning or replacing the extruder gear, securing it with a set screw, and reconnecting motor connectors.
Detailed procedures for unclogging a print head using either the 'Hot Pull' or 'Cold Pull' method, with step-by-step instructions.
Addresses common print quality problems such as poor bed adhesion, under-extrusion, and warping, providing solutions for each.
| Nozzle Temperature | Up to 300 °C |
|---|---|
| Heated Bed | Yes |
| Supported Materials | ABS, ASA, Carbon Fibre, PETG, PLA, Polycarbonate, Polypropylene, TPU |
| Connectivity | Wi-Fi, Ethernet, USB |
| Power Requirements | 220-240V |