Do you have a question about the TRAK RACER MS-CM-SML2 and is the answer not in the manual?
Explains icons for people, tightening, loosening, adjustment, safety, priority, and mirrored components.
Details the correct sequence for installing screws, lock washers, and washers.
Provides guidance on identifying and measuring flat, hex, and button head screws.
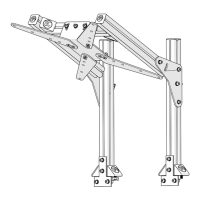
Connects base profiles using 600mm and 300mm lengths with T-nuts.
Attaches corner brackets to the main frame using screws and washers.
Installs corner brackets onto aluminum profiles.
Connects vertical 400mm profiles using T-nuts.
Secures corner brackets to vertical supports.
Joins aluminum profiles with corner brackets.
Mounts brackets to the main support structure.
Attaches logo plates and TV back panels.
Mounts logo plates to aluminum profiles.
Attaches monitor VESA mount plates.
Installs end caps on aluminum profiles.
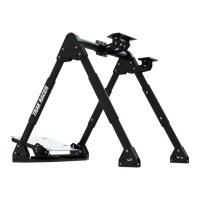
Mounts the assembled monitor stand onto a racing cockpit.
| Type | Monitor Stand |
|---|---|
| Compatibility | Single Monitor |
| Frame Material | Aluminum |
| Adjustable | Yes |
| VESA Compatibility | 75 x 75 mm, 100 x 100 mm |
| Material | Aluminum |
| Color | Black |
| Mounting Type | Desk Mount |