Do you have a question about the TRAK RACER TR80 and is the answer not in the manual?
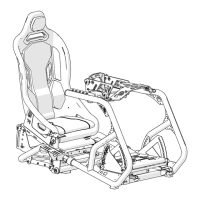
Lists included parts, noting exclusions and referencing other manuals for specific mounts.
Attaches feet to main beams and adds specific parts, excluding red striping for later application.
Adds specific parts to the frame, noting a crucial measurement for profile placement.
Adds two profiles on top of the existing square, using corner brackets for alignment.
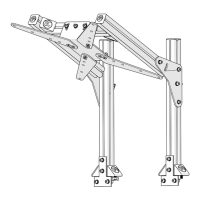
Installs seat sliders and brackets, with notes on height adjustment and lever operation.
Tests if the seat rails slide easily after the lever has been fitted.
Attaches the seat to the bracket and tests seating position adjustment with the lever.
Installs the wheel mount support, noting that seat-to-wheel distance is personal preference.
Lays down parts after tightening upright profiles for the standard TR80-80WM wheel mount.
Attaches the wheel mount to the frame, specifying the placement of T-nuts.
Attaches two metal plates using pre-installed nuts for structural support.
Attaches adjustment plates to the inside of the already installed plates on the profile.
Attaches the wheel mount plate to the adjustment brackets.
Installs the shifter profile, noting side preference and height adjustability.
Attaches the shiftermount to the L-shaped bracket and profile, allowing for preference adjustment.
Adds illustrated parts to the frame, noting that distance can be adjusted later.
Adds pictured parts to complete the bottom frame structure.
Adds the side structure of the pedal plate to each side of the rig.
Slides nuts into place to attach the middle profiles of the rig.
Adds the pedal plate and demonstrates its adjustability for user preference.
Applies red striping after adjusting components, requiring cutting for custom fits.
Installs end caps on the outer ends of profiles and brackets for a finished look.
Attaches both sliders to the frame using M8x12 bolts.
Bends the slider handle and moves sliders to expose rear fastening holes.
Attaches seat brackets using M8x16 bolt and M8 Locknut in the backward position.
Slides the slider forward to repeat the process for the front-end of seat brackets.
| Type | Racing Simulator Cockpit |
|---|---|
| Seat Included | No |
| Compatibility | PC |
| Mounting Options | Wheel, pedals, shifter, and monitor mounts |
| Included | Adjustable Pedal Mount, Adjustable Wheel Mount, Shifter Mount |