.co.uk
RIBstore is a specialist supplier of RIB and inflatable boat care and repair products, including professional grade adhesives,
tube cleaners and protectors, valves and spares and Hypalon and PVC fabric.
For your RIB and inflatable boat needs visit www.RIBstore.co.uk
HOW TO …
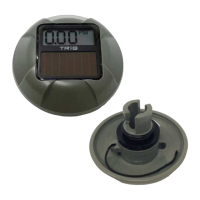
How to install a TRIB airCap HR
Warning!
The use of inflatable watercraft is inherently dangerous and should only be
attempted by qualified individuals. It is your responsibility to ensure that your
equipment is functioning properly. Only operate your watercraft when it is in
good condition and properly inflated. Frequently check your watercraft’s
inflation pressure with a second calibrated pressure gauge to ensure airCap
is functioning properly. Always wear a suitable personal flotation device when
using your inflatable watercraft.
How it Works
• airCap operates directly from light. To turn it on just place it in a well-lit environment (e.g. outdoors). It has
no batteries, giving it a long life and eliminating the need for charging.
• airCap is designed to replace your watercraft’s existing inflation valve cap. But it also works great as a
conventional pressure gauge.
Remove the Existing Cap and Tether
• Remove the existing valve cap. When the tether cord is exposed, untie it and remove it from the valve
body.
Attach the airCap HR Tether
• Thread the supplied tether cord on the airCap through one of the holes on the valve body.
• It may be necessary to loosen the valve and screw it out to thread the tether into the valve. This is done
using a standard valve wrench.
• After cord is fed through valve body tie a knot close to the end.
• A double-overhand knot is preferred.
• Pull newly tied knot against valve body and retighten valve (if loose).
Inflate Your Watercraft
• Inflate your boat or SUP to proper pressure as specified by the manufacturer.
Insert the airCap HR
• Position the airCap with LCD facing away from the valve.
• Insert the attachment features into the valve body.
• Press firmly and rotate the airCap ¼ turn, securing it into the valve.
• The make-before-break seal is designed to prevent air from leaving your inflatable while the airCap is
being inserted. Because of this, when inserting the cap, press the cap straight into the valve and turn.
• More force will be required than is needed for the original valve cap.
Difficult to Install?
There are a wide variety of ¼ turn valves on the market; many with slightly different tolerances. To ensure that
airCap HR seals well when installed, the main seal is tight on some valve versions. This can make it difficult in
some instances to rotate airCap into the seated position. If you encounter this issue, don’t worry there are several
ways to solve it.
1. Remove the main seal, flip it over and reinstall it. There is a ring cut-out on the bottom that will relieve the
interface pressure. Make sure the make-before-break o-ring also gets reinstalled correctly. See Image 1.
2. Use the original seal that came with the valve. These seals are typically compatible. See Image 2 showing
airCap HR with a Summit2 seal installed. Make sure the make-before break o-ring also gets reinstalled
correctly.
3. airCap HR will often become easier to turn into the seated position after a few turns back and forth. For
tight valves the locking detents will wear a little and this will relieve some of the pressure