EasyManua.ls Logo

TRIB airCap HR - User Manual

TRIB airCap HR
4 pages
Print Icon
To Next Page IconTo Next Page
Loading...
airCap
TM
HR
User
’s
Manual
TRīB
®
Outdoor Tech
©
2019
info@triboutdoor.com
www.triboutdoor.com
Version 2019.0
1
Thank you for choosing airCap HR! The following information will help you get the most out of your
purchase.
Warning!
Rafting and the use of other inflatable watercraft is inherently dangerous and should only be
attempted by qualified individuals. Only operate your watercraft when it is in good condition and
properly inflated. Always check and monitor your watercraft’s inflation pressure with a second
properly calibrated pressure gauge. Always wear a suitable personal flotation device when using
your craft on the water.
Installation and Operation
airCap HR is designed to replace your watercraft’s existing inflation valve cap.
Remove the Existing Cap and Tether
Remove the existing valve cap. When the tether cord is exposed, untie it and remove it from
the valve body.

Other manuals for TRIB airCap HR

Question and Answer IconNeed help?

Do you have a question about the TRIB airCap HR and is the answer not in the manual?

Summary

Safety Warnings and Precautions

Installation and Operation

Remove Existing Cap and Tether

Instructions for removing the old valve cap and tether from the watercraft.

Attach the airCap HR Tether

Steps for threading and tying the tether cord to the airCap and valve body.

Inflate Your Watercraft

Guidance on inflating the watercraft to the manufacturer's specified pressure.

Insert the airCap

Procedure for inserting and securing the airCap into the watercraft's valve.

AirCap HR Features

Operation Overview

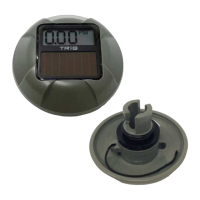
How the airCap functions and displays inflation pressure.

Over Pressure Alarm

Details about the airCap's alarm for high pressure conditions.

Configuration and Settings

Setting the Alarm Pressure

Instructions for setting the airCap's overpressure alarm threshold.

Setting the Units Display

How to change the pressure units (psi, bar, kPa) displayed by the airCap.

Low Light Conditions

Information on airCap's performance and operation in low light environments.

Technical Specifications and Maintenance

Pressure Range

Maximum pressure the airCap can read and its behavior at overpressure.

Cleaning and Maintenance

Guidelines for cleaning and maintaining the airCap to ensure longevity.

Overview

The airCap HR is a precision instrument designed to replace the existing inflation valve cap on inflatable watercraft, providing real-time inflation pressure monitoring and an over-pressure alarm. It is intended for use with rafts and other inflatable watercraft, helping users ensure their craft is properly inflated for safe operation.

Function Description

The primary function of the airCap HR is to measure and display the inflation pressure of an inflatable watercraft. It is designed to be a direct replacement for the standard valve cap, making it an integrated part of the watercraft's inflation system. The device continuously monitors pressure and displays it on an LCD screen.

A key safety feature of the airCap HR is its over-pressure alarm. Users can set a desired alarm pressure, and if the watercraft's internal pressure exceeds this value, the airCap HR will display "OP" (Over Pressure) to alert the user. This helps prevent damage to both the watercraft and the airCap HR itself, as operating in an over-pressure condition is not recommended.

The airCap HR operates in most light conditions, including cloudy or overcast weather, due to its solar-powered design. For operation in low light or after dark, a headlamp or flashlight can provide sufficient light to power the device.

Important Technical Specifications

  • Pressure Range: The airCap HR can read pressures up to 20 psi (138 kPa, 1.38 Bar).
  • Over-Pressure Indication: Displays "OP" when pressure exceeds 20 psi.
  • Power Source: Solar-powered, with functionality in various light conditions.
  • Units Display: Can display pressure in psi, bar, or kPa, configurable by the user.
  • Installation: Replaces the existing inflation valve cap.

Usage Features

  • Installation:

    1. Remove the existing valve cap and untie its tether cord from the valve body.
    2. Thread the supplied tether cord through the holes on the valve body and secure it with a standard valve wrench.
    3. Tie a knot (preferably a double-overhand knot) at the end of the tether cord to close it.
    4. Pull a newly tied knot against the valve body and retighten the valve (if loose).
    5. Position the airCap with the LCD facing away from the valve.
    6. Insert the attachment features into the valve body.
    7. Press firmly and rotate the airCap ¼ turn to secure it into the valve.
    8. The "make-before-break" seal design ensures that air is prevented from leaving the inflatable while the airCap is being inserted.
    9. If inserting the cap, press the cap straight into the valve and turn. More force may be required than for the original valve cap.
  • Inflation: Inflate the watercraft to the proper pressure as specified by the manufacturer.

  • Operation: The airCap HR will display the inflation pressure whenever a suitable light source is present.

  • Setting the Alarm Pressure:

    1. Ensure the airCap is in full sunlight.
    2. Press the SET button on the rear of the airCap to enter pressure setting mode.
    3. The display will flash and show the current alarm pressure value.
    4. Press the button again within 3 seconds to change the alarm pressure value. Repeat until the desired pressure is reached.
    5. The airCap will return to normal mode if the button is not pressed again.
  • Setting the Units Display:

    1. Completely cover the airCap display and solar panel for 10 seconds to power it down.
    2. While the solar panel is still covered, press and hold the programming button.
    3. Turn the airCap on by exposing it to full sun.
    4. The airCap will power on and enter unit programming mode.
    5. Click the button within 3 seconds to change the units.
    6. The current unit choice will flash on the display. Press the button again within 3 seconds to select the desired units.
    7. The airCap will return to normal mode if the button is not pressed again.

Maintenance Features

  • Cleaning: Clean the airCap HR only with mild soap and water. Avoid using solvents.
  • Protection: Avoid abrasive surfaces contacting the airCap, especially on the lens.
  • Storage: If watercraft repairs are needed, it is best to remove the airCap for storage in a safe location. The airCap can be left attached to the watercraft or removed when the watercraft is in storage.

Warning: Rafting and the use of other inflatable watercraft are inherently dangerous and should only be attempted by qualified individuals. Users should only operate their watercraft when it is in good condition and properly inflated. Always check and monitor watercraft inflation pressure with a second, properly calibrated pressure gauge. Always wear a suitable personal flotation device when using the craft on the water.

TRIB airCap HR Specifications

General IconGeneral
BrandTRIB
ModelairCap HR
CategoryPower Tool
LanguageEnglish