TM
®
©
info@triboutdoor.com
Attach the airCap HR Tether
• Thread the supplied tether cord on the airCap through one of the holes on the valve body.
• It may be necessary to loosen the valve and screw it out to thread the tether into the valve.
This is done using a standard valve wrench.
• After cord is fed through valve body tie a knot close to the end.
• A double-overhand knot is preferred.
• Pull newly tied knot against valve body and retighten valve (if loose).
Inflate Your Watercraft
• Inflate your boat or SUP to proper pressure as specified by the manufacturer.
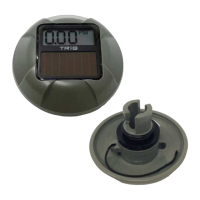
Insert the airCap
• Position the airCap with LCD facing away from the valve.
• Insert the attachment features into the valve body.
• Press firmly and rotate the airCap ¼ turn, securing it into the valve.
• The make-before-break seal is designed to prevent air from leaving your inflatable while the
airCap is being inserted. Because of this, when inserting the cap, press the cap straight into
the valve and turn.
• More force will be required than is needed for the original valve cap.
Operation
• airCap will display the inflation pressure whenever a suitable light source is present.
• See “Low Light Conditions” section for more information.
Over Pressure Alarm
• The pressure inside an inflatable will increase with increases in temperature or elevation.
• airCap HR has an alarm setting to warn the user when the watercraft reaches pressures that
may damage it.
• The alarm pressure is adjustable for each inflatable it is installed on.
• Direct sunlight is required for best performance of the overpressure alarm.
 Loading...