Do you have a question about the Tribesigns JW0622 and is the answer not in the manual?
Follow instructions, check parts, use soft surface, and tighten screws correctly.
Install tip-over restraint to reduce the risk of furniture tipping.
Identifies all furniture parts with labels and quantities.
Identifies all fasteners, cams, and tools with labels and quantities.
Detailed guide on correctly installing cam locks and pins for secure assembly.
Securely attach the furniture legs to the base panel using specified hardware.
Mount drawer slides to the side panels and base of the cabinet.
Construct the main cabinet structure by connecting side, back and base panels.
Secure the top panel to the main cabinet frame.
Secure the back panels to the cabinet using brackets and screws for stability.
Construct the drawer boxes by joining sides, back, and bottom panels.
Connect drawer fronts to the assembled drawer boxes.
Slide the assembled drawers into the cabinet, aligning them with the internal slides.
Secure the unit to the wall using provided hardware for enhanced safety.
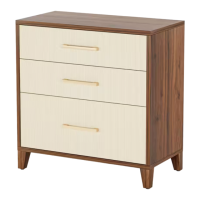
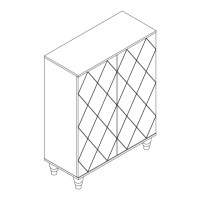
This document provides assembly instructions and support information for a file cabinet, model number JW0622, manufactured by Tribesigns.
The file cabinet is designed for storage, likely in an office or home setting, to organize documents and other items. Its primary function is to provide a structured and enclosed space for keeping files, with multiple drawers for segregation and easy access. The assembly instructions are detailed, guiding the user through each step of putting the cabinet together.
The assembly process begins with a "Call us!" section, emphasizing customer support for any issues before returning the product. Users are encouraged to contact Tribesigns via email (support@tribesigns.com) or phone (1-424-220-6888) if any parts are missing, damaged, incorrect, or if the product is not as expected. This proactive support aims to ensure customer satisfaction and facilitate a smooth assembly experience.
Key recommendations for assembly include:
The manual illustrates the tools required for assembly, which include a screwdriver and potentially an electric screwdriver. However, a specific caution is given regarding the use of an electric screwdriver: "When using the electric screwdriver, Reduce the power and torque to avoid damaging the furniture." This highlights the importance of gentle handling to preserve the integrity of the furniture components.
A critical safety feature mentioned is the "tip-over restraint." The instructions state: "(Install tip-over restraint provided) Use of tip-over restraints may only reduce but not eliminate, the risk of tip-over." This indicates that the file cabinet is designed with safety in mind, providing a mechanism to prevent accidental tipping, which is particularly important in households with children or in areas prone to seismic activity.
The assembly steps are presented with clear diagrams and numbered instructions. The "Installation of Cams and Pins" section provides detailed guidance on how to correctly install these crucial connectors. It explains: "Screw the pin into the hole. To set the cams correctly, ensure that the arrow on the cam is opening to the hole of the pin it is locking. Lock the cam by turning the cam head with a screwdriver until it is tightened. Please do not use an electric screwdriver to assemble the unit." This reiterates the need for manual tightening for these specific components to ensure proper and secure fastening. The diagrams clearly show the correct orientation of the cam and pin, with a "No gap" illustration indicating a correctly assembled connection. The manual stresses the importance of following the steps in sequence: "Read each step carefully before starting. It is very important that each step of instruction is performed in the correct order. If these steps are not followed in sequence, assembly difficulties will occur."
The "Parts & Hardware List" provides a comprehensive overview of all components, including various board parts (labeled 1 through 16) and hardware items (labeled A through N). Each part is accompanied by its quantity, allowing users to cross-reference and ensure everything is accounted for. The board parts are described with their dimensions and specific functions within the cabinet structure, such as side panels, top, bottom, and drawer components. The hardware list includes items like cams, pins, screws, handles, and the tip-over restraint, each with its corresponding quantity.
The assembly process is broken down into nine main steps, each with detailed diagrams showing how the components fit together. For example, Step 1 involves attaching the feet (part 7) to the bottom panel (part 6) using screws (part F) and pins (part B). Step 2 focuses on installing the drawer slides (part 16) onto the side panels (parts 4 and 5) and the back panel (part 3) using screws (part D). Step 3 details the assembly of the main cabinet structure, connecting the side panels, back panel, and bottom panel using cams (part A). Step 4 involves securing the top panel (part 1) to the assembled structure using pins (part B) and cams (part A).
Steps 5 and 6 are dedicated to assembling the drawers. Step 5 shows how to construct the drawer boxes using various drawer components (parts 10, 11, 12, 13) and hardware like pins (part B), screws (part H), and handles (part K). Step 6 illustrates how to attach the drawer fronts (part 8 or 14) to the assembled drawer boxes using cams (part A) and screws (part H). The manual clearly differentiates between the main drawer fronts (part 8) and the file drawer front (part 14), indicating that this cabinet likely has a combination of standard and file drawers.
Step 7 shows the insertion of the assembled drawers into the cabinet structure, ensuring they slide smoothly on the installed drawer slides. Step 8 focuses on attaching the back panel (part 9) to the cabinet using screws (part M) and brackets (part D), which are likely for stability and to enclose the back of the cabinet. Finally, Step 9 details the installation of the tip-over restraint (part L) to the cabinet and the wall, providing instructions for securing the cabinet to prevent tipping. This step includes diagrams showing how to attach the restraint to the cabinet (Step 1) and then to the wall (Step 2 and Step 3), emphasizing safety.
While the manual does not explicitly detail ongoing maintenance, the emphasis on quality and proper assembly implies that a correctly assembled cabinet will require minimal maintenance. The customer support information provided suggests that any issues arising from manufacturing defects or transit damage will be addressed by Tribesigns, ensuring the longevity and functionality of the product. The "No heartburn, when we handle the return" section further reinforces their commitment to customer satisfaction, offering solutions like re-packaging items, scheduling pick-ups, tracking packages, and replacements, should any problems arise.
The inclusion of social media links (Facebook, Twitter, Pinterest, YouTube, Instagram) under "Follow Tribesign" suggests that users can find additional support, tips, or community engagement through these platforms, potentially including maintenance advice or product updates.
In summary, the Tribesigns file cabinet (Model No. JW0622) is a multi-drawer storage unit designed for organizing files and other items. Its features include a robust assembly process with clear, step-by-step instructions, a strong emphasis on customer support for any issues, and a critical safety feature in the form of a tip-over restraint. The detailed parts list and hardware descriptions ensure that users can accurately identify and assemble all components, while cautions regarding tool usage and assembly sequence aim to prevent damage and ensure a successful build.
| Category | Indoor Furnishing |
|---|---|
| Material | Engineered Wood, Metal |
| Shape | Rectangular |
| Style | Modern |
| Assembly Required | Yes |
| Features | Storage Shelves |