EasyManua.ls Logo

Tripp Lite SRTHERMDUCT User Manual

Tripp Lite SRTHERMDUCT
8 pages
To Next Page IconTo Next Page
Page #1 background imageLoading...
Page #1 background image
Owner’s Manual
1
SmartRack
Accessories
Model: SRTHERMDUCT
1111 W. 35th Street, Chicago, IL 60609 USA
www.tripplite.com/support
Copyright © 2012 Tripp Lite. All rights reserved.
Warranty
Registration:
register online today for a
chance to win a FREE Tripp Lite
product—www.tripplite.com/warranty
Table of Contents
Introduction 2
Parts List 2
Installation 3
Warranty & Warranty Registration 7
201204262-93-2958-EN.indd 1 6/4/2012 2:39:46 PM
Question and Answer IconNeed help?

Do you have a question about the Tripp Lite SRTHERMDUCT and is the answer not in the manual?

Tripp Lite SRTHERMDUCT Specifications

General IconGeneral
BrandTripp Lite
ModelSRTHERMDUCT
CategoryAccessories
LanguageEnglish

Summary

Introduction

Parts List

Installation

Assembling the Chimney Base

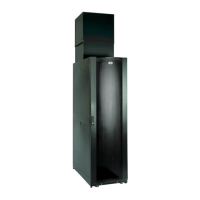
Assemble the 4 side panels of the Chimney Base using M4 nuts.

Assembling the Adjustable Chimney Slider

Assemble the 4 side panels of the Adjustable Chimney Slider using M4 nuts.

Stacking the Chimney

Fit the adjustable chimney slider onto the chimney base, adjusting height using locking pins.

Installing the Enclosure Bottom Panel

Install the bottom panel to the enclosure using 4 M4 screws or by laying it down.

Installing the Cable Access Cover

Place the cable access panel onto the top of the rack enclosure.

Installing the Chimney

Attach the chimney to the cable access cover and rack frame using M8 screws and adjust height.

Sealing the Rear Doors of the Enclosure

Install tubular and flat door seals and magnetic vinyl sheets to the rear doors for proper airflow.

Warranty & Warranty Registration

Limited Warranty

Details the 5-year warranty, exclusions for damage, and limitations on implied warranties.

Warranty Registration

Instructions to register warranty online for a chance to win a free Tripp Lite product.

Related product manuals