Aufbauanleitung/Assembling Instruction/Instruction de montage
TRIXIE Pet Products, Inc. · P.O. Box 101196 · Ft. Worth, TX 76185 · www.trixiepet.com
010317
Assembling Instruction & Part List
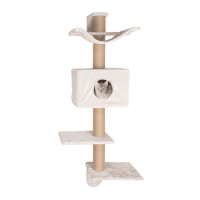
Item No. 44876
U
Advice:
Please note the secure assembly and mounting required two individuals (adults).
Please check the screws regularly and retighten them if necessary.
Pos. a
Pos. b
Item No.
Scratching Post
Color Height
44876 Dayna gray
59.5 inch
(152 cm)
Pos. No. Description Measurement Quantity Item No.
Pos. 1 Platform
17.75 × 0.75 × 15.75 in.
(45 × 2 × 40 cm)
2 44876-10
Pos. 2 Cave, foldable
17.25 × 11.75 × 15.75 in.
(44 × 30 × 40 cm)
1 44876-11
Pos. 3 Hammock
20.5 × 1.5 × 15.75 in.
(52 × 4 × 40 cm)
1 44876-12
Pos. 4 Holder for wall
5.5 × 9 × 11.75 in.
(14 × 23 × 30 cm)
2 44876-13
Pos. 5 Support for Hammock 1 44876-14
Pos. 6 Post with spacer bolt for cave
ø 2 × 10.5 in.
(ø 5 × 27 cm)
4 44876-30
Pos. 7 Post
ø 4.25 × 6 in.
(ø 11 × 15 cm)
1 44876-31
Pos. 8 Post
ø 4.25 × 11.75 in.
(ø 11 × 30 cm)
2 44876-32
Pos. 9 Post with spacer bolt
ø 4.25 × 11.75 in.
(ø 11 × 30 cm)
1 44876-33
Pos. a Rounded head screw
0.3 × 2 in.
(M8 × 50 mm)
1
44876-50
Pos. b Rounded head screw
0.3 × 2.75 in.
(M8 × 70 mm)
1
Pos. c Countersunk screw
0.3 × 1.5 in.
(M8 × 40 mm)
4
Pos. d Countersunk screw
0.3 × 2 in.
(M8 × 50 mm)
5
Pos. e Thread rod
0.3 × 3.25 in.
(M8 × 80 mm)
2
Screw 4
Washer
0.3 × 1 in.
(M8 × 24 mm)
2
Allen key 1
Pos. c
Pos. d
1
2
1
3
4
5
6
7
8
a
b
c
c
c
4
c
e
e
d
d
d
d
d
6
6
6
8
9
Pos. e