EasyManua.ls Logo

Trust 820 LCD POWERC@M ZOOM - User Manual

Trust 820 LCD POWERC@M ZOOM
23 pages
Print Icon
To Next Page IconTo Next Page
Loading...
TRUST 820 LCD POWERC@M ZOOM
1
UK
Instructions when using for the first time Chapter
1. Uninstalling old drivers and devices (3.1)
2. Installing the driver in Windows (3.2)
3. Installing DirectX in Windows (3.3)
4. Installing NetMeeting in Windows (3.4)
5. Installing PhotoImpression in Windows (3.5)
6. Using the camera (4)
7. Connecting the camera to the computer (5)
8. Using the applications in Windows (6)
9. Connecting the camera to a Macintosh (7)
10. Connecting the camera to the TV (8)
1 Introduction
This instruction manual is for users of the TRUST 820 LCD POWERC@M ZOOM.
The TRUST 820 LCD POWERC@M ZOOM can be used to take photographs, to
record live video images and can also be used as a webcam for chatting on the
Internet. The applications supplied with the camera have a wide range of options for
editing photographs and video clips.
When the Trust 820 LCD PowerC@m Zoom is connected to your computer, it can
be accessed directly like a removable disk. You can directly open the photographs
and video clips, edit them, send them via e-mail, save them on your computer, etc.
2 Safety
2.1 General information
Carefully read the following instructions before use.
- The TRUST 820 LCD POWERC@M ZOOM does not require any special
maintenance. Use a slightly damp, soft cloth to clean the camera.
- Do not use aggressive substances, such as white spirit, to clean the device.
These may harm the material.
- Do not submerge the device in liquid. This may be dangerous and will damage
the device. Do not use this device near water.
- Make sure nothing is placed on the cable. Do not use this device in an area
where the cable can become worn or damaged as a result of people walking over
it.
- Do not repair this device yourself. If you open this device, you may touch live
components.
- Under the following circumstances, have the device repaired by qualified
personnel:
- The cable or plug is damaged or worn.
- The device has come into contact with rain, water or another liquid.
2.2 Batteries
- The alkaline batteries supplied with the camera are not rechargeable. Do not
try to recharge them, because this may cause them to explode.
- Never throw the batteries onto an open fire. The batteries may explode.
- Never drill holes into the batteries.
!
Question and Answer IconNeed help?

Do you have a question about the Trust 820 LCD POWERC@M ZOOM and is the answer not in the manual?

Summary

Introduction to Trust 820 LCD PowerC@m Zoom

Safety Precautions for Trust 820 LCD PowerC@m Zoom

General Safety Information

Read instructions before use, cleaning advice, and warnings about liquid submersion and cable damage.

Battery Safety Guidelines

Information on non-rechargeable batteries, explosion risks, and handling precautions.

Installation Guide for Trust 820 LCD PowerC@m Zoom

Uninstalling Old Drivers and Devices

Steps to remove previous drivers and devices in Windows Safe Mode before new installation.

Installing Drivers for Windows Systems

Procedure to install camera drivers on various Windows versions, including notes on driver signing.

Software Installation Procedures

Installing Microsoft DirectX 8.1 b

Guide to install DirectX 8.1b for multimedia support, with OS compatibility notes.

Installing Microsoft NetMeeting 3.01

Instructions for installing NetMeeting for webcam use, including OS-specific details.

ArcSoft PhotoImpression Installation

Using the Camera

Inserting Camera Batteries

Step-by-step guide on how to open the compartment and insert AA batteries correctly.

Inserting SD;MMC Memory Card

Instructions for inserting a memory card, including formatting requirements and handling.

Camera Function Overview

Basic Camera Controls

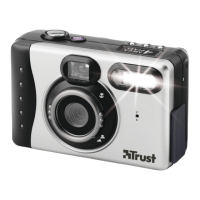
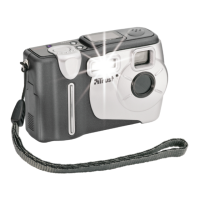
Explanation of buttons for flash, self-timer, and photo quality settings.

Advanced Camera Operations

Menu Navigation and Connections

Details on menu navigation, zoom, modes, and digital connections like USB and video-out.

Camera Lens and Status Icons

Lens, Modes, and Physical Features

Explanation of lens ring, macro mode, flash, and fixing strap for camera operation.

LCD Status Icon Meanings

Explanation of icons displayed on the LCD screen for mode, battery power, and resolution.

LCD Status Icons and Screen Functions

LCD Status Icon Meanings (Continued)

Further details on status icons for resolution, flash modes, self-timer, and picture counter.

LCD Screen Functions and Menu Options

Guide to using the LCD screen for preview, settings, and menu navigation, focusing on EV adjustment.

LCD Screen Menu Options

WB, PC Mode, and Setup Menu

Details on white balance, PC modes (webcam/storage), and setup options like language and sound.

Playback Menu and Memory Formatting

Playback Mode Functions

Explanation of playback mode functions like erasing photos and formatting memory.

Formatting Memory Card

How to Take Photographs

Viewing Taken Photographs

Deleting Photographs

Deleting a Single Photograph

Step-by-step guide to delete one specific photograph from the camera's memory.

Deleting All Photographs

Recording Video Clips

Connecting Camera to Computer

Using Camera as Removable Disk

Guide to connect camera as a storage device for accessing photos and videos on PC and Mac.

Using Camera as Webcam

Using Camera Applications

Using ArcSoft PhotoImpression

Guide on how to import, edit, and save photographs using ArcSoft PhotoImpression.

Using Microsoft NetMeeting

Steps to set up and use NetMeeting for internet calls with the camera.

Webcam and Internet Usage

Connecting to Mac OS 9.1 or Later

Connecting Camera to TV

Removing Camera and Driver

Disconnecting from USB Port

Safe procedure to disconnect the camera from the USB port using the Windows taskbar icon.

Removing the Camera Driver

Step-by-step guide to uninstall the camera driver from the computer via Add/Remove Programs.

Troubleshooting Common Issues

Device Not Detected or Not Responding

Solutions for Windows detection issues, capture device errors, and camera not responding.

Device Manager and Compatibility Issues

Resolving Device Manager errors and conflicts with TV/capture cards.

Troubleshooting Specific Problems

Power and Battery Problems

Solutions for camera not reacting, turning off, or failing to power on due to battery or reset issues.

Image Quality and Recording Issues

Troubleshooting for hazy recordings, no photos taken, or incorrect colours.

Connection and Webcam Image Issues

Resolving computer connection problems and issues with webcam image display.

Troubleshooting Image and Recording Issues

Colour and Exposure Problems

Fixes for colour casts, over/underexposure, and noise in photographs.

Recording and Memory Issues

Troubleshooting when no more recordings are made or memory is full.

Unlisted Problems and Support

Guidance on checking for updates and contacting customer support for unlisted issues.

Overview

The TRUST 820 LCD POWERC@M ZOOM is a versatile device designed for capturing photographs, recording live video images, and functioning as a webcam for internet communication. It comes with a suite of applications that offer extensive options for editing photographs and video clips. When connected to a computer, the device acts as a removable disk, allowing direct access to photographs and video clips for editing, emailing, or saving.

Safety and Maintenance:

Before use, it is crucial to read the safety instructions carefully. The camera requires no special maintenance; a slightly damp, soft cloth is sufficient for cleaning. Avoid using aggressive substances like white spirit, as they can damage the material. The device should never be submerged in liquid, as this is dangerous and will cause damage. It is also important to avoid using the device near water. Ensure that the cable is not placed where it can be walked over, preventing wear or damage. Users should not attempt to repair the device themselves, as opening it may expose live components. Repairs should only be carried out by qualified personnel, especially if the cable or plug is damaged, or if the device has come into contact with rain, water, or other liquids.

Battery Usage:

The camera uses AA alkaline batteries, with Duracell Ultra batteries being recommended. Rechargeable AA NiMH batteries (minimum 1800 mAh) can also be used. Standard AA NiCd batteries are unsuitable. Empty alkaline batteries should be disposed of according to local authority guidelines. It is important not to mix old and new batteries, as old ones can deplete new ones. If the camera will not be used for an extended period, remove the batteries to preserve their capacity. Batteries should be kept out of reach of small children. The supplied alkaline batteries are not rechargeable; attempting to recharge them may cause them to explode. Never throw batteries into an open fire or drill holes into them. The batteries will not recharge when the camera is connected to a USB port.

Installation:

The installation process involves several steps to ensure proper functionality. The most common cause of installation faults is the presence of drivers for similar, older devices. Therefore, it is recommended to first uninstall any old drivers and devices. This is done by entering Windows 'Safe Mode' (pressing F8 during startup), accessing 'Add/Remove Programs' in the 'Control Panel', and removing any programs related to old, unused (similar) devices. After removing these programs, restart the computer.

Next, the driver for the TRUST 820 LCD POWERC@M ZOOM needs to be installed. This driver must be installed before connecting the camera to the computer. The latest drivers can be downloaded from the manufacturer's website. Ensure all other programs (except Windows) are closed during installation. For Windows 2000 and XP users, a message about an unsigned driver may appear, but this does not affect functionality. Start Windows, insert the CD-ROM, and the Trust Software Installer should start automatically. If not, run D:\SETUP.EXE. Click on 'Digital Camera Driver v1.0' to begin installation. The driver includes components for both the photographic camera (MSDC) and webcam (WDM Web camera) functions, which are installed simultaneously. Windows ME, 2000, and XP natively support MSDC, so only the WDM Web camera component will be installed from the CD-ROM for these systems. Follow the on-screen instructions, click 'Next', and then 'Finish' to complete the installation and restart the computer.

Microsoft DirectX and NetMeeting Installation:

For optimal multimedia support, especially for programs like Microsoft NetMeeting, install Microsoft DirectX 8.1b. This version is suitable for Windows 98, ME, and 2000. Windows XP already includes DirectX 8.1, so the installation button for DirectX will be disabled; later releases can be installed via 'Windows Update' or Service Pack 1. To install DirectX, start the Trust Software Installer, click 'Microsoft DirectX 8.1b', follow the on-screen instructions, and restart the computer.

NetMeeting 3.01 is included with Windows 98, ME, 2000, and XP, allowing the camera to function as a webcam. The latest version for Windows 98 and ME is on the CD-ROM, while Windows 2000 already has it. For Windows XP, NetMeeting is not directly visible, with Windows Messenger being used instead. To use NetMeeting in Windows XP, click 'Start - Run', type [Conf], and click 'OK'. The NetMeeting installation window will appear after a short delay. Follow the on-screen instructions. For Windows 98 and ME, start the Trust Software Installer, click 'Microsoft NetMeeting 3.01', and follow the instructions. Fill in personal details, select 'Digital Camera Video Capture' as the camera, and choose whether to create desktop or Quick Launch shortcuts. Configure audio and image settings, then click 'Finish'. If audio settings cannot be properly configured, check sound card and device system requirements and connections.

ArcSoft PhotoImpression 3.0 Installation:

ArcSoft PhotoImpression 3.0 is used for opening, editing, printing, and emailing photographs taken with the camera. To install, start the Trust Software Installer, click 'PhotoImpression 3.0', follow the on-screen instructions, and restart the computer.

Using the Camera:

Inserting Batteries: Open the battery compartment on the bottom of the camera by sliding the cover and opening the flaps. Insert the two AA alkaline batteries as indicated inside the holder. Close the compartment by pushing and sliding it into place. Incorrect battery insertion can damage the camera and void the warranty.

Inserting an SD/MMC Memory Card: The camera has 16 MB of internal memory, expandable up to 128 MB with an optional SD or MMC memory card (not supplied). Open the flap for the memory slot on the bottom. Insert the SD or MMC card into the slot, ensuring it is correctly oriented to avoid damage to both the camera and the card. Press the card fully in, then close the flap. To remove, open the flap and push the card again. The SD/MMC memory card must be formatted before taking photographs.

Camera Functions:

The camera features several buttons for various functions:

  • Flash button (A): Sets the flash mode (Auto Flash, No Flash, Force Flash). Default is 'No Flash'.
  • Self-timer button (B): Activates a 10-second self-timer for taking photographs.
  • Photo quality button (C): Selects the resolution for photographs:
    • ★: 1280 x 960 (1.2 Mpixels) - approx. 43 photos on 16 MB internal memory.
    • ★★: 1600 x 1200 (2 Mpixels) - approx. 25 photos on 16 MB internal memory.
    • ★★★: 2048 x 1536 (3 Mpixels) - approx. 17 photos on 16 MB internal memory.
    • ****: 2304 x 1728 (4 Mpixels) - approx. 8 photos on 16 MB internal memory.
  • On/Off button (D): Press for 1 second to turn the camera on or off (two beeps). The camera automatically turns off after 2 minutes of inactivity.
  • Exposure button (E): Takes photographs or starts/stops video recording.
  • Viewfinder (F): Used to view the subject.

LCD Functions:

  • Menu button (G): Calls up the camera menu on the LCD screen, scrolls through options (Up/Down arrows), and selects options (OK).
    • Zoom in/out: Digital zoom up to 4x (in 7 steps) for 1280 x 960 and 1600 x 1200 resolutions.
  • Record / Play mode button (H): Changes camera mode to 'Record' (Capture), 'Video', or 'Play' (PlayBack).
    • Record mode (Capture): Takes photographs.
    • Video mode: Records AVI video clips with sound via a built-in microphone.
    • Play mode (PlayBack): Views and deletes photographs and video clips.
  • LCD screen on/off button (I): Turns the LCD screen on or off. The LCD screen automatically turns off after 30 seconds of inactivity to save batteries.
  • LCD screen (J): Displays the subject (Preview), photographs, video clips, camera settings, and menu.
  • Digital connections (K): Two connections on the left side for video-out (A) and USB (B).
    • Video-out (A): Connects to a TV or video recorder to view media.
    • USB (B): Connects to a computer for saving media or using as a webcam.

Other Features:

  • Fixing ring for the wrist strap (L): Attaches the supplied wrist strap to prevent accidental drops.
  • Lens (M): Records the image. Keep clean to avoid affecting results.
  • Macro mode (N): Selectable by rotating the ring around the lens.
    • Macro mode: For close-up photographs (55 cm to 80 cm).
    • Normal mode: For surroundings or people (160 cm to infinity).
  • Flash (O): Built-in flash for extra lighting in dark surroundings.

Status Icons on the LCD Screen:

  • Capture mode (camera icon): Takes photographs.
  • Video mode (video camera icon): Records video clips.
  • PlayBack mode (play icon): Views and deletes media.
  • Full battery power (full battery icon): Batteries are full.
  • Low battery power (low battery icon): Batteries are almost empty; replace them.
  • Battery empty (empty battery icon): Batteries are empty; camera will turn off; replace them.
  • 1.2 Mpixel resolution (1.2M icon): Takes photographs at 1280 x 960.
  • 2 Mpixel resolution (2M icon): Takes photographs at 1600 x 1200.
  • 3 Mpixel resolution (3M icon): Takes photographs at 2048 x 1536.
  • 4 Mpixel resolution (4M icon): Takes photographs at 2304 x 1728.
  • TV video standard (NTSC/PAL icon): Displays the TV video standard (NTSC for America/Japan or PAL for Europe) for the camera's video-out connection.
  • Auto Flash (A icon): Camera determines flash usage.
  • Force Flash (flash icon): Flash always used.
  • No Flash (crossed-out flash icon): Flash disabled (default).
  • Self-timer (clock icon): Photograph taken 10 seconds after exposure button press.
  • Picture Counter (888 icon): In 'Capture' mode, shows remaining photos; in 'Video' mode, shows remaining recording time; in 'PlayBack' mode, shows photos already taken.

LCD Menu Functions (Capture Mode):

  • EV (Exposure Value): Adjusts light quantity (+1.0 Max, +0.5 Increased, Normal, -0.5 Less, -1.0 Minimum).
  • WB (White Balance): Sets white balance based on light type (Auto, Sun, Shade, Tungst, FLRSCN).
  • PC Mode: Sets camera for webcam or removable disk use.
    • WEB Cam: Uses camera as a webcam for internet chat.
    • Storage: Uses camera as a removable disk for JPG images and AVI films. Select this option before connecting to the computer for Windows to detect the correct driver.
  • Setup: Configures various camera functions.
    • Language: Selects menu language (English, German, French, Spanish, Italian).
    • Sound: Turns button press sounds on/off.
    • TV Mode: Selects TV video standard (PAL or NTSC) for video-out.
    • Frequency: Sets mains filter (50 Hz or 60 Hz).
  • Exit: Returns to the main menu.

LCD Menu Functions (Video Mode):

  • PC Mode: Same as in 'Capture' mode.
  • Setup: Same as in 'Capture' mode.
  • Exit: Exits the menu.

LCD Menu Functions (PlayBack Mode):

  • Erase one: Deletes selected photograph.
  • Erase all: Deletes all photographs.
  • DPOF (Digital Print Order Format): Enables DPOF for direct printing to compatible printers.
  • Format Memory: Formats internal memory or SD/MMC card. SD/MMC cards must be formatted before use.
  • Exit: Exits the menu.

Taking Photographs:

  1. Turn on the camera.
  2. Set to 'Capture' mode.
  3. Set lens ring (N) to 'Macro' for close-ups (55-80 cm) or 'Normal' for general use (160 cm to infinity).
  4. Use viewfinder (F) or LCD screen (J) to frame the subject. Turn on LCD with button (I) if needed.
  5. Press exposure button (E) to take a photo. 'Processing' message appears, then photo is saved.
  6. LCD returns to normal display. Adjust camera settings as needed for optimal quality (see chapters 4.3, 4.4, 4.5).

Viewing Photographs:

  1. Turn on the camera.
  2. Set to 'PlayBack' mode.
  3. Use Up/Down Arrow buttons (G) to scroll through photos on LCD screen (J).

Deleting Photographs:

Deleting One Photograph:

  1. Turn on the camera.
  2. Set to 'PlayBack' mode.
  3. Scroll to the photo to delete.
  4. Press 'Menu' button (G).
  5. Select 'Erase one', then 'OK' (G).
  6. Select 'Yes' and 'OK' (G) to confirm.

Deleting All Photographs:

  1. Save desired photos to computer first.
  2. Turn on the camera.
  3. Set to 'PlayBack' mode.
  4. Press 'Menu' button (G).
  5. Select 'Erase all', then 'OK' (G).
  6. Select 'Yes' and 'OK' (G) to confirm. 'No pictures in memory' message appears.

Recording Video Clips:

  1. Turn on the camera.
  2. Set to 'Video' mode.
  3. Press exposure button (E) to start recording. 'REC' text and a countdown clock appear on LCD.
  4. Press exposure button (E) again to stop recording. Video clip is saved as an AVI file.

Connecting to the Computer:

The camera can be used as a removable disk (MSDC) or a webcam (WDM Web camera). Select the desired function from the camera menu before connecting. All camera buttons are disabled when connected; disconnect to alter settings.

As a Removable Disk:

  1. Install MSDC driver (Windows 98 only). Windows ME, 2000, XP support MSDC natively.
  2. Turn on the camera.
  3. Press 'Menu' (G), scroll to 'PC' mode, 'OK' (G).
  4. Select 'Storage', 'OK' (G).
  5. Scroll to 'EXIT', 'OK' (G).
  6. Start Windows.
  7. Connect USB cable to camera (B) and computer.
  8. Windows detects new hardware, installs driver.
  9. Double-click 'My Computer', then '200_CAMERA' (removable disk).
  10. Open '\ DCIM \ 100D-CAM ' folder to access JPG photos and AVI videos.
  11. Use ArcSoft PhotoImpression to edit photos. Do not save edited photos to camera memory.

As a Webcam:

  1. Install driver (see chapter 3).
  2. Turn on the camera.
  3. Press 'Menu' (G), scroll to 'PC' mode, 'OK' (G).
  4. Select 'WEB cam', 'OK' (G).
  5. Scroll to 'EXIT', 'OK' (G).
  6. Start Windows.
  7. Connect USB cable to camera (B) and computer.
  8. Windows detects new hardware, installs 'Digital Camera Video Capture' driver.
  9. Use with Microsoft NetMeeting (see chapter 6.2).
  10. For WDM video camera in Windows ME/XP: Double-click 'My Computer', then 'Digital Camera, WDM Video Capture' icon to view live video. Snapshot photos are 320 x 240.

Connecting to Mac OS 9.1 or Later:

Mac OS 9.1+ supports the camera as a removable disk. Webcam function does NOT work on Mac.

  1. Turn on the camera.
  2. Set to 'Capture' mode.
  3. Press 'Menu' (G).
  4. Scroll to 'PC' mode, 'OK' (G).
  5. Select 'Storage', 'OK' (G).
  6. Scroll to 'EXIT', 'OK' (G).
  7. Start Mac OS.
  8. Connect USB cable to camera (B) and Mac.
  9. '200_CAMERA' folder appears on desktop. Open '\ DCIM \ 100D-CAM ' to access JPG photos. Video clips (AVI) are not supported on Mac.
  10. In MAC OS X, a window will appear to automatically download photos. Drag '200_CAMERA' to Trash and disconnect camera to remove.

Connecting to the TV:

  1. Turn on the camera.
  2. Press 'Menu' (G).
  3. Select 'Setup', 'OK' (G).
  4. Scroll to 'TV mode', 'OK' (G). Select PAL or NTSC.
  5. Scroll to 'Exit', 'OK' (G).
  6. Connect composite video cable (supplied) to camera's video-out (A) and TV's composite video input (yellow plug). Purchase SCART adapter if needed.
  7. Switch on TV/video recorder.
  8. Tune TV to video-in channel.
  9. Set camera to 'PlayBack' mode. View photos on TV.

Removal:

Disconnecting from USB Port:

  1. Double-click 'Unplug or Eject Hardware' icon in Windows taskbar.
  2. Select 'USB Disk', click 'Stop'.
  3. Click 'OK' to confirm.
  4. Click 'OK' again. Disconnect camera.

Removing the Driver:

  1. Click 'Start - Settings - Control Panel', double-click 'Add/Remove Programs'.
  2. Select 'Digital Camera', click 'Add/Remove'.
  3. Follow on-screen instructions.
  4. Remove camera's USB plug.
  5. Restart computer.

Troubleshooting:

Refer to the troubleshooting section for common issues and solutions, including:

  • Windows not detecting device: Check USB port, connection, USB hub power.
  • 'Capture device was not detected' error: Check USB port, USB hub power.
  • Exclamation mark '!' in Device Manager: Check USB hub power.
  • Conflict with TV/capture card: Remove TV Capture card, install camera, then reinstall TV capture card.
  • Camera not responding: Reinsert batteries, disconnect USB, turn on/off, take out of sleep setting.
  • Batteries full, camera unresponsive: Replace batteries, reset camera (disconnect USB, remove batteries for 10 min, reinsert).
  • Camera turns off suddenly: Use alkaline/NiMH batteries, camera not used for >3 min, low battery.
  • Camera won't turn on/off immediately: Replace batteries.
  • Hazy recordings: Hold camera still, increase distance, improve lighting, turn off automatic exposure.
  • No photo taken: Memory full (transfer photos), camera busy saving previous photo.
  • No computer connection: Reconnect cables.
  • No webcam image: Close other applications, install DirectX 8.1b, set VGA card to lower resolution/color depth.
  • Displaced image/wrong colors: Set white balance, edit color with ArcSoft PhotoImpression, adjust monitor settings, check printer settings/cartridge/paper.
  • Noise/dark photos: Sufficient light, use flash (up to 2m).
  • Overexposed photos: Flash not suitable for bright daylight, change lighting, take photos in shadow, adjust white balance.
  • No more recordings: Camera memory full (download/delete photos).
  • Other problems: Check www.trust.com/customercare/help/camera or contact Trust Customer Care Centers with article number (13413) and problem description.

Trust 820 LCD POWERC@M ZOOM Specifications

General IconGeneral
Optical Zoom3x
LCD Screen Size2.4 inches
Resolution8.0 MP
Video Resolution640 x 480
Storage MediaSD Card
Battery Type2 x AA

Related product manuals