The Turf Tank ONE is an advanced robotic system designed for painting perfect lines on various sports fields, saving users time and money. This system consists of a Rover (the robot itself), a Base Station, and a Tablet for control.
Function Description
The Turf Tank ONE system automates the process of line marking on sports fields. The Base Station establishes a precise positioning reference, the Rover autonomously navigates and paints lines based on pre-programmed field plans, and the Tablet serves as the control interface for managing field plans, monitoring the robot, and adjusting settings. The system is designed to ensure accuracy and efficiency in line marking, making it suitable for a wide range of sports and field types.
Usage Features
Getting Started:
Upon receiving the Turf Tank ONE, users are guided through a simple three-step readiness process:
- Verify Contents: Check the contents of the crate against the provided checklist to ensure all components are present.
- Charge Batteries: Fully charge the batteries for the Turf Tank Tablet, Robot, and Base Station.
- Relax: The system is designed for ease of use, and support is available if needed.
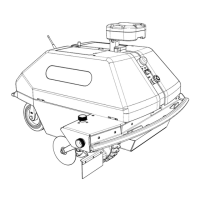
Rover (Robot) Features:
The Rover is the primary line-marking unit. Key features include:
- Indicator Light: Provides visual feedback on the robot's status.
- On/Off Switch: Controls the power to the robot.
- Emergency Stop: A safety feature to immediately halt robot operations.
- Battery/Paint Compartment: Houses the robot's battery and the paint supply.
- Shields (Pair): Protect the paint system and help guide the robot.
- Rear Wheel & Front Wheel: Enable mobility and steering.
- Front Bumper & Back Bumper: Provide protection during operation.
- Disc-Width Adjustment Knob: Allows for precise adjustment of line width.
- Sprayer-Height Adjustment Knob: Controls the height of the spray discs for optimal line quality.
- Spray Discs: Apply paint to the ground.
- Sprayer Assembly (Solenoid): Manages paint flow.
- Robot Antenna: Essential for communication with the Base Station and Tablet.
Paint System Features:
The paint system is integrated into the Rover and includes:
- Solenoid Power Wire: Supplies power to the solenoid for paint control.
- Paint Tube: Carries paint from the compartment to the sprayer.
- Front Bumper: Part of the robot's protective frame.
- Disc-Width Adjustment Knob: Adjusts the width of the painted line.
- Spray Shield Adjustment Knob & Spray Shield: Control and protect the spray area.
- Sprayer Assembly: The core component for paint application.
- Quick Fan Cap: Easily removable for maintenance.
- Spray Nozzle: Directs the paint onto the surface.
- Spray Discs: The final point of paint application.
Base Station Features:
The Base Station provides the precise positioning data for the Rover. It includes:
- Pole Battery: Powers the Base Station, offering 8 to 10 hours of battery life.
- Power Indicator Lights: Show the battery level and operational status.
- View Capacity Button: Allows checking the battery capacity.
- Power Port: For charging the Pole Battery.
- Power Cable: Connects the Pole Battery to the Base Station.
- Base Station Antenna: Receives satellite signals for positioning.
- Prism Pole: Supports the Base Station at the correct height.
- LP-E6 Battery: Additional batteries for the Base Station, each providing 1.5 hours of life. These are inserted into specific compartments (Battery Compartment A and B) in the lid.
- Information Panel: Displays status indicators for transmitting, satellites, and internet connection.
- Position Button: Used to save and search for Base Station positions.
- Position Light: Indicates the status of position saving and searching.
- Key to Information Panel Symbols: Explains the meaning of the symbols on the information panel.
- Serial Number QR Code & Serial Number and Product Number: For identification and support.
- Antenna Port: Where the large antenna is attached.
- Battery Cover A & B: Secure the LP-E6 batteries.
- Charging Port: For charging the Base Station.
- Prism Pole/Pole Battery Attachment Port: Connects the Base Station to the prism pole or pole battery.
Base Station Placement and Position Management:
- Placement: Determine a consistent spot for the Base Station, install a ground spike, place the tripod with the prism pole resting in the spike, and ensure the tripod is level. Attach the large antenna and then the prism pole or pole battery. Important: Do not turn on the Base Station before attaching it to the prism pole.
- Existing Position: To use an existing saved position, turn on the Base Station. It will automatically search for the saved position, indicated by a flashing orange Position light. Once found, a solid orange Position light, flashing blue Transmission light, and five beeping sounds will confirm. If not found, there will be no orange or blue lights and a five-second continuous error tone. The Position button can be pressed at any time to search for a saved position.
- Creating a New Position: Turn on the Base Station, then press and hold the Position Button until a short beep is heard. Signs of a successfully created position include a steady orange Position light, a flashing blue Transmission light, and five beeping sounds. After creating a new position, the Base Station must be power cycled (turned off and on again). The Base Station should be raised 10-12 feet on the prism pole for operational height. Note: Leave at least 30 yards between multiple saved positions.
Paint Mixing (Concentrate):
- Guidelines: These are general guidelines; brand-specific instructions may vary.
- Water First: Pour water into an empty 5.5-gallon jug. For a 4:1 mix ratio (bright), use four gallons of water. For a 3:1 mix ratio (brighter), use three gallons of water.
- Add Concentrate: Pour one gallon of paint concentrate into the jug.
- Mix Thoroughly: Mix with a drill bit for at least 90 seconds, up to two full minutes, to ensure even pigment dispersal.
Paint (RTS - Ready to Spray):
- Instructions: Shake vigorously or use a drill mixer bit for 30 seconds, and the paint is ready to spray.
- Nozzle Options:
- Cone Nozzle: Ideal for general purpose sports and rounded edges, designed to use less paint.
- Flat Fan Nozzle: Ideal for football hashes, logos, and sharp edges, providing custom results.
Maintenance Features
Basic Troubleshooting:
If the Robot, Tablet, or Base Station are not functioning as expected, check the following:
- Batteries: Ensure all batteries (Tablet, Robot, Base Station) are fully charged.
- Robot Battery Seating: Verify the Robot's battery is properly seated and the compartment latch is locked.
- Antennas: Confirm antennas are attached to both the Base Station and the Robot.
- Emergency Stop/Bumper: Check if the Emergency Stop button or bumper stop mechanisms are engaged.
- Tablet Connectivity: Ensure the Tablet is connected to the Robot's WiFi, the Robot appears in the App, and WiFi is not blocked.
- Cellular Signal (Tablet): Verify the Tablet is receiving a cellular signal, Roaming Data is turned on, the signal is strong, and "4G" and "R" appear above the cell signal indicator.
- Reboot: Completely shut down and then power up the Robot and Tablet.
For persistent issues, contact a Robot Expert for assistance.
Important Daily Tasks:
To ensure optimal performance and longevity of the Turf Tank ONE system, daily maintenance is crucial:
- Charge Batteries EVERY DAY:
- Charge Robot Batteries.
- Charge the Tablet.
- Charge the Base Station batteries (Pole Battery or LP-E6 batteries).
- Monitor Battery Life: Keep an eye on battery levels for the Tablet, Robot, and Base Station. For multiple fields in a day, consider upgrading to a Pole Battery or purchasing additional LP-E6 batteries. For best performance and to prevent damage, ensure all components maintain a charge above 25%.
- Check Field Conditions: Before painting, inspect the field for any obstacles or poor conditions that might affect robot operation.
- Clean Robot Thoroughly after EVERY use:
- Remove and wash the Quick Fan Cap, Spray Nozzle, Gasket, and Chamber Reducer with warm water.
- Run warm (not hot) water through the entire Paint System (hoses, pump, sprayer) until the water runs clear.
- Remove the Mesh Filter from its housing on the tube in the Paint System and wash it in warm water.
For further assistance, product manuals, and more help, users can visit the support website or contact a Robot Expert via call or text.