This document describes the TV•EARS Voice Clarifying Headphone, a device designed to enhance audio clarity, particularly for voices, when watching television. It includes a quick installation guide, features, maintenance instructions, and warranty information.
Function Description
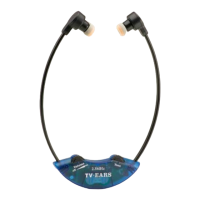
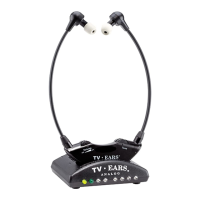
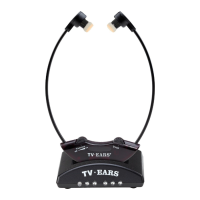
The TV•EARS Voice Clarifying Headphone system consists of a pair of wireless headphones and a mini transmitter. The primary function is to provide clear, amplified audio directly to the user's ears, making dialogue easier to understand, especially for individuals with hearing difficulties. The system offers two distinct sound modes: "Theater Sound" for an immersive audio experience with enhanced bass and audio quality, and "Voice Clarifying" mode, which specifically enhances voice clarity. The wireless design allows users to move freely within a certain range from the television without losing audio.
Important Technical Specifications
Headphones:
- Battery Type: Ni-MH, AAA/HR03
- Battery Capacity: 1000 mAh x 2
- Charging Time: 3.5 hours
- Working Time: 8-10 hours
- Voltage: 1.2V x 2
- Connectivity: AUX-IN via 3.5mm jack for connecting to other audio devices like tablets or laptops.
- Charging: USB-C charging port, supports either USB-A to USB-C or USB-C to USB-C charging cords.
- Indicators: Power ON/OFF & 5.8G indicator (Blue LED), Battery charging indicator (Red/Green LED).
Transmitter:
- Frequency: 5.8 GHz
- Connectivity:
- Digital Audio: Optical (Digital Audio Out) port.
- Analog Audio: RCA (red and black) and 3.5mm (green) "Audio Out" ports.
- Power: USB-C to USB-A cable for power, connecting to a supplied power block.
- Modes: "Secure Mode" and "Open Mode" for pairing multiple headphones.
Usage Features
Mini Transmitter Setup:
- Placement: Place the transmitter close enough to the television to connect it.
- Power: Plug the supplied USB-C cable into the transmitter's "Power" port and the other end into the AC adapter, then into a standard electrical outlet or surge protector.
- Audio Connection (Digital):
- Remove plastic caps from both ends of the digital audio cord.
- Plug one end into the "Digital Audio Out" port on the back of the TV.
- Plug the other end into the "Optical" port on the back of the transmitter. A "click" indicates a secure connection.
- Note: TV's digital audio output format may need to be set to Dolby Digital or DTS. If you get static, change this option to PCM in your TV's setup menu (e.g., Audio Settings > Additional Audio Settings > Digital Audio Out Format > Change format from Dolby or DTS to PCM).
- The optical plug and jack are not square; position the optical plug so it matches the orientation of the optical jack, then push the plug into the jack. You should hear and feel a "click" when the plug is correctly inserted into the optical jack.
- If the Digital Audio Out port is round, use a Coaxial audio cord instead of the optical.
- Audio Connection (Analog):
- RCA Analog Installation: Plug the dual end (red and black) of the 3.5mm RCA cord into the "Audio Out" ports on the back of the television, satellite box, or cable box. Plug the single (black) end of the 3.5mm RCA cord into the "Analog" port on the back of the transmitter. The correct port has a green border around it.
- 3.5mm Analog Installation: Plug one end of the Analog Audio Cord (black) into the "Audio Out" port on the back of the television, satellite box, or cable box. Plug the other end into the "Analog" port on the back of the transmitter. The correct port has a green border around it. If your TV's headphone port looks like the following, your TV may be muted. If this is the case, then connect using the RCA Analog Installation method.
Headphone Features:
- "VOLUME" knob and Power ON/OFF:
- Turn the knob clockwise to click the headphones on. A blue LED will flash to show headphones are connecting, then turn solid.
- Keep turning clockwise to increase volume; turn counter-clockwise to decrease volume.
- Turn the knob all the way down until it clicks to turn off the headphones. The blue LED should then turn off.
- "THEATER SOUND" button: Press to activate Theater Sound mode, enhancing bass and audio quality.
- "VOICE CLARIFYING" button: Press to activate Voice Clarifying mode, enhancing voice clarity. Press again to resume Theater Sound mode.
- "MUTE" button: Press to mute the volume; press again to restore it.
- AUX-IN 3.5mm jack: Receive audio from another audio device (e.g., tablet, laptop) by connecting a 3.5mm cable from that device's headphone jack to the AUX-IN port of the headphones. Audio will not be received from the television until that cord is disconnected.
- Battery charging indicator (Red/Green LED): Red LED indicates battery is below 20% charge. Yellow LED indicates charging. Green LED indicates fully charged.
Secure Mode / Open Mode:
- Open Mode (Default): The transmitter is set to broadcast to any TV•EARS product within range, allowing multiple users to pair with one transmitter.
- Secure Mode: Enables manual pairing of up to 2 TV•EARS products with the transmitter, preventing interference from other wireless devices.
- Activating Secure Mode:
- Move the "Secure/Open" switch on the transmitter to Secure (White) side.
- Place headphones close to the transmitter.
- Press and hold the ADD button on the transmitter for 3-5 seconds. The blue LED on the transmitter will begin flashing, then solid.
- Turn on the headphones; the blue LED on the headphones will also start flashing.
- When the blue LED on the headphones becomes solid, the transmitter blue LED will go off.
- Re-Activating Open Mode:
- Move the "Secure/Open" switch to the Open (Green) side on the transmitter.
- Place headphones close to the transmitter.
- Press and hold the ADD button on the transmitter for 3-5 seconds. The blue LED on the transmitter will begin flashing, then solid.
- Turn on the headphones; the blue LED on the headphones will also start flashing.
- When the blue LED on the headphones becomes solid, the transmitter blue LED will go off.
Note: It may take longer when switching to Open mode from Secure mode. When activating or deactivating secure mode, make sure only the long-range transmitter being paired is turned on in the household.
Maintenance Features
Battery Replacement:
- Turn the right ear pad counter-clockwise to unlock the ear pad.
- Remove the old batteries and replace with new ones. Only batteries from TV•EARS are compatible with the charger.
- Replace the ear pad and rotate clockwise to lock it into place.
Ear Pad Replacement:
- Turn the ear pad counter-clockwise to remove it from the headphones.
- Replace it with a brand new one and rotate clockwise to lock it into place.
- Note: It is not necessary to match the "L" or "R" sign on each side of the headphone. Aside from the labeling, the two pads are identical.
Warranty:
- TV•Ears 5 Year Limited Warranty: This warranty covers product failures for a period of 5 years from the original purchase date. The warranty is only valid if the product is purchased from TV•Ears directly or from one of the TV•Ears authorized resellers. During the 5-year warranty, if the product fails within the first year of the original purchase date, it will be replaced once at the cost of shipping and handling with the same or newer model. Subsequently, for the remainder of the 5-year warranty period, if the product fails, it will be replaced for 50% off MSRP with the same or newer model of equal value. The warranty does not cover: under this warranty, ear tips, batteries, and shipping charges. Any replacement parts purchased at 50% off automatically extends your warranty into a new 5-year limited warranty.
- How to receive warranty service or return product: Call 1-866-611-9934 to speak to customer support. For returns, you will need to receive an RMA number and place it clearly and legibly on the outside of the package. Otherwise, returns are not accepted. All shipping charges are NOT covered by TV•Ears.
- To activate your FREE 5 Year limited warranty: Call 1-866-611-9934, go online to tvears.com/warranty-registration, or mail to TV Ears, Inc., 2701 Via Orange Way, Suite 1, Spring Valley, CA 91977.
FCC Rules:
- This device complies with Part 15 of the FCC Rules. Operation is subject to two conditions: (1) this device may not cause harmful interference, and (2) this device must accept any interference received, including interference that may cause undesired operation.
- Changes or modifications not expressly approved by the party responsible for compliance could void the user's authority to operate the equipment.
- This equipment has been tested and found to comply with the limits for a Class B digital device, pursuant to Part 15 of the FCC Rules. These limits are designed to provide reasonable protection against harmful interference in a residential installation. This equipment generates, uses, and can radiate radio frequency energy, and if not installed and used in accordance with the instructions, may cause harmful interference to radio communications.
- If interference occurs, try to correct it by: Reorienting or relocating the receiving antenna, increasing the separation between the equipment and receiver, connecting the equipment into an outlet on a circuit different from that to which the receiver is connected, or consulting the dealer or an experienced radio/TV technician for help.