4.4 The function of weather forecast
Weather icons for 4 states: sunny semi-sunny
cloudy rainy
4.5 Trend indicator:
The trend pointer displayed on the LCD indicates
the trend of the indoor temperature:
1. The difference between current temperature and
recorded temperature is more than +1°C, the
trend shows C.
2. The difference between current temperature
and recorded temperature is less than -1°C, the
trend shows A
3. When the change of temperature is within
+/-1°C, the trend shows B
4.6 The comfort – level icons:
see table
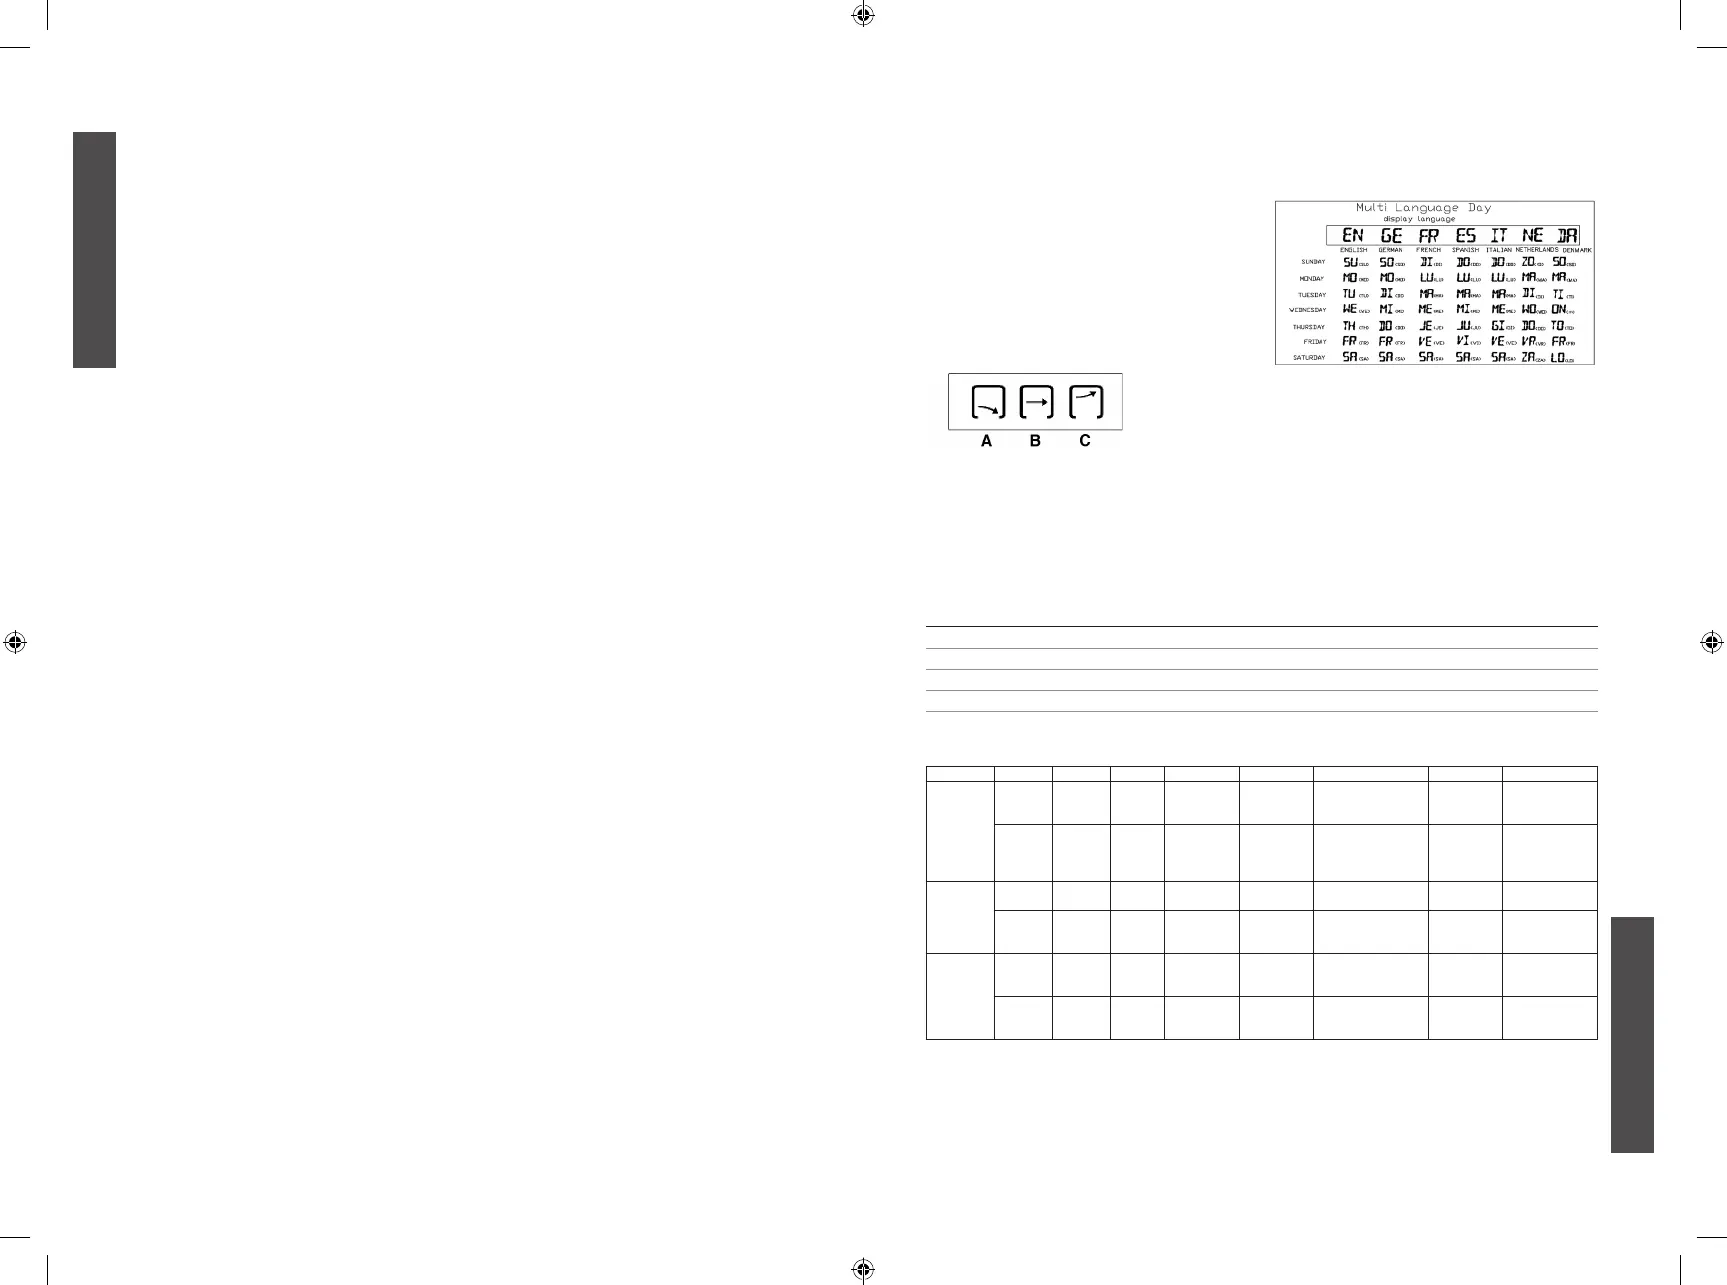
Seven Language For Your Reference:
3
ENGLISH
2
ENGLISH
OPERATION INSTRUCTION
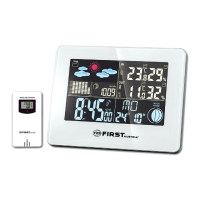
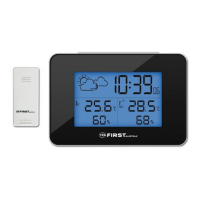
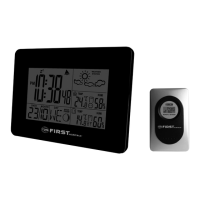
1. MAIN FUNCTIONS:
1. Weather forecast for 4 states: sunny, semi-
sunny, cloudy, rainy
2. Seven function keys: SET, ALARM, CH,MAX/
MIN, UP, DOWN/CF, SNOOZE/LIGHT.
3. Seven languages to show the day: English,
Germany, French, Italian, Spanish, Dutch,
Danish
4. 6 digit time display: hour, minute, second
5. Temperature display format selectable (°C/°F),
12/24 hour selectable
6. Calendar indication: 2000-2099
cycle: 15 seconds
8. Indoor humidity range: 20-95%, sampling cycle:
15 seconds
9. Outdoor temperature/humidity with RF: up to 3
channels
10. In/out trend indication of temperature/humidity
11. Indication of the comfort index
12. The function of Alarm/Snooze
13. Moon phase
2. POWER-ON AND RESET
1. When Power-On and reset, LCD full display for
3 seconds enter the normal state after “Beep”
check temperature and humidity
2. The calendar defaults 0:00 January 1, 2007
3. Alarm defaults 0:00
4. Time system defaults 24Hr.
5. The weather icon defaults semi-sunny
3. INSTRUCTION OF OPERATING THE
KEYS
3.1 Key functions (see table)
3.2 Normal states
1. Hold “SET” to enter into time setting
2. Click “ALARM” to switch the alarm on/off
3. Hold “ALARM” for 2 seconds to enter into Alarm
setting
4. Click “UP” to switch between 12hr/24hr
5. Press “DOWN/CF” to switch between °C/°F
6. Click “MAX/MIN” to switch Maximum/Minimum
temperature and humidity
7. Hold “MAX/MIN” for 2 seconds to clear the
history record of temperature and humidity
8. When ALARM rings, click “SNOOZE/LIGHT” to
enter into the snooze state every 5 minutes
9. Click “SNOOZE/LIGHT” the backlight will be on
for 5 seconds
10. Press “CH” to switch RF channel, CH1 CH2
CH3
11. Hold “CH” key for 2 seconds to clear out all data
of current channel
3.3 Time set
1. Hold “SET” key for 2 seconds to enter into time
setting
2. The sequence of time setting: World Time Zone
Hour Minute Year Month Date
Language Exit
next setting state
5. Press “UP” one time, the setting will go ahead
for one step; hold the key for 2 seconds, it will
run forward by 8 steps/second.
6. Press “DOWN/CF” one time, the setting will
backward for one step; hold for 2 seconds, it will
run back by 8 steps/second.
7. Moon phase is changed accordingly the
changing of month and date
8. The system will exit automatically if no key is
operated in 8 seconds.
3.4 Alarm set
1. Hold “ALARM” key for 2 second to enter into
alarm setting
2. The sequence of alarm setting: Hour Minute
Exit
the next setting state
5. Press “UP” one time, the setting will go ahead
for one step; hold the keys for 2 seconds, it will
run forward by 8 steps/seconds.
6. Press “DOWN/CF” one time, the setting will
backward for one step; hold for 2 seconds, it will
run back by 8 steps/second.
7. The system will exit automatically if no key is
operated in 8 seconds.
4. FUNCTION AND EFFECT
4.1 The receiving function of RF
1. After installing the battery and checking
temperature/humidity, it will enter RF receiving
state automatically for 3 minutes.
2. Under normal display mode, hold the “CH”
key for 2 seconds to clear out the channel
information
3. If there is no effective signal with same ID code
received for the current channel in 35 minutes,
the temperature of that CH will shows “--. -“.
4. The temperature display will resume back when
the correct signal is received again
4.2 The function of alarm
1. The BUZZER will ring for 2 seconds as below:
a. 0-10 sec.: one “beep” per second
b. 10-20 sec.: two “beep” per second
c. 20-30 sec.: four “beep” per second
d. After 30 sec.: “beep” continuously
2. When ringing, click “SNOOZE/LIGHT” key once
to enter into 5 minutes snooze states, exit if any
other key is clicked.
4.3 The function of temperature and humidity
2. The indoor & outdoor humidity range: 20-95%
3. Sampling period: 15 seconds.
The comfort – level icons:
COMFORT LEVEL ICON DISPLAY TEMPERATURE RANGE HUMIDITY RANGE
DRY
L
-5°C to +50°C under 40%
COMFORT
J
+20°C to +28°C 40% to 70%
WET
K
-5°C to +50°C Over 70%
NO INDICATION -
K
Less than 20°C or more than 28°C Less than 40% or more than 70%
Key functions:
Operation Function SET Alarm Up Down/CF Snooze/Light CH MAX/MIN
Standard
mode
Click ----- Alarm
on/off
12hr/24hr
switchable
°C/°F
switchable
Backlight/Enter into
snooze state
Switchable
between
CH 1, 2, 3
Display the max/
min temperature
and humidity
Hold Enter
into clock
setting
Enter
into
alarm
setting
----- ----- ----- Clear current
registered ch
Delete the max/
min temperature
and humidity
record
Time set Click
the setting
----- One step
forward
One step
backward
Backlight ----- -----
Hold ----- ----- 8 steps/
second
forward
8 steps/
second
backward
----- ----- -----
Alarm set Click -----
the
setting
One step
forward
One step
backward
Backlight ----- -----
Hold ----- ----- 8 steps/
second
forward
8 steps/
second
backward
----- ----- -----
m_2461_kl_v03.indd 2-3 10/15/12 2:30 PM
 Loading...