EasyManua.ls Logo

U-Line H-39 - User Manual

U-Line H-39
3 pages
Print Icon
To Next Page IconTo Next Page
Loading...
PAGE 1 OF 3 0321 IH-39
H-39
INDUSTRIAL
STRAPPING CART
1-800-295-5510
uline.com
LOAD NEW COIL OF STRAPPING
NOTE: Instructions apply for loading a 16"
diameter core of plastic or steel strapping.
1. Lay the dispenser down on its back and loosen the
wing nut by turning it counter-clockwise.
2. Remove the wing nut and the front reel disc
assembly.
NOTE: Observe the pay-off direction of the
lead end. When the coil is mounted, the
lead end should point toward the brake arm
strap guide. As the strap is used, the coil and
flanges will rotate clockwise.
3. Place a new coil of strapping on the dispenser.
CAUTION!: Steel strapping is heavy. Use proper
lifting techniques to avoid personal injury.
Always wear gloves when handling steel
strapping.
4. Align and center the larger coil core and lower the
new coil over the central hub, allowing it to settle
over the smaller circular indentation on the hub reel
disc.
5. Cut and remove the tie closest to the lead end of
the strapping.
6. Thread the lead end through the brake arm strap
guide.
7. Cut and remove the remaining ties. For steel
strapping, replace the front reel disc with the core
indentation facing inward so that the indentation
fits into the core of the coil. The flat face of the front
reel assembly should be facing outward.
8. Place the front reel disc assembly on the coil.
9. Replace and securely tighten the wing nut by
turning it clockwise.
CAUTION! The wing nut must be tight to
prevent tangling of strapping.
10. When the wing nut is secure, stand the dispenser
upright. Turn the lead end back on itself over the
strap guide assembly to prevent personal injury.
INSTRUCTIONS
Para Español, vea página 2.
Pour le français, consulter la page 3.
Question and Answer IconNeed help?

Do you have a question about the U-Line H-39 and is the answer not in the manual?

U-Line H-39 Specifications

General IconGeneral
BrandU-Line
ModelH-39
CategoryOutdoor Cart
LanguageEnglish

Summary

Instructions

Load New Coil of Strapping

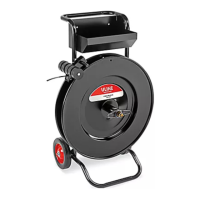
Steps for loading a new coil of plastic or steel strapping onto the dispenser.

Prepare Dispenser and Loosen Wing Nut

Lay dispenser down and loosen the wing nut counter-clockwise.

Remove Reel Assembly

Remove the wing nut and the front reel disc assembly.

Place New Coil on Dispenser

Place a new coil of strapping onto the dispenser, aligning the core.

Handle Steel Strapping Safely

Caution: Steel strapping is heavy; use proper lifting and wear gloves.

Align and Settle Coil

Align and center the coil core over the central hub to settle it.

Remove Strapping Tie

Cut and remove the tie closest to the lead end of the strapping.

Thread Lead End

Thread the lead end of the strapping through the brake arm strap guide.

Prepare Reel Disc for Steel Strapping

For steel, orient the reel disc indentation inward before placing on coil.

Replace Reel Disc and Tighten Nut

Place the front reel disc assembly and securely tighten the wing nut clockwise.

Ensure Wing Nut Tightness

Caution: Wing nut must be tight to prevent strapping tangling.

Final Setup and Safety Check

Stand dispenser upright and secure lead end to prevent injury.

Related product manuals