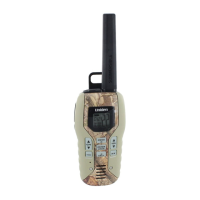
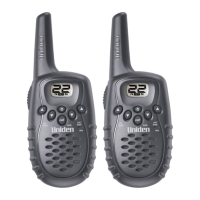
GMR5088-2CKHS, GMR5095-2CKHS
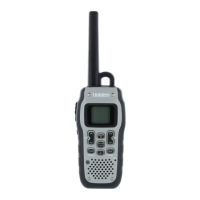
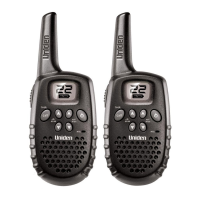
GMR5098-2CKVP
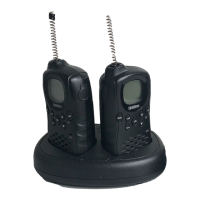
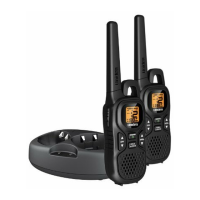
CHARGING CRADLE
1
2
3
4
5
6
7
10
11
12
13
14
17
19
22
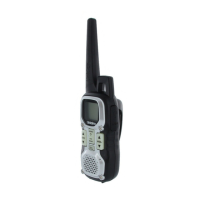
LIQUID CRYSTAL DISPLAY
9
8
15
16
18
20 21
Radio color/pattern varies
according to model number.
23
24
25
*Range may vary depending on environmental
and/or topographical conditions.
• 15GMRS/7FRSChannels
• 7WeatherChannels
• 142PrivacyCodes(CTCSS
ToneandDCSCode)
• Upto50MileRange*
• InternalVOXCircuitry
• TRUWaterproof™(JIS7)—
SubmersibleandFloats
• DirectCallwithName
Display
• 143GroupCodes
• SilentMode
• 10SelectableCall/RingTone
Alerts
• BacklitLCDDisplay
• RogerBeep
• CallAlert;Vibrate
• 2EarbudswithVOXMicor2
1 Antenna 14 Enter/Lock
2 PushtoTalk 15 BatteryLevel
3 Boost 16 GroupNumber
4 Monitor 17 GroupIndicator
5 ChannelUp/Down 18 RX(Receive)orTX
(Transmit)Indicator
6 Tone 19 VOXIndicator
7 DCall 20 MissedCallIndicator
8 Microphone 21 AlertIndicator
9 Speaker 22 ChannelNumber
10 Flashlight/Monitor 23 ChargingLED
11 Menu/Power 24 Chargingcontacts
12 VolumeUp/Down 25 miniUSBport
13 Weather
CongratulationsonyourpurchaseofaUniden
GMRS(GeneralMobileRadioService)
waterproofradio.Theselightweight,palm-sized,
radiosarestate-of-the-artdevices.The
GMR5088-2CKHSandGMR5095-2CKHS
modelsincludeearbudvoxmics.GMR5098-
2CKVPincludestwoVOXheadset boommics.
Usethematsportingeventstocontactfamily
andfriends,whilehiking,skiing,oroutdoors,or
inaneighborhoodwatchforvitalcommunication
—evenoutsidebythepool!Don'tworry;they
float!
Your radio complies with JIS7 water-
resistant standards, which means the radio
can be submerged in 1.0 meters of water for
30 minutes without damage.
• Theradiowillonlymeetthisratingiffully
assembledandallrubbersealsandthejack
coverarewellmaintainedandcorrectlyfitted.
ThismeansthattheHeadsetplugisnot
inserted,andtheHeadsetjackcoverandthe
batterypackareattachedandsecurely
fastened.
• Afteryourradioissubmergedinwater,you
mightnoticethatthesoundisdistorted.Thisis
becausewaterremainsinandaroundthe
speakerandmicrophone.Justshaketheradio
toclearexcesswater,andthesoundshould
returntonormal.
Note: If your radio is exposed to salt water,
clean your radio thoroughly with fresh water
and dry it before turning it on.
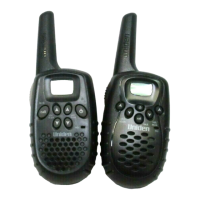
PACKAGE CONTENTS
Yourpackagecontainstworadios,6
rechargeableAANiMHbatteries,oneACadapter
withmicroUSBconnector,onechargingcradle,2
earbud/micheadsetsforGMR5095-2CKHSand
GMR5088-2CKHS(GMR5098-2CKVPhastwo
headsetboommics),twobeltclips,andthis
referenceguide.Toorderthefollowingoptional
accessories,visitourwebsiteatwww.uniden.
com.Use only Uniden accessories.
• NiMHBatteries–#BP-38
• ChargingCradle–#RC-658R
• HeadsetBoomMic–#ZA-133orZA-160
• ACAdapter–#AD-0001
• CarabinerClip–#TSTD0720002
GMRS LICENSE
The radio operates on the General Mobile
Radio Service (GMRS) frequencies when
using Channels 1-7 and channels 15-22. You
must have a GMRS license issued by the
Federal Communications Commission to
legally use these channels.
For licensing information and application
forms, visit the FCC online at: www.fcc.gov/
wtb/uls or call the FCC hotline at 1-800-418-
3676. If you have any questions, you can
contact the FCC direct at 1-888-225-5322. No
license is required for operation on channels
8-14 or operation on any channel in Canada.
INSTALL THE BATTERY
Eachradiouses3rechargeableAANiMH
batteriesforpower(included).Itcanalsouse
non-rechargeableAAalkalinebatteries(not
included).ToinstalltheNiMHbatteries:
1.Turnthe screwholdingthebattery
compartmentcounterclockwisewitha
screwdriverandliftupthebatterycover,
2.Insert theNiMHbatteriesin thebattery
compartmentaccordingtothedirections
indicatedonthebattery.Installingthe
batteriesincorrectlywillpreventtheunitfrom
operating.
3.Before placingthebatterycoverbackonthe
radio,checktherubbersealaroundthe
batterycompartment.Makesurethattheseal
isingoodconditionandthatthereisno
foreignmatterunderit.
4.Replace thebatterycompartmentdoor.
Tightenthescrewssecurely.
Note:If the rubber seal appears worn, nicked,
or dried out, replacement seals are available
from www.uniden.com.
CHARGING THE RADIO
Followtheseinstructionstochargeorrecharge
yourradios.
Make sure to turn the radio OFF before
placing it in the charging cradle.
1.Insert theadapter'smicroUSBplug toDCIN
5VUSBjackofthechargingcradleandplug
theotherendintoanACoutlet.
2.Set thechargingcradleonastabledeskor
tabletopandplacetheradiosinthecharging
cradlewiththekeypadfacingforward.
3.Make surethattheLED illuminates.Charge
thebatteriesfor16hoursandremovethe
radiofromthechargingcradleaftercharging.
Note:
• UseonlythesuppliedbatteriesandAC
adapterorapprovedaccessoriesfrom
Uniden.
• Chargetimemayvarydependingonthe
batteryliferemaining.
• Thebatteriesmustbeinstalledfortheunitto
operate,eveniftheunitisalsoconnectedto
externalpower.
• Ifbatterypowerislow,youcannotoperate
theradioevenusingexternalpower.Allow
thebatteriestochargebeforeusing.Ifyoutry
Choosing a Channel
Yourradiohas22channelsand142Privacy
codesyoucanusetotalktoothers.Inorderto
speaktosomeone,bothyourradiosmustbeset
tothesamechannelandPrivacycode.
Tochooseachannel:
PressCH or ,thenpressCH or
toincreaseordecreasethechannel
numberdisplayed.
Toscrollthroughthechannels,pressCH or
,thenpressandholdCH or formore
than1second.
Note: Channels 1-7 and 15-22 have a typical
range of up to 50 miles by pressing BOOST.
HI displays when you select a GMRS
channel, and LO displays when you select
an FRS channel.
SETTING UP GROUP MODE
Groupmodeletsseveralpeopletalkonthe
samechannelinaseparategroup.Inorderto
useGroupmode,youneedtoinitializespecific
settingsinyourradio:
• SettheradiotoGroupmode.
• SetaGroupCode.
• SetaUnitNumber.
• Seta"Nickname."
Setting the Radio to Group Mode
TosettheradiotoGroupmode,whichenables
DirectCall,AutoChannelChange,andAllCall,
pressandholdTONE/GROUPfor 2seconds.
TheradiodisplaysGRP andgroupcode.
Note: In Group mode, you cannot receive
transmissions from other radios unless
they are also set to the same channel and
group code.
Setting the Group Code
Setthegroupcodeforyourradiogroupfrom
0-142.Everyoneinyourgroupmustselectthe
samegroupcodeinordertocommunicatewith
eachother.
1.PressTONE/GROUPinGroupmode.Press
CH or toselectthegroup number.
2.Press ENTER/ orTONE/GROUPtoreturn
tonormaloperation.
Setting the Unit Number
Eachradioinyourgroupneedstobesettoa
uniqueunitnumber,from1-16.
1.Press MENU/ .Advancethroughthe menu
untilUNITappears,andthenpressENTER/
.Thecurrentunit numberflashes.
2.Press CH or toselectthedesiredunit
number.
3.Press ENTER/ tocontinuetothenext
section.
Setting Your Nickname
Yournicknameappearsonotherunits’displays
whenyoumakeanAllCallorDirectCall.Thisis
alsothenamethatappearsonotherradio
displayswhensomeonewantstomakeaDirect
Calltoyou.Withoutanickname,theunit
numbershows.
1.Press MENU/ .Advancethroughthe menu
untilUNITappears,andthenpressENTER/
.Thecurrentunitnumber flashes,then
pressENTER/ .Theradiodisplays
- - - -
(oryourcurrentnickname)withthefirstplace
inthenicknameflashing.
2.Press CH or toselecttheletter,then
ENTER/ toadvancetothe nextletteruntil
youhaveenteredyournickname.
3.Press MENU/ to confirmthesettingand
exitthemenu.
Using Group Mode
Groupmodeletsyoumakedirectcallstoother
peopleinyourgroupwithoutalertingtheentire
groupandalsoletsyouquicklychange
everyoneinyourgrouptoanotherchannelfrom
asingleradio.BeforeusingGroupmode,follow
theinstructionsin"SettingUpGroupmode"on
everyradioinyourgroup.Then,torecordthe
unitIDandeveryone’snickname ineveryradio,
sendacallto"All"fromeachradioonetime
(see"SendingaDirectCall").
Sending a Direct Call
DirectCallletsyoucalleveryoneinyourgroup
atonce,orcallasinglepersoninyourgroup
withoutanyoneelseinthegroupknowing.Itis
likea"speeddial"directlytotheperson(s)you
wanttotalkto.
Tocalleveryoneinyourgroup,pressD CALL in
Groupmode.Theradioflashes ALL.Then,
pressD CALL or ENTER/ .Everyoneinyour
groupreceivesacall"chirp"forabout3
seconds.Whenthechirpends,beginyour
conversation.
Note:When you make a direct call to "all," your
radio also sends out your nickname or ID so
that it will show up in the call list for everyone in
your group.
Tocallonepersoninyourgroupwithouthaving
otherpeopleknow,pressD CALLinGroup
mode.Then,useCH or toselectthe
personyouwanttocallandpressD CALL or
ENTER/ .Yourradiosoundstonesfor3
secondsasitsendsthecall.Whentheselected
personanswers,youcanbeginyour
conversation.
Youcansilencethecalltonesanytime by
pressingPTTorBOOST.
from brand to brand. See the specifications
for the specific tones used for each setting.
Channel Scan Feature
Yourradiohasachannelscanfeaturethatlets
youeasilyscanall22channels.Whenanactive
channelisdetected,theradiopausesonthat
channeluntilthechannelisclear.Thenaftera
2-seconddelay,theradioresumesscanning.
PressingPTTorBOOSTwhilethescanis
pausedonachannelletsyoutransmitonthat
channel.
Toturnonchannelscan:
PressMENU/ .The radiodisplaysSCAN.
PressENTER/ .Thechannelnumberchanges
astheradiorapidlycycles throughthechannels.
UsetheradioinStandard(notGroup)mode
whenyouneedtobeabletocommunicatewith
radiosthatdonothavethegroupfeature.
Talking on Your Radio
Totalktoothersusingtheradio:
1.Press andholdPTTor BOOSTandspeakin
aclear,normalvoiceabout2-3inchesaway
fromthemicrophone.Whileyoutransmit,
TXHIorTXLOappearsonthedisplay
accordingtothetypeofchannel.Toavoid
cuttingoffthefirstpart ofyourtransmission,
pauseslightlyafterpressingPTTorBOOST
beforeyoustarttalking.
2.When youfinishspeaking,release PTTor
BOOST.Youcannowreceiveincomingcalls.
Whilereceiving,RXappearsonthedisplay.
Note:
• When you press BOOST, BOOST appear on
the display. The radio transmits at maximum
power when a GMRS channel is selected.
• IfBOOST,PTTorVOXiscontinuouslyused,
1minuteafteryoustartusingthefeaturethe
transmissionstopsandyouhearatimeout
errortone.
Monitor Mode Feature
Yourradioletsyoulistenforweaksignalson
thecurrentchannelatthepressofakey.
ToturnontheMonitormode:
• PressandholdLIGHT/MONfor2seconds
untiltwobeepssoundforcontinuous
listening.Thereceivercircuitstays open,so
youhearboththenoiseandweaksignals.
ToturnoffMonitor mode:
PressLIGHT/MONtoreturntotheprevious
mode.MONandRXdisappear.
Navigating through the Normal Menu
YourradiohasaMenufunctiontoaccess
advancedfeatures.InordertouseAuto
ChannelChange,youneedtosetyourradioto
Groupmode.
Start
Scanning
Scan
Mode
Silent
Mode
ON-OFF
Auto
Channel
Change
Channel
Change
VOX
Level
OFF, 1-5
1-10
Call
Tone
Unit
Setting
Setting
Unit
Number
Roger
Beep
ON-OFF
Beep
Tone
ON-OFF
Setting
Nickname
1.Toenterthemenu,press MENU/ .
2.Press MENU/ again toadvancethrough
themenu.Afterthelastmenuitem,theradio
exitstothepreviousmode.
3.Other waystoexitthe Menufunctionare:
a.Press PTT,BOOST,LIGHT/MON, D
CALL, WX/ALERT or TONE/GROUP.
b.Wait10 secondsuntiltheradio
automaticallyreturnstotheprevious
mode.
Setting Silent Mode
WhenyouturnonSilentmode,allincoming
callsaremuted,thedisplaybacklightflashes,
andthechannelindicatordisplaysSLNTand
CALLtoalertyoutoanincomingcall.Ifyoudo
notrespondtothecallwithin15seconds,the
backlightturnsoff.TheGMR5095will also
vibratetoremindyouthatyoumissedacall.
Silentmodeisdisabledfor15secondswhen
youtransmit,receive,orpressanyotherbutton.
TosetSilentmode:
1.Enter themenu.Advancethroughthemenu
untiltheSLNTdisplays,thenpressENTER/
.Thecurrentsettingflashes.
2. Press
CH
todisplayon,thenpressENTER/
Note: To prevent unwanted silent alerts, be sure
to use a Privacy Code or Group Code whenever
you use the Silent mode feature.
You can hear the received voice when you turn
on channel scan and an active channel is
detected, even during Silent mode.
Missed Call Alerts
IfyoureceiveanincomingcallwhileSilent
modeisonanddonotrespond,theradiowill
turnontheMissedCallicon.Ifyouareusing
Groupmode,theradiowillalsoindicatewho
madethecall.
TheGMR5095willalsoremindyouofamissed
callbyvibratingeveryminuteafterthecallfor3
minutes.
HeadsetBoomMics
• BOOSTforMaximum
Range*
• HeadsetJack
• AutoChannelChange
Call
• BatteryLevelMeter
• RechargeableNiMH
Batteries
• DualChargingCradle
withACAdapter
• ChannelMonitor
• ChannelScan
GroupScan
• KeypadLock
• EmergencyWeather
Alert
• EmergencyLight
Yourconversationremainsprivatebetweenyou
andthepersonyoucalleduntil15secondsafter
yourlastconversation.Then,your radio
automaticallyexitsPrivatemode.
Automatically Changing Channels
AutoChannelChangeletsyoueasilycoordinate
achannelchangeforeveryoneinyourgroup.
Youmightwanttodothiswhenyou findyouare
gettingalotofinterferenceonyourcurrent
channel.Youalsousethisfeaturetochange
fromalow-powerchannel(8-14)tooneofthe
high-poweredchannels(1-7,15-22)formore
range(ortoalow-powerchannelifyouneed
longerbatterylife).
Tostartanautochannelchange,onanyradio
inthegroup,pressMENU/ . Advancethrough
themenuuntilCHCX appears,thenpress
ENTER/ . Thecurrentchannelflashes. Use
CH or to selectthetargetchannel.You
cancheckwhethertheselectedchannelis
clear.ThenpressD CALLorENTER/ .
Yourradiochirpsforabout10secondswhile it
sendsoutthechannelchangesignal.Aseach
radioreceivesthechannelchangesignal,it
chirpsonce,thenchangestothenewchannel.
Toensureallradiosmakeittothenewchannel,
werecommendyou:
• Makesureyouareinanopenenvironment,
wheretheradiowillgetthebestrange.
• Optimizerangeduringthechannelchange
signalbyraisingtheradiooveryourheadto
givethebestpossibleheight.
• Doa"rollcall"onthenewchannelafterthe
movetobesurenoonewasleftbehind.If
youmissedsomeone,returntotheprevious
channelandissuethesignalagain.
USING THE RADIO IN
STANDARD MODE
UsetheradioinStandard(notGroup)mode
whenyouneedtobeabletocommunicatewith
radiosthatdonothavethegroupfeature.
Choosing a Privacy Code
YoucanselectaPrivacyCodefrom1-142for
eachchannel.oF(off)indicates noPrivacy
Codeselectedandyourradiocanreceivea
signalregardlessofthecodesettingsofthe
transmittingradio.
1.Press TONE/GROUP.ThePrivacyCode
indicatorflashes.
2.Press CH or toincreaseordecrease
thecode.YoucanalsoselectoF.
3.Press ENTER/ orTONE/GROUP toreturn
tonormaloperation.
Note: Only tones 1-38 are standard across
radio brands. Other settings might differ
Voice Operated Transmission
Yourradioisequippedwithauserselectable
VoiceOperatedTransmitter(VOX)thatcanbe
usedforautomaticvoicetransmissions.TheVOX
featureisdesignedtobeusedwithaheadsetwith
amicrophone.Initiatetransmissionbyspeaking
intotheremotemicrophoneinsteadofpushing
PTTandBOOST.ToselecttheVOXlevel:
1.Press MENU/ .Advancethroughthe Menu
untilVOXappearsonthedisplay, thenpress
ENTER/ . The currentlevel(off,1-5) flashes.
LeveloF(off)disablesVOX, whilelevels1-5
setthesensitivityoftheVOXcircuit.
2.Press eitherCH or toreachthedesired
VOXsensitivitylevel,thenpressENTER/ .
Uselevel1forincreasedsensitivitytovoicein
normallyquietenvironments,anduseahigher
leveltoreduceundesiredactivationinvery
noisyenvironments.
Transmitting a Call Tone
Yourradioisequippedwith10selectablecall
tonesthataretransmittedwhenyoupressD
CALLinStandardmode.
Theselectedtonealsowillbeheardwhen
someoneplacesadirectcalltoyou.
Toselectacalltone:
1.Press MENU/ .Advancethroughthe menu
untilCALLappears,thenpressENTER/ .The
currentcalltonenumber(1-10)flashes.
2.Press CH or toincreaseordecreasethe
numbertothedesiredcalltone.Eachtonewill
beheardthroughthespeaker.PressENTER/
toselectacalltone.
Totransmittheselectedcalltone,pressD CALL.
Theselectedtoneistransmittedforafixedlength
oftime.PressPTTorBOOSTtocancel.
Roger Beep
RogerBeepisabeepthatissenttonotifytheend
oftransmission(bothPTTand VOXtransmission).
YoucanhearRogerBeepthroughthespeaker
whenbothRogerBeepandBeepToneareon.
WhenRogerBeepisonandBeepToneisoff,you
donothearRogerBeep,butitistransmittedto
yourparty.
ToadjustRogerBeep,pressMENU/ .Advance
throughthemenuuntilRGRappears,thenpress
ENTER/ .Thecurrentsettingflashes.
ToturnoffRoger Beep:
PressCH todisplayoF,thenpressENTER/
ToturnonRogerBeep:
PressCH todisplayon,thenpressENTER/
Adjusting the Sound (Beep Tone)
Yourradiosoundsabeepeachtimeyou
pressakey(exceptforPTTandBOOST).
totransmitwhilepowerislow,theradiowill
automaticallyturnoff.
• Chargetimemayvarydependingonthe
batteryliferemaining.
• Donotrechargealkalinebatteries.Doingso
cancreateasafetyhazardordamagethe
radio.
• Forfastercharging,turnofftheradiobefore
charging.
Warning!
• Thechargingcradleisnotwaterproof.Ifthe
chargingcradlefallsinthewater,unplugit
beforeattemptingtoremoveitfromthewater.
Allowthecradletodrycompletelybefore
reconnectingthepower.
• Wipeoffdirtorshake waterfromyourradio
beforeplacinginthechargingcradleifyour
radioissoiledorwet.
USING A HEADSET
GMR5088-2CKHSandGMR5095-2CKHSboth
comewithanearbudheadsetwithmiconthe
cord.TheGMR5098-2CKVPcomeswithboom
micheadset.Touseaheadset,lifttherubber
coverfromovertheheadsetjack,thenplugin
theheadset.
Important: Your radio is not waterproof when
using a headset jack. When you remove the
headset, be sure to fully press the jack cover
into place to restore its waterproof capability.
USING RADIO BATTERY LEVEL
AND LOW BATTERY ALERT
Thisradiohasabatterylevelmeterthat
indicatesthebatterypowerlevel.Whenthe
batterylevelislow,thebatterylevelmetericon
flashesandthenBATT appearsafter30
seconds.RechargetheNiMHbatteries
immediately.
Warning!To avoid the risk of personal injury or
property damage from fire or electrical shock,
only use the Uniden accessories specifically
designated for this product.
USING THE RADIO
Inordertogetthemostoutofyournewradio,
readthisreferenceguidecompletelybefore
attemptingtooperateit.
Turning the Radio On and Adjusting
the Volume
1.Press andholdMENU/ toturntheradio
on.
2.Press VO or toincreaseordecrease
thevolumelevelthenpressENTER/ .
3.Press andholdMENU/ toturntheradio
off.