SECTION A, PAGE 6
BE SURE THAT THE PIPE FITTING THAT YOU THREAD INTO THESE
PORTS IS NON-METALLIC. IT CAN BE PVC OR NYLON. ANY
METALLIC FITTING (GALVANIZED, BRASS, ETC.) PUT INTO THESE
PORTS CAN EVENTUALLY CAUSE A HOLE IN THE WATER-
COOLED JACKET THAT WILL FLOOD THE CONTROL WITH WATER
AND DESTROY THE SYSTEM. WARRANTY IS VOID IF METALLIC
FITTINGS ARE INSTALLED IN THESE PORTS!
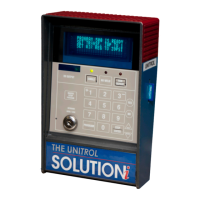
If your control does NOT have a remote console
as shown in the photo below, skip to A12.
A11. MOUNTING THE REMOTE CONSOLE:
A11.1 LOCATION: Select a location on the welder
to mount the remote console. Ideally this should be at
eye level and close enough for easy data input on the
keypad.
A11.2 BRACKET: Bolt the U bracket supplied with
the console to a secure surface on the welder and mount
the console with the two ¼” thumb screws supplied. Be
sure that the location allows the console to swing both
ways.
A11.3 PLUG IN CONSOLE: Plug the cable into
the socket at the back of the remote. HAND tighten the
two jack screws.
DO NOT TIGHTEN THESE SCREWS WITH A SCREWDRIVER
OR PLIERS. EXCESS FORCE WILL BREAK THE SOCKET
FASTENER AND VOID THE WARRANTY!
A11.4 ROUTE CABLE: Route this remote console cable to the power
supply cabinet and push the excess cable into the large compression fitting supplied
on the cabinet top. Be sure that there is enough of a loop at the console to allow full
movement of the console. Tighten strain relief fitting.
U bracket mounted to console.
Notice that the top of the
bracket has the threaded insert.
 Loading...