EasyManua.ls Logo

Unitronics V200-18-E3XB - User Manual

Unitronics V200-18-E3XB
16 pages
Print Icon
To Next Page IconTo Next Page
Loading...
Unitronics 1
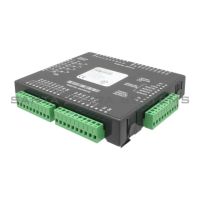
V200-18-E3XB Snap-in I/O Module
The V200-18-E3XB
plugs directly into the
back of compatible
Unitronics OPLCs,
creating a self-
contained PLC unit
with a local I/O
configuration.
Features
18 isolated digital inputs, includes 2 H.S.C inputs, ty
pe pnp/npn
(
source/sink)
15 isolated relay
outputs
2 isolated pnp/npn (source/sink) transis
tor outputs, includes 2 H.S. outputs
4 isolated analog/PT100/TC inputs
4 isolated analog outputs
Before using this product, it is the responsibility
of the user to read and understand this document
and any
accompany
ing documentation.
All examples and diagrams shown herein ar
e intended to aid understanding, and do not guarantee
operation. Unitronics accepts no responsibility
for actual use of th
is product based on these
examples.
Please dispose of this product in accordance wi
th local and national standards and regulations.
Only qualified service personnel should open this device or carry
out repairs.
User safety and equipment protection guidelines
This document is intended to aid trained and competent personnel in the installation of this equipment as
defined by the European directives for machinery, low voltage, and EMC. Only a technician or engineer trained
in the local and national electrical standards should perform tasks associated with the device’s electrical wiring.
Symbol Meaning Description
Danger
The identified danger causes phy
sical
and property damage.
Warning
The identified danger can cause
phy
sical and property damage.
Symbols are used to highlight
information relating to the user’s
personal safety and equipment
protection throughout this document.
When these symbols appear, the
associated information must be read
carefully and understood fully.
Caution
Caution Use caution.
Failure to comply with appropriate safety guidelines can result in severe personal injury
or property damage. Always exercise proper caution when working wi
th electrical
equipment.
Check the user program before running it.
Do not attempt to use this device with
parameters that exceed permissible levels.
Install an external circuit breaker and take appropriate safety measures against short-
circuiting in external wi
ring.
To avoid damaging the system, do not connect / disconnect the device when the pow
er
is on.
Caution
Ascertain that terminal blocks are properly
secured in place.
Environmental Considerations
Do not install in areas with: excessive or conductive dust, corrosi
ve or flammable gas,
moisture or rain, ex
cessive heat, regular impact shocks or ex
cessive vibration.
Provide proper ventilation by leaving at least 10mm of space betw
een the top and
bottom edges of the device and the enclosure w
a
lls.
Do not place in water or let wa
ter leak onto the unit.
Do not allow
debris to fall inside the unit during installation.
Question and Answer IconNeed help?

Do you have a question about the Unitronics V200-18-E3XB and is the answer not in the manual?

Overview

The V200-18-E3XB is a snap-in I/O module designed to integrate directly into compatible Unitronics OPLCs, forming a self-contained PLC unit with local I/O capabilities.

Function Description:

This module provides a comprehensive set of I/O features for industrial automation applications. It includes 18 isolated digital inputs, 15 isolated relay outputs, 2 isolated transistor outputs, 4 isolated analog/PT100/TC inputs, and 4 isolated analog outputs. The digital inputs support both pnp (source) and npn (sink) types, with two inputs capable of high-speed counter (HSC) functionality. The relay outputs are SPST-NO (Form A) and are isolated by relay. The transistor outputs are high-speed and can be individually configured as pnp (source) or npn (sink) via wiring and jumper settings. The analog inputs are highly versatile, supporting current, voltage, RTD (PT100), and thermocouple (B, E, J, K, N, R, S, T types) measurements, configurable via wiring and jumper settings. The analog outputs provide 0-10V or 4-20mA signals.

Important Technical Specifications:

Digital Inputs:

  • Number of inputs: 18 (in two groups)
  • Input type: pnp (source) or npn (sink)
  • Galvanic isolation: Digital inputs to bus (Yes), Digital inputs to digital inputs in same group (No), Group to group (Yes)
  • Nominal input voltage: 24VDC
  • Input voltage (pnp source): 0-5VDC for Logic '0', 17-28.8VDC for Logic '1'
  • Input voltage (npn sink): 17-28.8VDC for Logic '0', 0-5VDC for Logic '1'
  • Input current: 6mA@24VDC for inputs #4 to #17, 8.8mA@24VDC for inputs #0 to #3
  • Response time: 10mSec typical
  • High-speed inputs (0, 2): 32-bit resolution, 10kHz maximum frequency, 40µs minimum pulse width. Inputs 1 and 3 can be used as counter resets.

Digital Outputs (Power Supply):

  • Nominal operating voltage: 24VDC
  • Operating voltage: 20.4 to 28.8VDC
  • Quiescent current: 20mA@24VDC
  • Max. current consumption: 85mA@24VDC (excluding PNP output requirements)
  • Galvanic isolation: Digital power supply to bus (Yes), Digital power supply to relay outputs (Yes), Digital power supply to transistor outputs (No)

Relay Outputs:

  • Number of outputs: 15 (in two groups)
  • Output type: SPST-NO (Form A)
  • Isolation: By relay
  • Type of relay: Tyco PCN-124D3MHZ or compatible
  • Output current: 3A maximum per output (resistive load), 8A maximum total for common (resistive load)
  • Rate voltage: 250VAC / 30VDC
  • Minimum load: 1mA@5VDC
  • Life expectancy: 100k operations at maximum load
  • Response time: 10mS (typical)

Transistor Outputs:

  • Number of outputs: 2, high-speed
  • Output type: pnp: P-MOSFET (open drain), npn: N-MOSFET (open drain)
  • Galvanic isolation: Transistor outputs to bus (Yes), Transistor outputs to transistor outputs (No), Transistor outputs to relay outputs (Yes)
  • Output current: pnp: 0.5A maximum per output, npn: 50mA maximum per output
  • Maximum frequency: Resistive load (pnp: 2kHz, npn: 50kHz), Inductive load (0.5Hz)
  • ON voltage drop: pnp: 0.5VDC maximum, npn: 0.4VDC maximum
  • Short circuit protection: Yes (pnp only)
  • Operating voltage: 3.5V to 28.8VDC

Analog I/O's Power Supply:

  • Nominal operating voltage: 24VDC
  • Operating voltage: 20.4 to 28.8VDC
  • Quiescent current: 70mA@24VDC
  • Max. current consumption: 130mA@24VDC
  • Galvanic isolation: Analog power supply to bus (Yes), Analog power supply to analog inputs (Yes), Analog power supply to analog outputs (Yes)

Analog/PT100/TC Inputs:

  • Number of inputs: 4
  • Type of input: Set via appropriate wiring and jumper settings.
  • Analog inputs (Input range): 0-10V, 0-20mA, 4-20mA
  • Conversion method: Successive approximation
  • Resolution: 14-bit (16384 units) at 0-10V, 0-20mA; 3277 to 16384 (13107 units) at 4-20mA. 12 or 14-bit resolution selectable via software.
  • Conversion time: Synchronized to cycle time
  • Input impedance: >1MΩ (voltage), 121.5Ω (current)
  • Absolute maximum rating: ±20V (voltage), ±40mA (current)
  • Full-scale error: ±0.4%
  • Linearity error: ±0.04%
  • PT100 inputs (Input range): -200 to 600°C/-328 to 1100°F, 1 to 320Ω.
  • PT100 Resolution: 0.1°C/0.1°F
  • Thermocouple inputs (Input range): As per table on page 15.
  • Thermocouple Resolution: 0.1°C/0.1°F maximum
  • Warm-up time (Thermocouple): ½ hour typically, ±1°C/±1.8°F repeatability

Analog Outputs:

  • Number of outputs: 4 (single-ended)
  • Output range: 0-10V, 4-20mA
  • Resolution: 12-bit (4096 units)
  • Conversion time: Synchronized to scan time.
  • Load impedance: 1kΩ minimum (voltage), 500Ω maximum (current)
  • Galvanic isolation: Analog outputs to bus (Yes), Analog outputs to Analog/PT/TC inputs (Yes), Analog outputs to analog outputs (No)
  • Linearity error: ±0.1%
  • Operational error limits: ±0.2%

Environmental:

  • Operating temperature: 0° to 45°C (32° to 113°F)
  • Storage temperature: -20° to 60°C (-4° to 140°F)
  • Relative Humidity (RH): 5% to 90% (non-condensing)
  • Dimensions (WxHxD): 138x23x123mm (5.43x0.9x4.84")
  • Weight: 279g (9.87 oz)

Usage Features:

  • Wiring: Use crimp terminals for wiring with 26-12 AWG wire. Ensure proper stripping (7±0.5mm), insertion, and tightening of wires. Avoid exceeding 0.5 N·m torque to prevent wire damage. Do not use tin, solder, or other substances on stripped wire. Install wiring at maximum distance from high-voltage cables and power equipment. Input/output cables should not share multi-core cables or the same wire.
  • Digital Inputs: Each group of 9 inputs shares a common signal and can be configured as pnp (source) or npn (sink). Inputs 10 and 12 can be used as normal digital inputs, high-speed counters, or part of a shaft encoder. Inputs 11 and 13 can be used as normal digital inputs, high-speed counter resets, or part of a shaft encoder.
  • Digital Outputs: Use a 24VDC power supply. Each relay output can be wired separately to either AC or DC loads. The 0V signal of relay outputs is isolated from the controller's 0V signal. Transistor outputs can be configured as npn or pnp via jumper settings and wiring. The 0V signal of transistor outputs is isolated from the controller's 0V signal.
  • Analog I/O Power Supplies: A 24VDC power supply is required for all analog input and output modes. The analog I/O power supply is isolated, allowing the controller's 24VDC power supply to be used. The 24VDC power supply must be turned on and off simultaneously with the controller's power supply.
  • Analog Inputs: Inputs can be wired for current or voltage. When set to current/voltage, all inputs share a common ACM signal. RTD inputs require one lead wired to the common signal (CM). 4-wire PT100 can be used by leaving one sensor lead unconnected. Thermocouple inputs support various types (B, E, J, K, N, R, S, T) and can be set to mV by software.
  • Analog Outputs: Outputs can be wired for either current or voltage.
  • Jumper Settings: Jumper settings for analog inputs and digital/analog outputs are critical for configuring the module's functionality. These settings are accessed by removing the module from the controller and then removing the PCB board.

Maintenance Features:

  • Safety Guidelines: Always read and understand the document before use. Only qualified service personnel should open the device. Failure to comply with safety guidelines can result in severe personal injury or property damage.
  • Equipment Protection: Check the user program before running. Do not use the device with parameters exceeding permissible levels. Install an external circuit breaker and take appropriate safety measures against short-circuiting. Do not connect/disconnect the device when power is on. Ascertain that terminal blocks are properly secured.
  • Environmental Considerations: Avoid installation in areas with excessive or conductive dust, corrosive or flammable gas, moisture, rain, excessive heat, regular impact shocks, or excessive vibration. Provide proper ventilation by leaving at least 10mm of space around the device. Do not place in water or allow water to leak onto the unit. Prevent debris from falling inside the unit during installation.
  • Increasing Contact Life Span (Relay Outputs): For inductive DC loads, connect a clamping diode in parallel. For inductive AC loads, connect an RC snubber circuit in parallel.
  • Warm-up Period: For analog inputs and outputs, a warm-up period of half an hour is recommended to ensure proper performance.
  • Shielding: Shields for analog inputs should be connected at the signal source. Shields for analog outputs should be earthed, connected to the earth of the cabinet.
  • Troubleshooting (Analog Inputs): The analog value can indicate faults such as input value deviating above/below the input range or power supply disconnection.
  • Troubleshooting (PT100 Inputs): The analog value can indicate faults such as sensor not connected, value exceeding permissible range, power supply disconnected, or sensor short-circuited.
  • Troubleshooting (Thermocouple Inputs): The analog value can indicate faults such as sensor not connected, value exceeding maximum/minimum, or power supply disconnected.
  • Accessing Jumpers: To access jumpers, turn off power, disconnect and dismount the controller. Discharge any electrostatic charge by touching a grounded object. Avoid touching the PCB board directly; hold it by its connectors. Remove the snap-in module by pressing the 4 side buttons and gently rocking it. Remove the center screw from the upper PCB board and lift the PCB board by its edges.
  • Reassembly: Return the PCB board, secure the center screw. Reinstall the module by aligning circular guidelines and applying even pressure until a 'click' is heard. Ensure all sides and corners are correctly aligned.

Unitronics V200-18-E3XB Specifications

General IconGeneral
BrandUnitronics
ModelV200-18-E3XB
CategoryControl Unit
LanguageEnglish

Related product manuals