GETTING STARTED
button placement
1
7
6
8
9
10
2
3
4
5
MIN/-/MIN: shows minimum temperature
& humidity; adjusts clock, alarm, date and
temperature alarm values
C/F: changes House Code and Channel Code;
selects °C or °F
SET: activates SET function
Table Stand
Battery Compartment
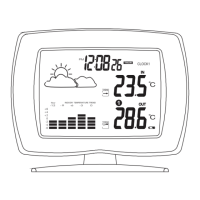
LCD Screen
ON/OFF: toggles between C and F, 12 and
24hourformat,Alarm1&2onandoff,andbar
graph indoor and outdoor selection; scrolls
through temperature alarm settings (off/high/low)
°°
CHN: scrolls through remote channels (1 to 3);
adjusts time and date values
HOUR/+/MAX: shows maximum
temperature & humidity; adjusts clock,
alarm, date and temperature alarm values
SNOOZE/MODE: scrolls through Clock1&2,
Alarm1&2,DateandTemperatureAlarm mode;
snooze for alarm
1
2
3
5
4
6
9
GETTING STARTED
Remove battery cover
Set up the transmitter(s) setting up the receiverbefore
Remove battery cover
2 AA size batteries (included)
2 AA size batteries (included)
setting up transmitter
1
*
1
Temperature and humidity will appear and
on the LCD screenalternate
House code will blink for 8 seconds
2
2
3
3
4
5
6
7
8
9
10
Select House code (1-15) by pressing C/F
Press SET
Press SET
Channel code will blink for 8 seconds
Select Channel code (1-3) by pressing C/F
* If you have multiple transmitters for a single receiver,
set each transmitter to the House codesame
* If you have multiple transmitters for a single receiver,
set each transmitter to a Channel codedifferent
Setting the Temperature Alarm for the Local Temperature
Based on the and data collected from the remote
transmitter (Channel 1), the receiver will display the following weather
icons on the LCD screen.
temperature humidity
The is an ideal feature to be used for greenhouses
and wine cellars, or any place that you require controlled temperature.
Once activated, the temperature alarm would sound when the room gets
too warm or too cold depending on your settings.
temperature alarm
WEATHER ICONS
HISTORICAL TEMPERATURE BAR GRAPH
WS290C + WT440H
Wireless Weather Station
OWNER’S
MANUAL
setting up receiver
WS290C receiver
WT440H transmitter
11
Battery Cover
12
Wall Mount Bracket & Table Stand
%
1
1
1
SET
C/F
-
AA
1
.5V
+
-
AA
1
.5V
+
5
9
1
3
4
7
6
8
10
11
2
Insert batteries into compartment,
observing proper polarity
Insert batteries into compartment,
observing proper polarity; replace cover
Select temperature display in C or F by pressing C/F
°°
Replace battery cover
Congratulations on your purchase of this
weather station set, WS290C + WT440H.
Please take the time to read and
understand this manual so you can begin
to enjoy the convenience and features this
product has to offer.
Main Display Unit WS290C:
* dual clock and dual alarm
* calendar (month/day/date)
* local temperature display
* receives and displays temperature and
humidity readings from up to 3 remote
transmitters via RF technology of 433MHz
* minimum and maximum temperature and
humidity memory
* temperature and humidity trend indicator
* temperature history (bar graph for past
12 hours)
* weather icons
* user-selectable C or F
* table stand or wall mountable
* battery type:2xAA
°°
FEATURES
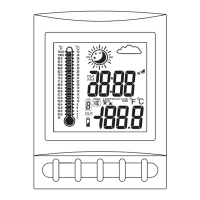
Remote Transmitter WT440H
* drip-proof design with LCD screen
* temperature display in user-selectable
Cor F
* humidity display
* transmission range: up to 40 metres in
open area
* table stand or wall mountable
* battery type:2xAA
°°
SET
C/F
-
AA
1
.5V
+
-
AA
1
.5V
+
8
7
12
11
11
12
3
1
12
Indoor Bar Graph Outdoor Bar Graph
1
1
10
9
1
2
3
4
2
1
The bar graph lets you see the temperature trend over a period of 12 hours in
3-hour intervals. The left axis denotes the change in temperature in ±2 degrees.
The top axis denotes the time period broken into 3-hour intervals. The reference
point is at (0,0); where the current period is time zero and the change in
temperature is zero.
EXAMPLE: Bar Graph
1
2
3
Howtoreadthebargraph?
About 12 hours ago
The temperature was approximately degrees
than the current temperature
4
cooler
About 9 hours ago
The temperature was approximately degrees
than the current temperature
2
cooler
About 6 hours ago
Within the last 3 hours
The temperature was approximately the
as the current temperature
same
The temperature was approximately degrees
than the current temperature
2
warmer
Selecting Indoor or Outdoor Bar Graph:
You can select to view the indoor or outdoor bar graph. The indoor bar graph is
based on the local temperature and the outdoor bar graph is based on the
remote (outdoor) temperature of Channel 1.
Toggle between the indoor and outdoor bar graph
by pressing in date mode.ON/OFF
If you have selected the indoor bar graph, the INDOOR symbol will appear on
the display. Otherwise, you have selected the outdoor bar graph.
Scroll to Date mode using .MODE
3
2
1
3
4
1
About Freeze Warning:
NOTE:
!
!
!
The SNOW icon will blink to warn of 'freezing'.
Activated when Channel 1's temperature is between -1.9°C and +2.9°C.
The SNOW icon will appear solid if and when Channel 1's temperature
falls below -1.9°C.
!
!
!
When you first set up the weather station set, the weather icon shown on
the display will be CLOUDY.
The weather icon is based solely on the temperature and humidity data
collected from the remote transmitter Channel 1.
If Channel 1’s slot is empty, the weather icon shown on the display will
always be CLOUDY.
SUNNY
CLOUDY RAIN
SNOW
FREEZE
WARNING
OR
OR
<blinking snow>
TEMPERATURE ALARM
You can set the temperature alarm for the local temperature (main
receiver unit) and/or for one of the remote (outdoor) channels
separately.
UPPER TEMPERATURE LIMIT: warmIf the temperature gets too
and reaches the upper temperature limit, the alarm would sound.
LOWER TEMPERATURE LIMIT: coldIf the temperature gets too
and reaches the lower temperature limit, the alarm would sound.
Scroll to the local temperature alarm setting
mode by pressing .MODE
The Temperature Alarm symbol will appear
and the indoor temperature will be blinking.
Press or key to set the desired value for the
temperature limit.
+-
Press to select the following settings:ON/OFF
UP ARROW
UPPER TEMPERATURE LIMIT
LOWER TEMPERATURE LIMIT
TEMPERATURE ALARM DISABLED
DOWN ARROW
BLANK
(NO ARROW)
PAGE 1
PAGE 2
PAGE 3
PAGE 10
PAGE 11
PAGE 12
2