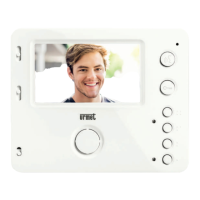
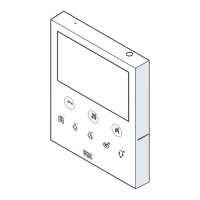
The Urmet Miro 1750/5 and 1750/6 are 2Voice video door phones designed for use in video door phone systems. They feature a 4.3" 16:9 display and offer hands-free communication.
Key Features and Components:
- Call Volume Adjustment (1): A sliding cursor allows adjustment of call volume (MAX, MEDIUM, MUTE).
- Call and Conversation Speaker (2): Integrated speaker for audio during calls and conversations.
- Display Brightness Adjustment (3): Adjusts the brightness of the 4.3" display.
- Display Colour Intensity Adjustment (4): Controls the colour intensity of the display.
- Display (5): A 4.3" display with a 16:9 aspect ratio.
- Microphone (6): Built-in microphone for two-way communication.
- Audio Activation/Deactivation Button (7): Used to activate or deactivate the audio function.
- Green LED (8): Located under the audio button, it indicates "call in progress" (steady green) or "conversation ongoing" (blinking green).
- Door Opener Button (9): Activates the door opening function.
- Green LED (10): Located under the door opener button, it indicates "possibility of a door opening" (steady green).
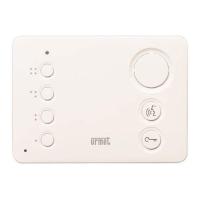
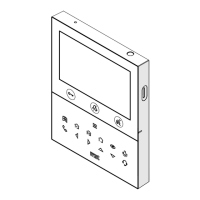
- Yokis Device Connection Buttons (11, 12):
- Button (11) connects to Yokis devices via contacts Y1, Y2 (max 50 mA @ 24 Vcc).
- Button (12) connects to Yokis devices via contacts X1, X2 (max 50 mA @ 24 Vcc).
- Function Buttons (13, 14): These buttons have functions detailed in the button function table.
- Multicolour Indicator LED (15): Provides various status indications.
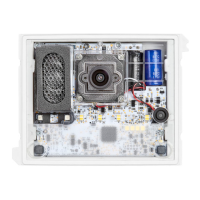
- System Connection Terminals (16): Used to connect the video door phone to the system.
- Configuration Dip Switches (17):
- SW1 (n.1) defines the operating mode: OFF for "Hands Free" (default) or ON for "Push to talk".
- SW1 (n.2-8) define the apartment number.
- SW2 (n.1-2) define the station number within the apartment.
- Removable Door (18): To be removed for in-out connection with accessory Ref. 1750/50.
Technical Specifications:
- Power Supply: 24 Vcc (for Yokis device connections).
- Display Size: 4.3 inches.
- Display Aspect Ratio: 16:9.
- Yokis Contacts: Y1, Y2, X1, X2 (max 50 mA @ 24 Vcc).
Installation:
- Flush-mounting Box: Install the flush-mounting box (Mod. 503 or Ø 60 mm) at the height indicated in the drawing (1.50 m from the floor).
- Bracket Fixing: Fix the bracket to the flush-mounting box or to the wall using the provided screws (2 M3.5 x 19 mm for Mod. 503, 2 2.9 x 13 mm countersunk screws for Ø 60 mm box, or 2 screws and screw anchors for wall mounting).
- Dip Switch Configuration: Program the dip switches according to the system booklet.
- Connections: Make all necessary connections.
- Device Fixing: Fix the video door phone to the bracket.
Removal:
To remove the video door phone from the bracket, insert a screwdriver tip into the indicated slot and push the video door phone upwards.
Terminal Pins Description:
- S+, S-: Supplementary ringer connection.
- X2, X1: Button connection (see button function table).
- Y2, Y1: Button connection (see button function table).
- CP: Floor call connection.
- LINE IN: System BUS connection.
The buttons have different functions depending on the state of the video door phone (STAND-BY, WAITING FOR PICK-UP, DURING AUDIO OPERATION, STAND-BY AND BUTTON PRESSED, PROGRAMMING STATE).
- Door Opener Button ( ):
- STAND-BY: Open pedestrian door.
- WAITING FOR PICK-UP: Open pedestrian door.
- DURING AUDIO OPERATION: Open pedestrian door.
- STAND-BY AND BUTTON PRESSED: Open pedestrian door.
- PROGRAMMING STATE: Enable/disable automatic door opener.
- Audio Activation/Deactivation Button ( ):
- DURING AUDIO OPERATION:
- In "Hands Free" mode: ends the conversation.
- In "Push to talk" mode:
- Long press: enables audio to the outdoor unit.
- Short press: activates or terminates the conversation.
- Auto-on Function Button ( ):
- STAND-BY: Auto-on function.
- WAITING FOR PICK-UP: Video switching.
- DURING AUDIO OPERATION: Special function (default: 8).
- STAND-BY AND BUTTON PRESSED: Programmable intercom call 2 (default: not programmed).
- PROGRAMMING STATE: Floor call ring tone selection (5 different ring tones).
- Garage Door Opener Button ( ):
- STAND-BY: Garage door opener.
- WAITING FOR PICK-UP: Garage door opener.
- DURING AUDIO OPERATION: Garage door opener.
- STAND-BY AND BUTTON PRESSED: Programmable intercom call 1 (default: call to switchboard).
- PROGRAMMING STATE: Door phone call ring tone selection (5 different ring tones).
Programming State:
To enter or exit programming state, hold the "Auto-on Function Button" ( ) for longer than 5 seconds. The yellow LED will blink slowly to indicate programming mode. The device will automatically exit programming mode after 10 minutes.
Indicator LEDs:
- Green LED under Audio Button (8):
- On steady: Call in progress.
- On blinking: Conversation ongoing.
- Green LED under Door Opener Button (10):
- On steady: Possibility of a door opening.
- Multicolour Indicator LED (15):
- Green blinking: Automatic door opener active.
- Red on steady: Main calling station door open.
- Slowly blinking red: Secondary calling station door open.
- Slowly blinking yellow: Programming state on.
Saving Programming:
To save programming, exit by pressing the "Auto-on Function Button" ( ) for more than 5 seconds. The device will automatically save parameters and exit programming state after 10 minutes.
Reset:
To restore default parameters, enter programming mode (hold "Auto-on Function Button" ( ) for >5 seconds), then simultaneously press the "Audio Activation/Deactivation Button" ( ) and "Door Opener Button" ( ) for >3 seconds. The system will emit 2 long beeps to confirm and exit programming state.
Operation with a Hearing Aid:
The video door phone includes a built-in hearing aid device for the hearing impaired. It allows users with hearing aids to hear conversations from the calling station or other video door phones. The device can interface with hearing aids with a "T" function at a distance of about 20 cm. Ensure the selector is set to "T" mode.
Mute Ring-Tone Speaker:
The call volume can be adjusted to mute the ring tone by moving the sliding cursor (1). A red signal in the upper part of the cursor indicates the mute state. If muted, the video module will turn on for video calls, and all acoustic signals (beeps) will be disabled, but supplementary ring-tone events will not be excluded.
If communication is disturbed, the two audio channels (inwards and outwards) can be activated individually. After receiving a call, a short press activates audio from the door unit. Holding the button down activates the audio channel externally, allowing the user to speak to the caller. To listen, release the button. To end the conversation, short press the button.
Connection of an E2BP Module for Centralisation of Lights and Rollers:
The Miro video door phone can be connected to an E2BP module for controlling lights and rollers. After programming Yokis devices, a button (e.g., ) can activate centralised closing of rollers, and another button (e.g., ::) can activate turning off lights. Further information on Yokis products is available on www.yokis.com.
Maintenance:
- WEEE Compliance: The crossed-out wheelie bin symbol indicates that the product must not be disposed of with other household waste. It is the user's responsibility to dispose of waste electrical and electronic equipment at a designated collection point for recycling. This helps prevent potential negative consequences for the environment and human health.
- Contact Information: For more information about where to drop off waste equipment for recycling, contact your local city office, household waste disposal service, or the shop where you purchased the product.