Installation
4 5
Installation
Warning! Please check for any
hidden cables and pipes before drilling
holes in the wall.
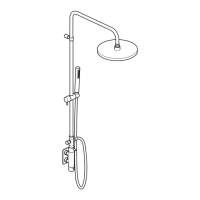
Screw together the riser and top riser.
At the diverter end place a washer into
the locking nut and screw onto the
valve, but do not tighten.
Using a level make sure the riser is
vertical and mark the position of the
post onto the wall, remove the riser.
Drill the hole to a suitable depth for
the wall plug and secure the bracket to
the wall with a suitable screw (see inset
right).
Screw the diverter back onto the valve
and push the post into the bracket,
tighten the post in position using the
grub screw. Tighten the the nut on the
diverter to secure it to the valve.
Finally place a rubber washer into the
showerhead and screw onto the top
riser. The angle of the showerhead can
be adjusted as required.
Hose connection
Place one of the rubber washers into the
cone end of the hose and screw to the
handset.
Place the second rubber washer into the
other end of the hose and attach it to
the mixer outlet opposite the diverter.
Cover plate
outline
Screws
Bracket
Cover
Hot Inlet
Cold Inlet
Adjustable
connection
Adjustable
connection
Valve
Adjustable
connection
Locking
nuts
Hexagonal
socket
Hose connection
Wall plug
Showerhead
Diverter
Nut and washer
Valve
Rubber
washer
Hose
Screw
Top riser
Before installing your new mixer, ush
through the pipework to ensure removal
of debris, turn o the water supply.
Warning! Please check for any
hidden cables and pipes before drilling
holes in the wall.
The xing bracket must be set into the
wall between (63mm minimum – 78mm
maximum) see page 3.
Note: The adjustable connection must
be installed with the hexagonal socket
towards the valve.
If you are tting the valve to a partition
wall or a wall of particularly soft
substrate you will need specialist xings.
Select the position for the shower
valve and bracket, bearing in mind the
showerhead and the dierent heights
of people using the shower. Oer the
shower bracket to the wall, mark the
3 xing points with a suitable pencil.
Remove the shower bracket from the
wall, drill the holes to a suitable depth
for the wall plugs and secure the bracket
with suitable screws.
Screw the adjustable connections to the
bracket use PTFE tape to ensure a good
seal, adjust to suit the depth of your wall.
Connect the hot supply to the top
connection of the bracket and cold
supply to the bottom (see top).
Finish the wall making sure that the
cover plate covers any hole surrounding
the connecters (top inset).
Slide the cover plate over the
connections on the bracket and up to
the wall. Apply a thin bead of silicone
around the outside to seal against the
tiled surface.
Place a washer in each of the locking
nuts on the valve and screw onto the
connectors.
Riser
Post
Hexagonal key
Bracket
Hose
Rubber
washer
 Loading...