Ncrtel Bend In9 the
causes
bends !
Use
only
not
be fltied ln +helr
push
rods excess lve ly
such o-rlngs whlch nl ll
actua I
p
laces.
Tne
and
Tne
Roia+e
+he crankshaft
so
as io
have
Insialla+lon
marks of ihe
camshafi
gear
ldler gear
mee+.
Draw the camshaf+ ou+
of
cv I lnder b lock.
7.
Use a
drlf+
of sulfable slze to remove lhe
camshaff
gear.
lf
you
Intend to insiall an old camshaft
or
gear,
clean ihe
par+s
before
flttlng ihem.
Place thread
plugs
In the camshaft ol I bore
ends.
Sef a wedge in+o the
camshafi
key
groove.
I,Jarm fhe
camshaft
gear
up
io the fempera+ure of
2 0 0
o
C and
place
li ln lis
posl+lon.
Lubr i cate ihe camshaf+ bear Ing
journa
I
s
and
push
+he
shat+
info
ihe
cy I Inder
b
lock check Ing
ihe
ins+alla+ion marks on +he
gear.
ll.
Fl+ ihe front cover
and
ihe
pulley
-
hub
plece
comblnaflon,
see Instruqtlons,
polnt
5.
12.
Lei
ihe
tappeis
dorn
and Install +he valve
gear
(
lnstructlons
3 | J
polnt
5).
Fl+ +he valvo
gear
cover and +he brea+her
plpe
as \{ell
as
the
boost alr
pipe
bel-lreen ihe tu.bocharger and the
lnle+
man i
fo
ld.
lJ.
Insiall
+he
al-ternaior and l'he beli spanner and
adjus+ the v-belt tenslon. Fll' the fan and
ii
gh+en
lis llxing screws.
C. CHECKING AND ADJUSTITIG THE YALVE CLEARANC€S
The clearance of bo+h
lnlei
and exhaus+ valves
ls
0,30 Fn. The clearanca can
be
checked
regardless of whe+her ihe englne ls cold or
ho1.
Check and adjust th6 valve cloarances of a
certaln cvllnder when the
Dlston
ls
at lfs
comoression stroke too dead
cenfre. Check ihe
valves
ln +he Injecl-lon order of the
englne.
Rgmove +he boost alr
Dloe
beivroen +he turbo-
charger and the
Inlei
manlfold.
Open
ihe flxlng
nu+s of the valvg
gear
cover, removg
+he
covor
and lhe brea+her
plpe.
Take off
the
plug
on +he
slde of the
flywheel houslng
(crankshafi
rotatlon ).
'O9
ENCINES
Ro+a+e the
crankshai't by the flywheel
gear
rlm
v.lth,
for ex6mple,
a
screwdr lver, unill the
exhaus+ valve
of the
lrd cyllnder
(5th
valve
f.om ihe
englne
fron+)
ls cömpletely
open.
Check
lhe valve
clearanca
of the
lsf cvilnder.
327
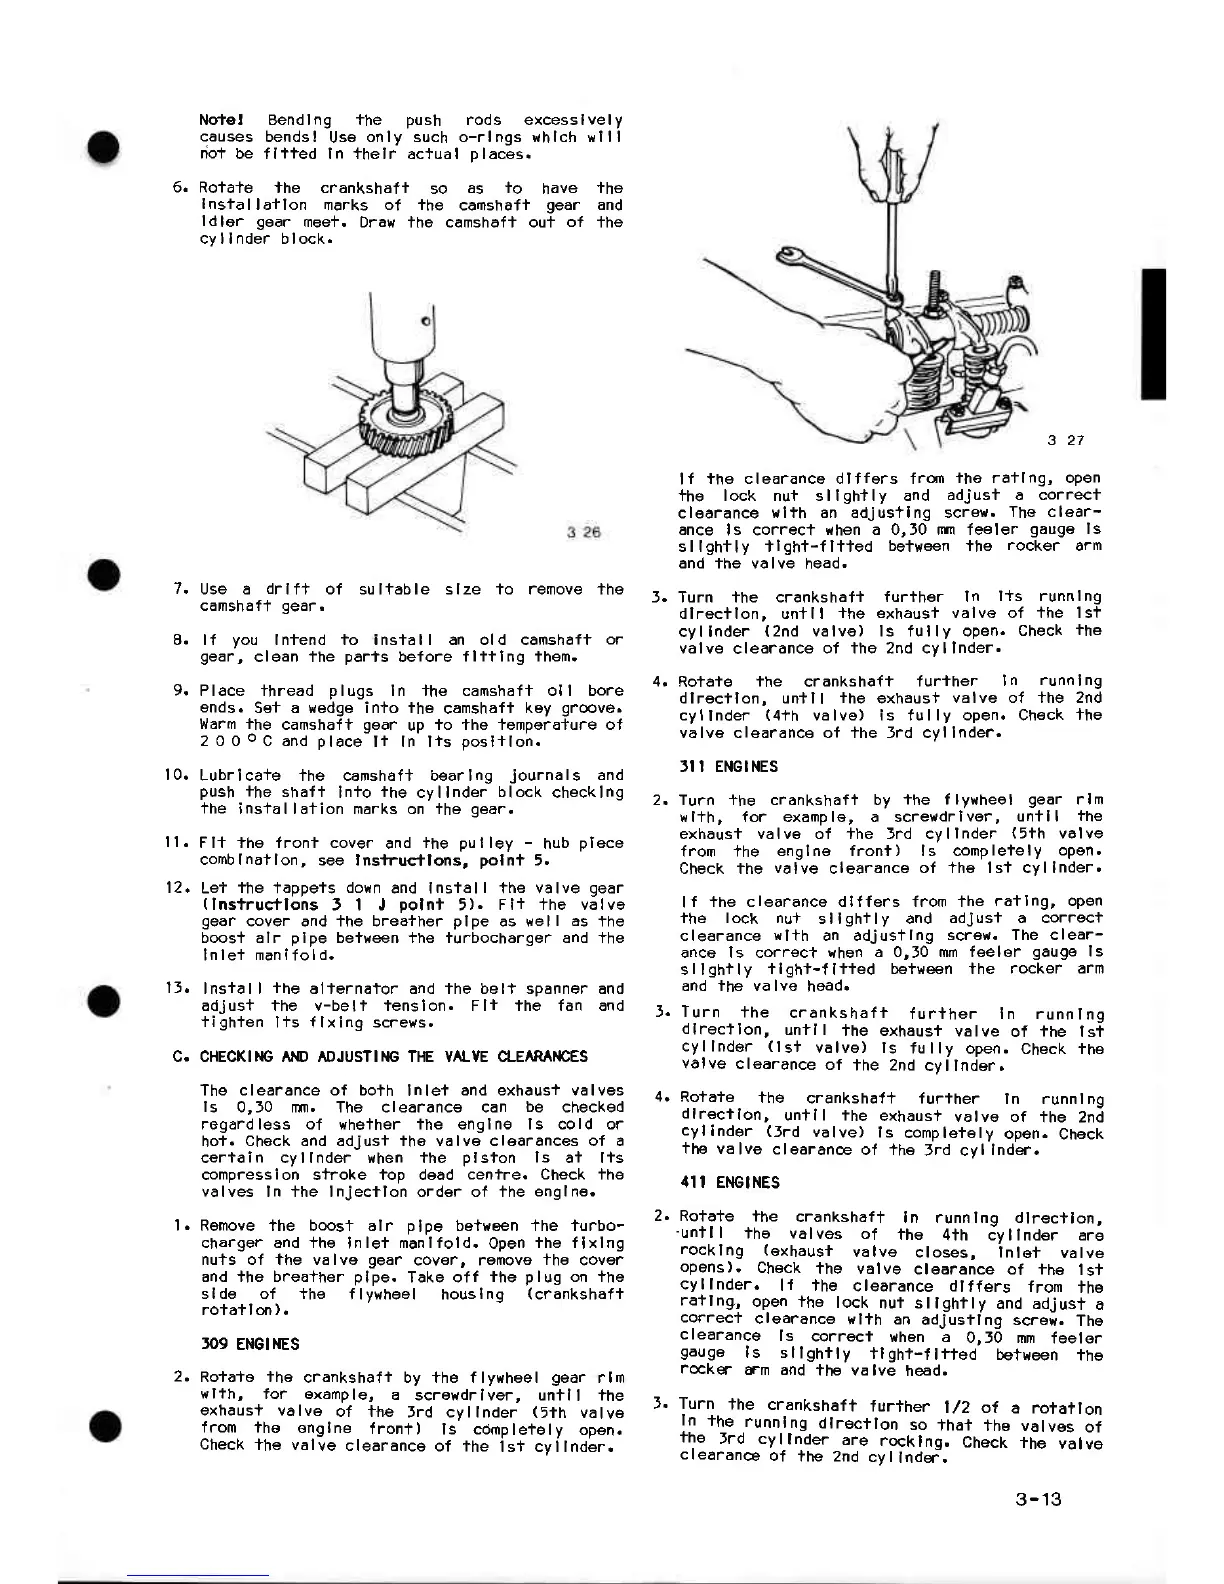
lf
the clearance dlffers f.dn
iho ra+lng, open
the lock nut sllgh+ly and
adjust a correct
cloarance
vllth an adjus+lng screx.
Tho clear-
ance
ls correc+
*hen a 0,30 |Im feeler
gauge
ls
sllghtly +lght-fltled
beiween the
rocker
arm
and the va lve
head,
J. Turn the crankshaf+
furiher ln
lts runnlng
dlrec+lon, un+ll
-ihe
exhausl valve of +he lst
cyllnder
(2nd
valvo) ls iully open.
Check
the
valve
clearance
of the znd cyllnder.
4.
Ro+aie
the
crankshaft
fur+her
In
runnlng
dlrecilon, un+ll
+he
exhausi
valve of +he 2nd
cyllnder
(4ih
valve) is fully open. Check
-the
valve clearance of +he Jrd cvllnder.
]I I ENGI NES
2. Turn +he crankshaf+ by
+he llywheol
gear
rlm
|{l+h, for example, a screwdrlvor,
untll
the
exhaust valve of +he frd cyllnder
(5th
valve
frorn ihe
englne front) ls cornp
leiel
y
open.
Check the
valve
clearance
ol +he lsi cyllnder.
lf
the clearance dlffers from +he
ra+lng, open
ihe lock nu+
sllgh+ly and
adjus+ a correc+
clearance
wl+h
an adjustlng
screw. The clear-
ance ls co.rect rhen
a 0,30 mm feeler
gauge
Is
sllghtly
tlght-fltted bet{een the
rocker arm
and the va lve
hoad.
J. Turn
+he
crankshafi
furlher In runn
I n9
dlrectlon,
untll
+he exhausi
valve
of
+he
lst
cyllnder
(lsl
valve) ls
fu lly
open. Check tho
valve
clearance
of
+he 2nd
cyllnder.
4.
Ro+aie
the
crankshaf+ {uriher
ln runnlng
dlrectlon,
un+ll ihe
exhaus+
valve of
ihe 2nd
cylinder
(frd
valve)
ls
completely
open.
Check
the valve
clearan@
of +he
frd cvllnder.
4II ENGI NES
2. Ro+a+e
the
crankshaft
In runnlng dlrecllon,
-untll
lho valves
of
the
4th cvllndsr are
rocklng
(exhausi
valve
closss, lnlol
valve
opens),
Check
the valve
clearance of l-he
ls+
cyllnder.
ll the
clearance dltfers
from
the
ratlng,
open lhe
lock
nui sllghfly
and adjust
a
correct
clearance
erl+h an
adjustlng screw.
The
clearance
ls
correci
when a
0,J0 nm
feelor
gauge
ls sllghily
ilghi-flited
between
the
r€ker
ö.m and
the va lve
head.
l. Turn
lhe
crankshaft
furlher
l/2 of
a rotailon
ln
lhe
runnlng
dlrectlon
so
+ha+
the valves
of
the
frd cyllnder
are
rocklng.
Check
the
valve
crearan@
of +he
2nd
cVllnder.
9.
10.
3-13
 Loading...