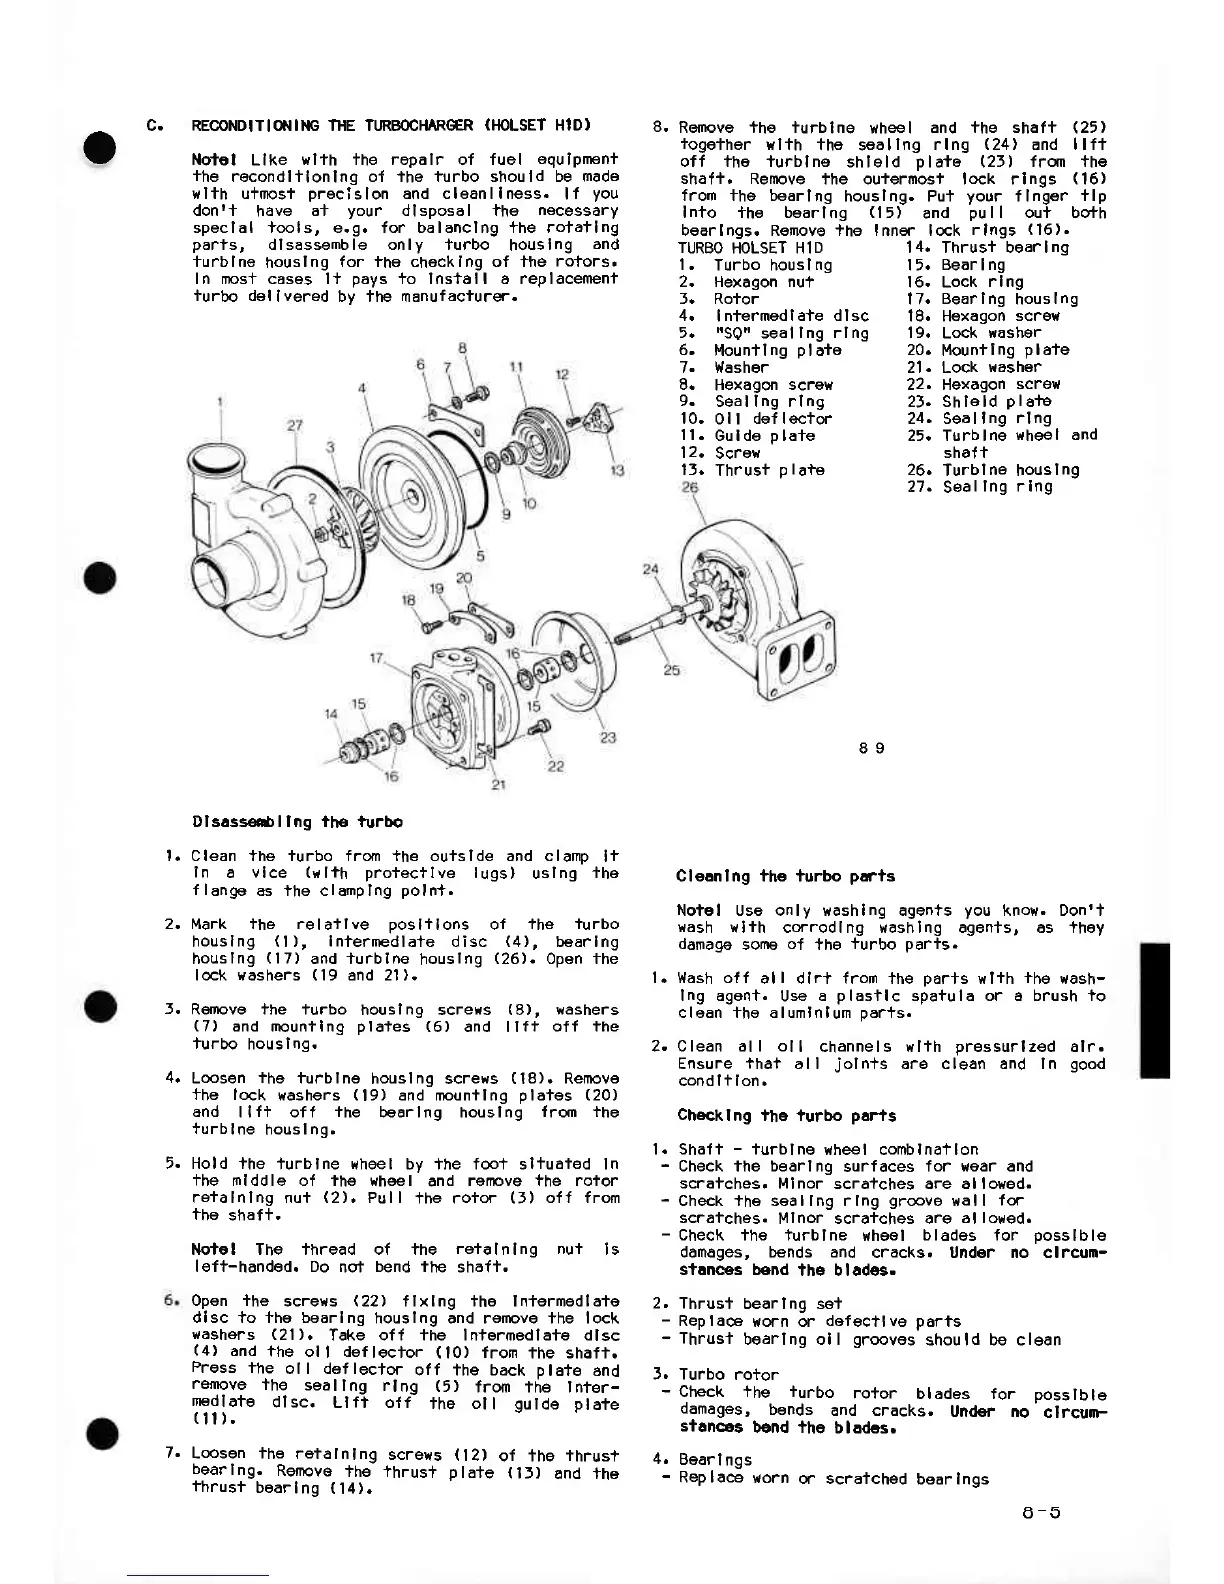
RE@NDIT I otl ll{c IHE TTRBoCHARGER
(IIOLSET
HID )
Notel
Llke
r.lth ihe ropalr of fuel
equlprFni
+he
rocondl+lonlng of
'the
turbo should be made
tilth u+0losi
precislon
and cleanllness.
lf
you
donr+
have
al
your
dlsposal ihe
necessary
speclal lools, e.g. for balanclng +he ro+atlng
parts,
dlsassemble only +urbo
houslng
and
turblne
houslng
for ihe checklng of ihe
rofors.
In r|os+ cases l+
pays
1o lnstall a replacemeni
turbo del
lvered by the manufacturer.
Dlsass€*llng th€ iurbo
Clean the turbo from ihe outslde and clamo
li
In
a
vlce
(rlih
protect
Ive lugs)
uslng
+he
flange
as the clanplng
poln+.
Mark i'he rela+lve
poslilons
ol
'i'he
turbo
houslng
(l
),
Inierrnedla+e
disc
(4),
bearlng
houslng
(17)
and +urblne
houslng
(26).
open the
lock rashers
(19
and 2l).
Ren|ove the i-urbo
houslng screws
(8),
rashers
(7)
and mountlng
plaies
(6)
and llft
off the
iurbo
houslng.
Loos€n
ihe
turblns
houslng screws
(18).
Renove
the lock
washers
(19)
and mountlng
plates
(20)
and
I lli off
fhe
be6rlng houslng
lrom
-the
+urb
Ine
houslng.
Hold +he
lurblne
(heel
by +he foo+ sl+uated In
ihe nlddle of the vlh6el
and
remove the roior
reialnlng nut
(2).
Pull
ihe roior
(5)
off from
the
shaft.
Note I The thread of ihe
reialnlng nut
ls
left-handed. Do
nql
bend ihe
shaft.
Open the
screris
(22)
flxlng ihe lnfermedla+e
dlsc io fhs bearlng
houslng and remove lhe lock
tiashers
(21).
Take oft the Iniermedla+s dlsc
(4)
and
fhe ol
I
def
leclor
(10)
frorn
the shaft.
Press
l-he
oll daf lecloc
off the back
plate
and
remove
the
seallng
rlng
(5)
fron the lnter-
nedlate
dlsc.
Llft o{f
the oll
gutde
plate
(|l
).
Remove +he turblne
vihe€l
and the shaft
(25)
+ogefher
ylth
the
seallng
rlng
(24)
and llfi
off tho lurblne
shleld
plats
(25)
from +he
shaf+. Remove
the ou+ermost lock rlngs
(16)
fron tha bearlng
houslng. Pu+
your
flnger
flp
Into ihe baarlng
(15)
and
pu
| | out bqth
bearlngs. Ronove +he Inner lck
rlngs
(16).
TURBO
HOLSET HID
14. Thrusi bearlng
l.
Turbo houslng 15.
Bearlng
2. Hexagon nu+
16. Lock
rlng
5. Roior
17.
Bearlng
houslng
4.
Intermadl
ale dlsc
18. Hexagon
screv
5.
rrsQrr
seallng
rlng 19.
Lock
washer
O
6.
Mounllng
p
la+e
7. l{asher
8.
Hexagon
screY
9.
Seallng rlng
10.
0ll
def lector
ll.
Guldo
plate
12.
Screv,
20.
lttounil
ng
plale
21. Lock
washer
22. Hexagon
screw
25. Shleld
p
late
24. Seallng
rl ng
25. Turb lne
rheel and
shaf i
26.
Turbl
ne
houslng
27.
S€allng
r Ing
89
Clecnlng the turbo
prts
Notg I Use only washlng agen+s
you
know. Don't
raEh
',rlih
co-rodlng washlng agen+s, as +hey
dönage
sone
of
the
turbo
pari9.
Wash o{f
all dlr+ fron +he
Dar+s
wlih
ihe
wash-
lng agont.
Use
a
plasilc
spatula or a brush io
clean tho alumlnlum
parfs.
Clean al I oll
channels vrlih
pressurlzed
alr.
Ensure
thai
all
jolnis
are clean and ln
good
cond I t lon.
Chscklng
lhe turbo
psrls
Shali
-
iurblne
wheel comblnatlon
Check the bearlng
surfaces
for woar and
scratches.
Minor scraiches are alloved.
Check +he seallng rlng
groove
l{all
for
scratches.
Mlnor scraiches ar9
allougd.
Check +he turblne
rrheol
blades for
posslble
dan6ges, b€nds and
cracks. Under no clrcun-
stcnc€s b€nd
the blades.
Thrusf
bearlng se+
ReDla@
worn or
dofgctlve
Darts
Thrus+
bearlng ol I
grooves
should be clgan
Turbo
rotor
Check the turbo
rofor
blades for
posslble
damages,
bends
and cracks.
Und€i no
clrcuF-
stoncas
b€nd the
b I adas.
Bear
I ngs
Replacp
worn
or scraiched
bearlngs
2.
3.
7.
Loosen the
rotalnlng
scrers
2)
of the
ihrus+
bearlng.
Renove
+he +hrus+
pla+e
fif)
and +he
thrusi
bear
Ing
fi4).
2.
l.
lJ.
Thrust
p late
 Loading...