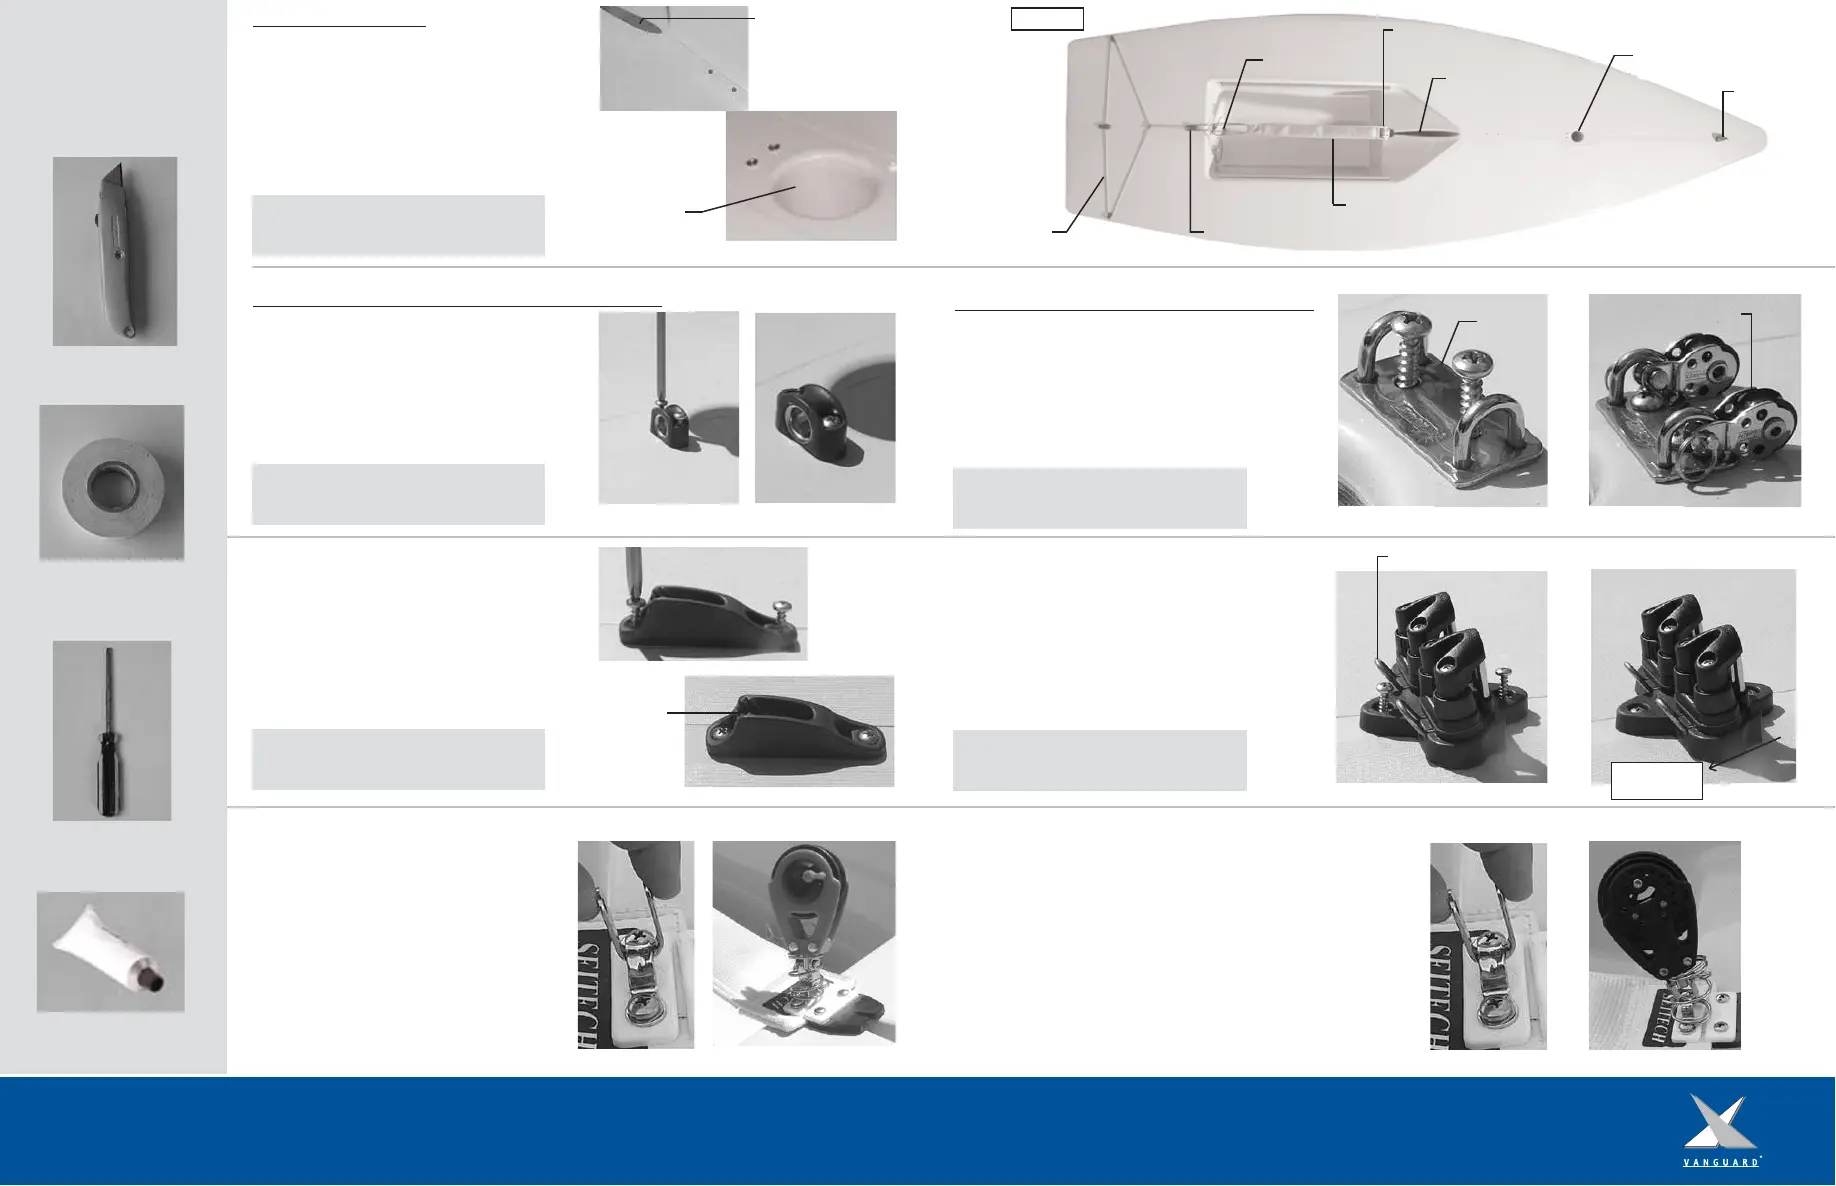
1. From the delivery kit locate the 2, 16mm
forkhead blocks and base. Unscrew the two
screws located by the mast step. Align the
block base over the holes and screw into place
(Figure 9). Attach the forkhead blocks to the
base using the provided pins and rings
(Figure 10).
Here is a list of tools
that we recommend
you have in order to
assemble your new
Laser:
Utility Knife
White Electrical Tape
Phillips Head
Screwdriver
Silicone Sealant
2. Unscrew the set of screws located in front
of the daggerboard well. Align the holes of
the cam cleat and screw into place (Figure 5).
Be sure that the open end of the cleat is
facing towards the cockpit (Figure 6).
3. Locate the ratchet block and spring from
the delivery kit. In the cockpit, at the forward
end of the hiking strap, locate the eyestrap
(Figure 7).
4. Remove the shackle from the bottom of the
ratchet block and place it around the eyestrap
(Figure 7).
5. Place the spring over the eyestrap, and
compress. While the spring is compressed,
attach the block to the shackle with the pin
and ring (Figure 8).
1. In the delivery kit locate the bullseye
fairlead and the clam cleat. Unscrew the two
screws located by the mast step (Figure 3).
Align the bullseye fairlead over the two holes
and screw into place (Figure 4).
There are a few pieces of hardware that you
will need to install on your new hull before
continuing to rig your Laser. Locate the two
sets of screws that are positioned on the deck
of the boat (Figure A, far right image). One
set of screws will be forward of the
daggerboard well (Figure 1) while the other set
will be aft of the mast step (Figure 2).
Hardware Installation: Laser Standard Models
Tip: Before replacing the screws be sure to dip
them into a silicon based sealant to allow for
a water tight and secure fit.
Hardware Installation: Laser Pro Models
Open end
2. In the delivery kit locate the cleat base
with cleats. Unscrew the two screws located
by the daggerboard well. Align the cleat base
over the two holes and screw into place
(Figure 11). Make sure that the shorter of the
metal fairleads are facing the bow. When
looking at the cleat base from the side, the
cleats should be angled down towards the bow
(Figure 12).
Shorter metal fairleads
Angled down
towards mast
3. Locate the ratchet block and spring from
the delivery kit. In the cockpit, at the forward
end of the hiking strap, locate the eyestrap
(Figure 13).
4. Remove the shackle from the bottom of the
ratchet block and place it around the eyestrap
(Figure 13).
5. Place the spring over the eyestrap, and
compress. While the spring is compressed,
attach the block to the shackle with the pin
and ring (Figure 14).
Bow eye
Mast Step
Hiking Strap
Daggerboard Well
Traveler
Clam Cleat
Bailer Plug
Ratchet Block Eyestrap
Figure 1
Figure 2
Figure 3 Figure 4
Figure 5
Figure 6
Figure 8Figure 7
Figure 9 Figure 10
Figure 11 Figure 12
Figure 13 Figure 14
Figure A
Hardware Location:
Reminder: Before replacing the screws be sure
to dip them into a silicon based sealant to
allow for a water tight and secure fit.
Reminder: Before replacing the screws be sure
to dip them into a silicon based sealant to
allow for a water tight and secure fit.
Reminder: Before replacing the screws be sure
to dip them into a silicon based sealant to
allow for a water tight and secure fit.
Reminder: Before replacing the screws be sure
to dip them into a silicon based sealant to
allow for a water tight and secure fit.
Block Base
16 mm Forkhead Blocks
Mast Step
Daggerboard Well
 Loading...