Website : www.juplink.com
Email : Support@juplink.com
Before Setting
To customize your wireless network connection and other
to download EC4-1200 updated Firmware and User Guide
Operating Conditions
Tech Support
Working Temperature: 0~45°C / 32~113°F
Working Humidity: 10%~90% RH (Non condensation)
Storage Temperature:-40~85°C / -40~185°F
Storage Humidity: 5%~95% RH (Non- condensing)
Mail: support@juplink.com
Tell : +1 (833) 923 - 2468 (Toll Free)
Service Time : EST : 09:00-17:00/PDT: 06:00
advanced repeater settings, please go to www.Juplink.com/Support/
for more information.
Quick Start Guide
V A N I N
EC4-1200
Wi-Fi Extender
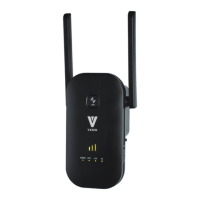
LED Status Indicators
Wi-Fi Signal Strength
Indicator LED
WPS
LED
2.4G / 5G Signal LED
PWR
On WPS is enabled and connected
WPS is enabled and connection being established
Off
Flashing
On
Off
Powered on
Powered off
Status Description
Function not enabled or Powered off
Normal connection but No transmissing data
Transmissing data
One LED on Weak reception, strength below 25%
Two LEDs on Good receiving, strength of 50~75%
Three LEDs on Excellent receiving, strength above 75
No Wifi signal or Powered off
On
Off
Flashing
Method 1 : Extending Your Wi-Fi Network Using Web UI
②Extend Your Wi-Fi Network
1. Connect your Wi-Fi device to the extender ’s Wi-Fi network
Juplink-EC4-1200_5G or Juplink-EC4-1200.
3. Username:admin / Password:admin
4. Modify your SSID and Password
( Note :It may takes a few seconds to scan the network )
Ensure that Mobile Data ( if any ) is disabled.
WLAN
Juplink-EC4-1200
Juplink-EC4-1200_5G
Login VANIN EC4-1200 extender
Username
Password
admin
admin
Cancel Login
6. Scroll to the lower part of the page, and enter the password of the Wi-Fi network you want to extend,
7. Scroll to the bottom of the page and Click “Save&Apply”.
②Extend Your Wi-Fi Network
③Relocate the
Extender
CancelSave&Apply
Wait until the Change setting successfully! page appears
Method 2 : Extending Your Wi-Fi Network Using WPS
You can use Method 2 if your router has a WPS button. otherwise, use Method 1
②Extend Your Wi-Fi Network
WPS
POWER
WPS
2.4G
5G
WPS
1. For better performance, plug the extender into an outlet between
the router and the Wi-Fi dead zone.
The location you choose must be within the range of your existing
Wi-Fi network
2. Wait until the 2.4G / 5G Signal LED turns solid green, or the
Wi-Fi Signal Strength Indicator shows at least Two LEDs on
POWER
WPS
2.4G 5G
POWER
WPS
2.4G 5G
POWER
WPS
2.4G 5G
POWER
WPS
2.4G 5G
5. Select a Wi-Fi network (SSID) you want to extend
Note:Default SSID and password are automatically copied from those of the router for both 2.4 GHz and 5 GHz networks. If you wish to modify
these settings, Select the check box and then enter the SSID and password that you wish to apply to the extended Wi-Fi network(s).
Juplink-RX4-1800
Juplink-RX4-1800_5G
Juplink-Router
③Relocate the
Extender
1. For better performance, plug the extender into an outlet between
the router and the Wi-Fi dead zone.
The location you choose must be within the range of your existing
Wi-Fi network
2. Wait until the 2.4G / 5G Signal LED turns solid green. or the
Wi-Fi Signal Strength Indicator shows at least Two LEDs on
1. Press the WPS button on the router and then press the WPS button on the extender within 2 minutes
2. Wait until the 2.4G / 5G Signal LED turns solid green
Within 1 ft
2. Run a web browser on the device which is connected
to the extender,Enter router.juplink.com
or 192.168.0.2
http://192.168.0.2 router.juplink.comor
①Power on the Extender
1. Plug the extender into a power outlet near the router
2. Wait until the 2.4G / 5G Signal LED turns solid green
Note : When the distance between the router and the extender is
less than 1 ft , pairing is easier to succeed
NOTE:
Before using
please turn
the right side
switch to ON