Do you have a question about the Vaporesso GEN FIT 40 and is the answer not in the manual?
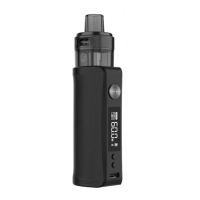
Instructions for securely attaching the tank to the battery using the 510 thread connection.
Steps to unscrew the base, remove the old coil, and install a new coil in the tank.
Procedure for filling the tank with e-liquid and allowing the coil to soak.
How to adjust the airflow volume by rotating the air-inlet ring on the tank.
Includes powering on/off, locking buttons, vaping, adjusting power, and flipping the screen.
Access system settings like VW, SMART VW, and DEFAULT by pressing '+' and '-' buttons.
Device stops working if vaped for over 10 seconds; 'OVER TIME' displays.
Device stops if no tank is detected; 'CHECK ATOMIZER' displays.
Device stops if a short-circuit is detected; 'SHORT ATOMIZER' displays.
Device won't operate if battery voltage is too low; 'LOW BATTERY' displays.
Device stops working if battery voltage is extremely low during vaping.
Device stops charging when fully charged.
Device stops charging if USB detects input voltage exceeding rated voltage.
General precautions for device usage, handling, and maintenance.
Information on nicotine addiction, unsuitable users, and potential health effects.
Instructions on how to check the authenticity label under light for position changes.
Steps to verify product authenticity by scanning the QR code on the label.
Procedure for submitting a warranty claim, evaluation, and repair/replacement process.
| Brand | Vaporesso |
|---|---|
| Model | GEN FIT 40 |
| Category | Vaporizers |
| Language | English |