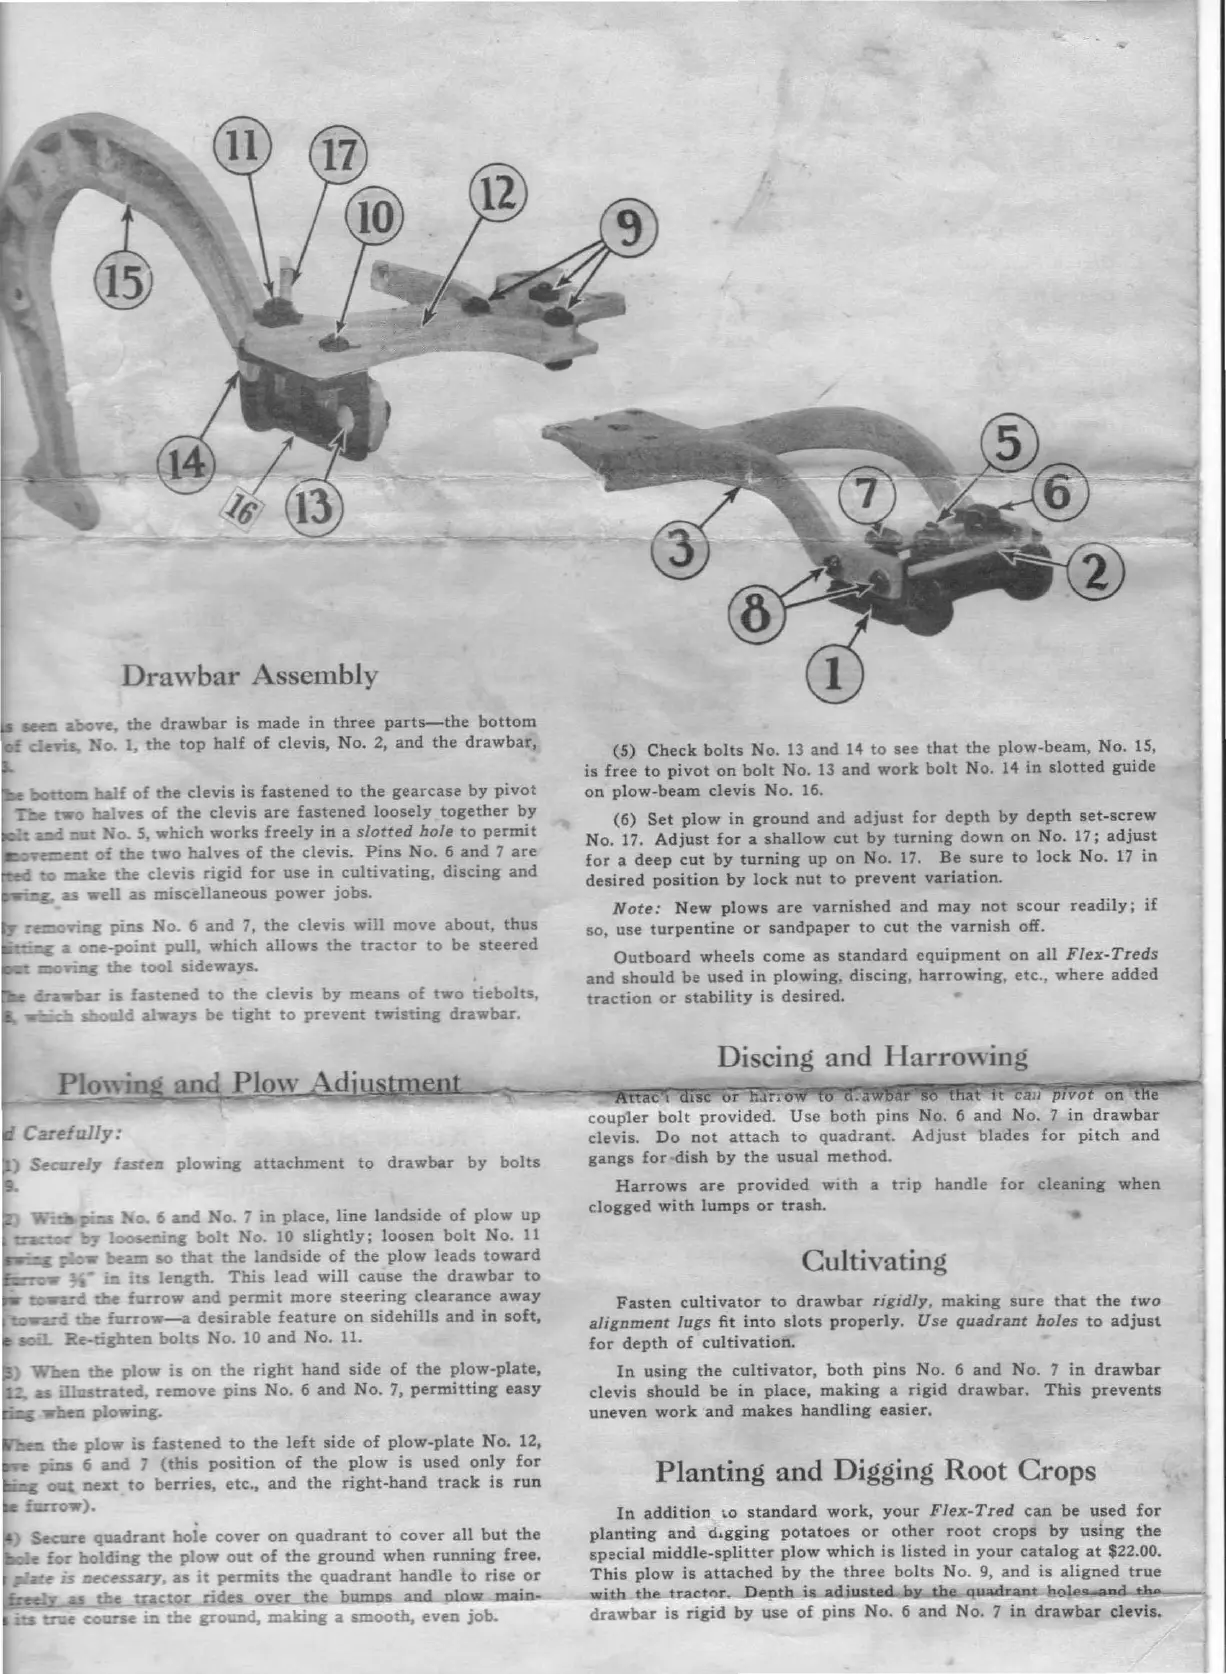
Drawbar Assembly
seer.
above, the drawbar is made in three parts-the bottom
: clevis, No.1, the top half of clevis, No.2, and the drawbar,
Ibotto=
!:.all
of the clevis is fastened to the gearcase by pivot
...ee
rwo !:.a.lves of the clevis are fastened loosely together by
';;~::at
No.5, which works freely in a slotted hole to permit
~e:l'
0:
the
rwo
halves of the clevis. Pins No.6 and 7 are
_'"to
=ke ~e clevis rigid for use in cultivating, discing and
--g.
as
well as miscellaneous power jobs.
y :=ori.o.t;
pins
No.
6
and
7,
the clevis will move about, thus
::i::-
a o:le-point pull, which allows the tractor to be steered
__ ~rin6 the tool sideways.
~ c.:-~...
bar
is fastened to the clevis by means of two tiebolts,
~ Could always be tight to prevent twisting drawbar.
iasrell
plowing attachment to drawbar by bolts
p:::s
0.
6 and No.
i
in place, line landside of plow up
t::z=:=
_y
Iocseniag
bolt No.
10
slightly; loosen bolt No.
11
- pzW'
beam
50
that the landside of the plow leads toward
_CiW'
-:i:l
iu
length. This lead
will
cause the drawbar to
toWL-C
ce
furrow and permit more steering clearance away
t::;w":2_-c.
the
iurrow-a desirable feature on sidehills and in soft,
smL
Re-tighten bolts No.
10
and No.
11.
-) When ::he plow is on the right hand side of the plow-plate,
as
illustrated, remove pins No.6 and No.7, permitting easy
....t=
plowing.
t!le
plow is fastened to the left side of plow-plate No.
12,
_ p&.s
6
and
7
(this position of the plow is used only for
out next to berries, etc., and the right-hand track is run
b:rrow).
Se~e quadrant hole cover on quadrant to cover all but the
e
for bolding the plow out of the ground when running free.
&:e
is
:ecessary,
as it permits the quadrant handle to rise or
~ the ctQr rid_es
0
thj:
_h_1UI1_D!>
..awl znaia-
i:::s
trUe coarse
in
t.i:e ground, making a smooth, even job.
(5)
Check bolts No.
13
and
14
to see that the plow-beam, No.
15,
is free to pivot on bolt No.
13
and work bolt No.
14
in slotted guide
on plow-beam clevis No. 16.
(6) Set plow in ground and adjust for depth by depth set-screw
No. 17. Adjust for a shallow cut by turning down on No. 17; adjust
for a deep cut by turning up on No. 17. Be sure to lock No. 17 in
desired position by lock nut to prevent variation.
Note: New plows are varnished and may not scour readily;
if
so, use turpentine or sandpaper to cut the varnish off.
Outboard wheels come as standard equipment on all Flex-Treds
and should be used in plowing, discing, harrowing, etc., where added
traction or stability is desired.
Discing
and
Harrowing
-Anae"1
diSC
o~oW''"fo
cr.aw"S'itt'"
i8
tflat-it
call
PTvOt' ....
on
the
coupler bolt provided. Use both pins No.6 and No.7 in drawbar
clevis. Do not attach to quadrant. Adjust blades for pitch and
gangs for dish by the usual method.
Harrows are provided with a
tr
ip handle for cleaning when
clogged with lumps or trash.
Cultivating
Fasten cultivator to drawbar rigidly, making sure that the two
alignment lugs fit into slots properly. Use quadrant holes to adjust
for depth of cultivation.
In using the cultivator, both pins No.6 and No.7 in drawbar
clevis should be in place, making a rigid drawbar. This prevents
uneven work and makes handling easier.
Planting and Digging Root Crops
In addition
\.0
standard work, your Flex-Tred can be used for
planting and
d.gging'
potatoes or other root crops by using the
special middle-splitter plow which is listed in your catalog at
$22.00.
This plow is attached by the three bolts No.9, and is aligned true
with
ilie.-tuctm:.,.
.D_eptb_.is._a!liu.s
e
quadran
~..i:.bA..
drawbar is rigid by use of pins No.6 and No.7 in drawbar clevis.
 Loading...